EasyManua.ls Logo

Shop fox M1018 User Manual

Shop fox M1018
67 pages
To Next Page IconTo Next Page
Page #1 background imageLoading...
Page #1 background image
Model M1018
***IMPORTANT UPDATE***
Applies to Models Mfd. Since 11/13
and Owner's Manual Revised 03/09
Phone #: (360) 734-3482 • Tech Support: techsupport@woodstockint.com • Web: www.woodstockint.com
COPYRIGHT © SEPTEMBER, 2017 BY WOODSTOCK INTERNATIONAL, INC.
WARNING: NO PORTION OF THIS MANUAL MAY BE REPRODUCED IN ANY SHAPE OR FORM WITHOUT
THE WRITTEN APPROVAL OF WOODSTOCK INTERNATIONAL, INC.
Printed in China#19052JH
We made the following changes to this machine since the manual was printed:
ON/OFF button has changed.
FOR/REV switch has changed.
Wiring diagram has been updated.
Aside from the information contained in this update, all other content in the owner's manual is
applicable and MUST be read and understood for your own safety.
IMPORTANT: Keep this update with the owner's manual for future reference. If you have any further
questions, contact our Technical Support.
READ THIS FIRST
46V2
43V2-1
43V2-2
62V2
43V2
48A
47
Changed Control Panel Parts
REF PART # DESCRIPTION
43V2 XM1018043V2
SWITCH ASSEMBLY V2.11.13
43V2-1 XM1018043V2-1
ROTARY SWITCH KEDU ZH-A F/O/R
43V2-2 XM1018043V2-2
ON/OFF SWITCH KEDU KJD17B 120V
46V2 XM1018046V2
SWITCH MOUNTING PLATE V2.11.13
48A XM1018048A
INDICATOR LIGHT ASSY
62V2 XM1018062V2
HEADSTOCK BOX V2.11.13

Table of Contents

Question and Answer IconNeed help?

Do you have a question about the Shop fox M1018 and is the answer not in the manual?

Shop fox M1018 Specifications

General IconGeneral
BrandShop fox
ModelM1018
CategoryPower Tool
LanguageEnglish

Summary

Important Update: Model M1018 Changes

Changed Control Panel Parts

Lists updated control panel components with part numbers and descriptions for the M1018 model.

Wiring Diagram

Revised Feed Box Components

Revised Feed Box Parts

Details updated parts for the longitudinal feed box, including part numbers and descriptions.

Safety Warnings and Precautions

General Safety Warnings

Highlights critical safety instructions and potential hazards associated with machine operation.

Introduction and Technical Support

Woodstock Technical Support

Provides contact information for technical assistance, troubleshooting, and warranty claims.

Machine Specifications

Controls and Features Overview

General Safety Instructions

Standard Safety Instructions

Lists essential safety guidelines for operating the machine, including area preparation and personal protection.

Additional Safety Instructions

Lathe/Mill Combo Safety Guidelines

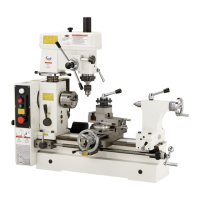
Provides specific safety advice for operating lathe/mill combination machines.

Electrical Setup and Safety

110V Operation Requirements

Details voltage, grounding, and circuit requirements for 110V operation.

Machine Setup and Inventory

Unpacking and Inventory Check

Guides on unpacking the machine and verifying all components are present.

Machine Placement and Cleaning

Workbench Load and Working Clearances

Advises on selecting a suitable workbench and ensuring adequate space around the machine.

Handle and Hand Crank Installation

Test Run Procedures

Lathe Test Run

Step-by-step guide to test the lathe operation for proper wiring and functionality.

Mill Test Run Procedure

Lathe Operations General

Switching to Lathe Operation

Instructions on engaging the lathe mode using the engagement hub.

Determining Correct Spindle Speed - Lathe

Spindle Speed Adjustment

Lathe Spindle Break-In

Procedure to break in the lathe spindle for long-lasting performance.

Power Feed and Carriage Controls

Feed Rate Lever Operation

Explains the function of the feed rate lever for adjusting feed speed.

Manual Carriage Controls

Longitudinal Hand Crank and Dial

Describes using the hand crank and its graduated dial for carriage movement.

Tailstock Controls

Tailstock Handwheel and Quill Lock

Covers operation of the tailstock handwheel and quill lock lever.

3-Jaw Scroll Chuck Installation

Removing and Installing the 3-Jaw Chuck

Provides step-by-step instructions for chuck removal and installation.

Loading Workpiece and Jaw Replacement

Loading Workpiece into Chuck

Guides on securing a workpiece in the chuck using the chuck key.

4-Jaw Chuck Mounting

Mounting a 4-Jaw Chuck with Plate

Instructions on attaching a 4-jaw chuck using the provided chuck plate.

Faceplate Workpiece Loading

Securing Workpiece on Faceplate

Steps for loading and securing a workpiece onto the faceplate for machining.

Dead Center Installation and Use

Installing and Removing the Dead Center

Procedures for installing and removing the dead center for workpiece support.

Turret Tool Post Setup

Securing Tools in the Turret Tool Post

Guidelines for properly mounting and securing cutting tools in the turret tool post.

Drill Chuck Assembly Installation

Installing Drill Chuck in Tailstock

Steps to install the drill chuck assembly into the tailstock for drilling.

Gear Charts and Setup

Understanding Gear Charts

Explains how to read and interpret the feed rate and threading rate charts.

Changing Gears for Feed Rates

Example Gear Change to 40 TPI

Provides an example procedure for changing gears to achieve a 40 TPI threading rate.

Aligning Tailstock to Spindle Center

Tailstock Alignment Procedure

Mill Operations General

Switching to Mill Operation

Instructions for engaging the mill mode using the machine's hub.

Determining Correct Spindle Speed - Mill

Mill Spindle Speed Adjustment

Changing Mill Pulley Belt Positions

Steps to adjust V-belt positions for different mill spindle speeds.

Mill Spindle Break-In and Controls

Mill Spindle Break-In Procedure

Procedure to break in the mill spindle for optimal performance.

Drill Chuck Removal and Installation

Removing Drill Chuck from Spindle

Steps to safely remove the drill chuck/arbor assembly from the spindle.

General Maintenance and Schedule

Maintenance Checks and Schedule

Outlines regular checks and a schedule for machine maintenance.

Lubrication Procedures

Apron and Cross Slide Ways Lubrication

How to lubricate the apron and cross slide ways.

Service and Adjusting Gibs

Cross-Slide Gib Adjustment

How to adjust the gib on the cross-slide for proper tension.

Gib Adjustment Procedures

Compound Gib Adjustment

Steps for adjusting the gib on the compound slide.

Wiring Diagram Details

Troubleshooting Common Issues

Motor and Electrical Troubleshooting

Addresses issues like motor not starting and blown fuses/breakers.

Warranty Registration Form

Customer Information

Fields for customer name, address, phone, and model details.

Product Warranty Information

Related product manuals