SHOPSMITH MARK V 845180
Page 24
CAUTION
Be sure the end of the Allen Wrench is smooth.
Watch that you don't scratch the Rip Fence surface.
3. Move the Rip Fence toward the Allen
Wrench until it just touches it. Lock the
Base Knob and Handle on the Base to
secure both ends of the Rip Fence. See
Figure 81.
Figure 81
4. Slide the Miter Gauge back and forth in
the Slot. See Figure 82. The tip of the
Allen Wrench should keep in slight con-
tact with the Rip Fence.
Figure 82
5. If it pulls away from or binds against the
Rip Fence, the Fence needs aligning. If
so, do the following:
a. Loosen the Handle and Base Knob,
remove the Rip Fence from the Table
and turn the Fence upside down.
Figure 78
ALIGN THE RIP FENCE PARALLEL
WITH THE WORKTABLE
(MARK V MODEL 510)
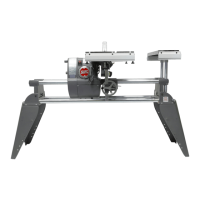
1. Place the Miter Gauge in the Left Slot of
the Worktable on the infeed side, as
shown in Figure 79.
Figure 79
2. Insert the Long 5/32" Allen Wrench
through the Miter Gauge and secure it
using the Short 5/32" Allen Wrench and
a Set Screw borrowed from the Tool
Rest, as seen in Figure 80.
Figure 80