77/94
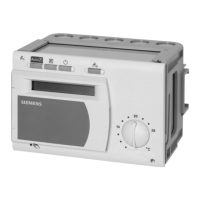
Siemens Building Technologies Basic Documentation RVD110, RVD130 CE1P2381E
HVAC Products 22 Handling 27.05.2004
22.3 Mounting
22.3.1 Mounting location
Suitable mounting locations are compact stations, control panels, control desks or the
heating room. Not permitted are wet or damp locations.
When the mounting location is selected, the RVD110 / RVD130 can be fitted as follows:
• Inside the control panel, on an inner wall, or on a DIN mounting rail
• On a panel front
• In the control panel front
• In the sloping front of a control desk
All connection terminals for extra low-voltage (sensors and room units) are at the top,
all those for mains voltage (actuators and pumps) at the bottom.
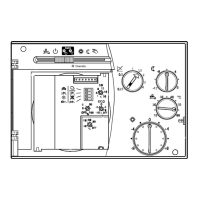
22.3.2 Mounting methods
The RVD110 / RVD130 are designed for 3 different mounting methods:
• Wall mounting: The base is secured to a flat wall with the help of 3 fixing screws
• DIN rail mounting: The base is fitted to the rail
• Flush panel mounting: The base is placed in a panel cutout measuring 138 × 92 mm;
the front panel may have a maximum thickness of 3 mm
22.3.3 Installation
General notes:
• The cable lengths should be selected such that the control panel front can be easily
opened
• Cable strain relief must be ensured
• The cables of the measuring circuits carry extra low-voltage
• The cables from the controller to the motorized valve and the pump carry mains voltage
• Sensor cables should not be run parallel to mains carrying cables
 Loading...