CHARGING THE BATTERIES – cont’d
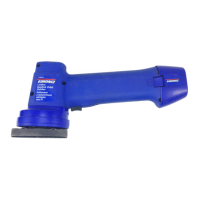
3. Insert the battery fully into the cavity
of the charging stand.
NOTES:
a) Align the raised rib of the battery
(5) with the matching slot (6) in the
front of the charging stand cavity
before inserting the battery. If the
battery does not fit into the charging
stand cavity easily, check to make
sure the raised rib of the battery is
toward the front of the charging
stand.
b) When fully inserted into the
charging stand cavity the red
indicator light (7) will come ON. If the
light does not come ON, the battery
is defective and must be replaced
with a new one.
4. After charging the battery for about 5
hours, remove the battery from the
charging stand and unplug the
charger from the power source.
BATTERY & CHARGER FACTS
1. The batteries supplied with the tool
are NOT fully charged when shipped.
Each battery must be charged for at
least 5 hours before being used in
the polisher.
2. There are two conditions under
which a battery will not accept a full
charge:
● when the battery is new
● when the battery has not been
used for an extended period of
time.
These are normal conditions and do
not indicate a problem. After about
four cycles of charging and
discharging through use, the battery
will accept a full charge.
3. When not in use, the battery can be
left on charge (indicated by the red
light), without any adverse effect.
The battery cannot be overcharged.
However, if the battery is not going to
be used for an extended period of
time, the charger should be
unplugged from the power source.