Do you have a question about the Simply45 Pro Series and is the answer not in the manual?
Strip cable jacket, slide on metal shell, and trim shielding/drain wire according to instructions.
Straighten conductors, align to T568A/B standard, and trim solid wires to specified length.
Insert remaining wires, trim flush to load bar, and fully seat cable jacket into the plug body.
Slide metal shell over plug, press to snap, insert into crimper, and compress handles.
Crimp external ground arm over cable jacket and attach Cap45 for final termination.
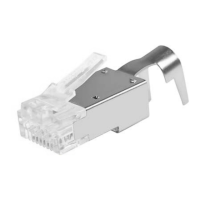
The Simply45™ S45-1755P ProSeries Pass Through Shielded External Ground RJ45 Modular Plugs are designed for terminating 10G shielded and other large diameter shielded LAN cables. These plugs incorporate a unique, patent-pending Cap45™ design.
The S45-1755P plugs facilitate a "pass-through" termination method, allowing wire conductors to extend through the front of the plug during the termination process. This design helps ensure proper wire alignment and seating before crimping, which is crucial for maintaining signal integrity in high-speed networks like 10 Gigabit Ethernet. The shielded design, combined with an external ground arm, provides enhanced protection against electromagnetic interference (EMI) and crosstalk, which are common issues in shielded cabling systems. The external ground arm ensures a secure and effective ground connection, further improving the cable's performance and reliability in environments with high electrical noise.
Cable Stripping: Begin by scoring the cable jacket approximately 2 inches (5cm) from the cable end using a Simply45 Adjustable LAN Cable Stripper (S45-S01BL/YL) or the wire stripper on a Simply45 Heavy Duty RJ45 Crimp Tool (S45-C100/S45-C101). Care must be taken not to cut too deep to avoid nicking the wire conductors. Once scored, remove the stripped cable jacket.
Metal Shell Placement: Slide the S45-1755P metal shell onto the cable jacket. Ensure the front of the shell faces the termination end. For now, slide it back out of the way.
Shielding and Drain Wire Management: Trim all cable shielding (aluminum foil, metal braid) back to the cable jacket using a Simply45 5” Angled Flush Cutter (S45-801). It is crucial not to cut off the drain wire. Fold the drain wire straight back about 1 inch (2.5cm) over the cable jacket. If the cable has a center spline/pair separator, cut it off as close to the jacket as possible without damaging the wire conductors.
Wire Straightening and Alignment: Untwist and straighten the wire conductors. The Simply45 Adjustable LAN Cable Stripper (S45-S01BL/YL) includes a wire straightener comb on top, which can be used for this purpose. Align the wires according to the desired T568A or T568B pattern. The T568B pattern is the most commonly used.
Wire Trimming (Initial): Using the S45-801 Flush Cutter, trim the solid wires back approximately 3/4 inch (2cm).
Load Bar Insertion (Striped Wires): Insert the four striped wires into the load bar first, following the chosen pattern. Ensure the wires are fully seated within the load bar.
Load Bar Insertion (Solid Wires): Next, insert the four solid wires into the load bar.
Wire Trimming (Final): Using the S45-801 Flush Cutter, trim the wires flush to the load bar, but leave at least 1 inch (2.5cm) of wire extending beyond the load bar.
Plug Insertion: Insert the cable with the BarS45 (load bar) into the plug. Push the wires through the front of the plug until they emerge from the other side. The S45-1755P plug is designed to accommodate large diameter cables up to 8.0mm (0.315 inches). Work the cable jacket into the plug until it is fully inserted. When viewed from underneath, the cable jacket should meet or be very close to the horizontal line on the plug. Ensure the drain wire remains straight down the cable jacket.
Metal Shell Attachment: Verify that the wires are still correctly aligned according to the pattern. Slide the S45-1755P metal shell over the plug body. Press in on the bottom of the plug as you attach the shell to ensure it snaps into place. The drain wire should remain straight back against the cable jacket, extending out from the back of the metal shell and past the external ground arm.
Crimping Tool Insertion: Insert the loaded plug completely into the crimper socket of a Simply45 Heavy Duty RJ45 Crimp Tool (S45-C100/S45-C101).
Crimping: Compress the crimper handles all the way down with one swift and firm motion until the handles release. This action secures the wires within the plug and crimps the contacts.
External Ground Arm Positioning: Push the external ground arm down over the drain wire and against the cable jacket. The drain wire should meet the rear end of the external ground arm. Loosely fold the external ground arm wings around the cable jacket using your fingers or a flat head screwdriver.
External Ground Arm Crimping: Use the external ground arm crimp feature on the Simply45 Shielded External Ground Crimper (S45-C101) to securely fold the external ground wings around the cable jacket. Alternatively, pliers (S45-802) can be used for this task.
Cap45™ Attachment: Inspect the terminated plug to ensure the wires are properly trimmed. Align the two posts on the Cap45™ with the two holes on the front of the plug. Push the posts into the plug until the Cap45™ is snug against the plug body.
The Simply45™ S45-1755P plugs, with their pass-through design, external grounding, and Cap45™ feature, aim to simplify the termination of shielded LAN cables while ensuring high-quality, reliable connections for demanding network applications.
| Brand | Simply45 |
|---|---|
| Model | Pro Series |
| Category | Accessories |
| Language | English |