E
Operating the
Machi
ne
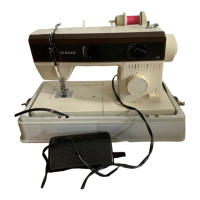
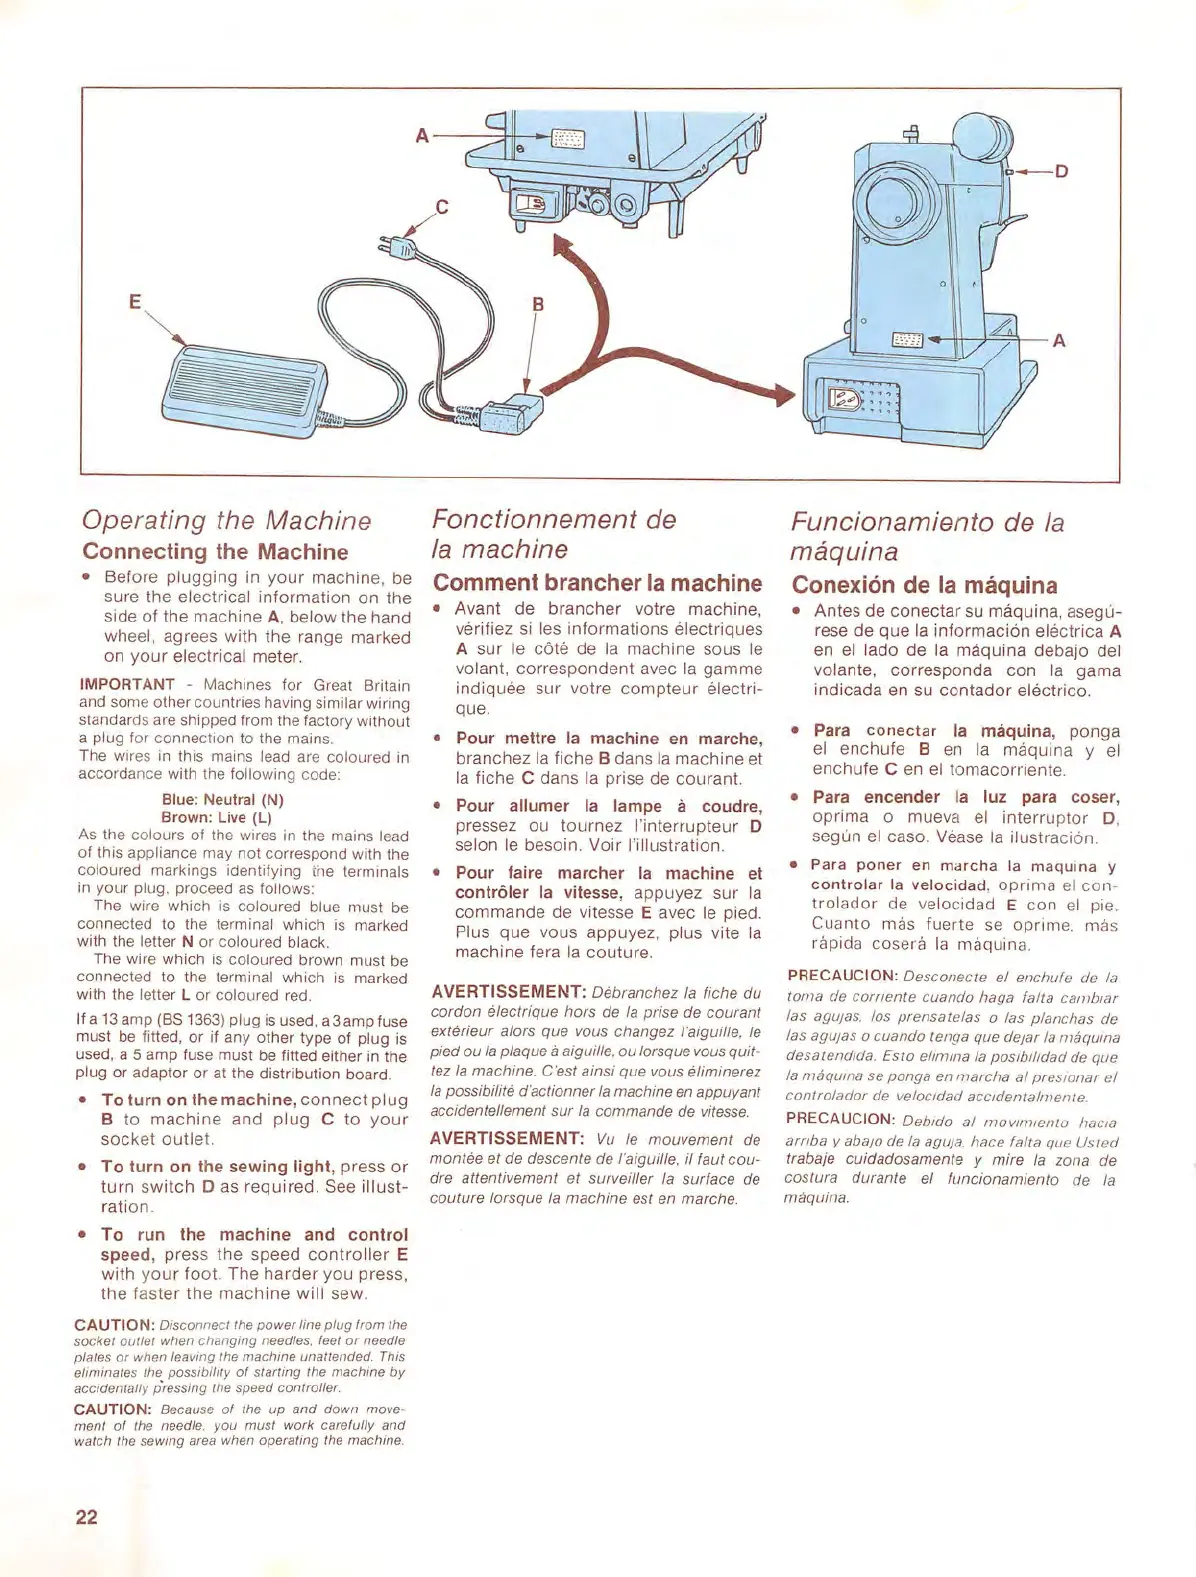
Connec
ti
ng the Machine
•
Bef
ore plu
gg
ing in y
ou
r machin
e,
be
sur
e the
el
ect
rical inf
ormati
on on the
side of the machine
A, below the
hand
wheel,
agr
ees with the range
marked
on
yo
ur
electrical meter.
IMPOR
TANT -
Mac
hines for G
reat
Brita
in
a
nd
some
o
th
er countri
es
hav
in
g similar wiring
stan
da
r
ds
ar
e s
hi
ppe
d fr
om
th
e factory without
a
pl
ug
for connection to t
he
ma
in
s.
Th
e w
ires
in
this
ma
in
s
lea
d
are
coloured in
accord
ance
with
the
foll
ow
i
ng
code:
Blue:
Ne
utral
(N)
Brown:
Live
(L)
As
t
he
co
lours of
the
wires
in
the
mains
lea
d
of this
app
li
an
ce
may
not correspo
nd
with
th
e
co
lour
ed
ma
rkings identifying the terminals
in
your plug, pr
oceed
as
fo
ll
ows:
Th
e
wi
re w
hi
ch
is
coloured b
lu
e m
us
t be
co
nn
e
ct
ed
to
th
e ter
mi
na
l w
hi
ch is ma
rk
ed
with
th
e letter N
or
co
loured
bl
a
ck.
Th
e wi
re
which
is
col
ou
red brown
mu
st be
co
nn
ected to
th
e t
er
mi
na
l
whi
ch is marked
wi
th
th
e
le
tter L
or
coloured red.
If a
13
a
mp
(
BS
13
63)
p
lu
g is
used
, a3
amp
fuse
must be
fi
tted, or if any other type
of
plug
is
used
, a 5 a
mp
fu
se
mu
st
be
fitted either
in
the
plug
or
ada
ptor or
at
the distribution bo
ard.
•
To
turn
on
the
machine,
conn
ec
t
plug
B
to
machi
ne
and
plug
C
to
y
our
soc
ket
outle
t.
•
To
tu
rn
on
the
sewing
light
,
press
or
turn
sw
itch
D as
required
. See
illust-
ration.
•
To
r
un
the
machine
and
control
spee
d,
press the speed
controller
E
with
yo
ur
fo
ot. The
harder
you
press
,
the
fast
er
th
e mac
hine
will
sew.
CAUTIO
N:
Disconnect
the
power
line
plug
from
the
socket
outlet when
changing
needles. feet
or
needle
plates
or
when leaving the
machine
unattended
This
eliminat
es
the
possibility
of
starting the
machine
by
accidentally p'ressing the
speed
controller.
CAUTION: Because
of
the
up
and
down
move-
ment of the nee
dl
e.
you
must
work
caref
ully
and
wa t
ch
the se win g area when operati
ng
the
mac
hine.
22
Fonctionnement
de
Ia
machine
Comment brancher
Ia
machine
•
Avant
de
brancher
votre
machine
,
verifiez
si
les i
nf
orm ations e
lectrique
s
A
sur
le cote de
Ia
mac
hine
sous le
vol
ant
, co
rrespondent
avec Ia
gamm
e
indiquee
sur v
otre
c
ompt
e
ur
electri-
que.
•
Pour
mettre
Ia
machine
en
marche,
branchez
Ia
fi che B dans
Ia
mac
hine
et
Ia
fiche
C dans Ia prise de
co
u
rant
•
Pour
allumer
Ia
lampe
a
coudre
,
pressez ou to
urn
ez l'
interrupteur
D
selon
le besoin. Vo
ir
!'illustration.
•
Pour
faire
marcher
Ia
machine
et
contr61er
Ia
vitesse, appuyez
sur
Ia
commande
de vitesse E avec le pied.
Plus
que
vous
appuyez
, plus vite
Ia
machine
fera
Ia
couture
.
AVERTISSEMENT: Debranchez
Ia
fiche du
cor
d
on
el
ectri
que
hors
de
Ia
prise de
cour
ant
exterie
ur
alors que vous
change
z
l'aiguill
e, le
pied ou
Ia p
la
que a aiguille,
ou
lorsque vous
qui
t-
fe
z
Ia
ma
chi
ne. C'est
ai
nsi que vous
el
iminer
ez
Ia
possi
bil
ite d'actionner
Ia
machine en appuya
nt
accidentellement
sur
Ia
commande de vitesse.
AVERTISSEMENT: Vu le
mou
ve
me
nt
de
mantee et de descente de
/'a
i
gu
ille, il taut cou-
dre attentiveme
nt
et
sur
veiller
Ia
sur
face de
couture
lorsque Ia
mac
hi
ne
est en marche.
Funcionamiento de
Ia
maquina
Conexi6n de
Ia
maquina
•
Antes
de
conecta
r su
maquina
.
as
egu-
rese
de
que
Ia
informacion
ele
ct
rica A
en
el
lado
de Ia
maquina
debajo
del
volante,
corresponda
con
Ia
gama
indicada
en su co
ntador
electrico.
•
Para
conectar
Ia
maquina,
ponga
el e
nchufe
B
en
Ia
maqui
na y el
enc
hufe
C en
el
tomacor
rie
nt
e.
• Para
encender
Ia
luz
para
coser
,
o
prim
a o
mue
va
el
interr
uptor
D.
s
egun
el caso. Vea
se
Ia
il
ustraci6
n.
• Para poner
en
marcha
Ia
ma
q
ui
na y
controlar
Ia
velocidad, op
rim
a el co n-
tr
olador de
ve
locidad E
co
n el pi
e.
Cua
nto
m
as
fuert
e
se
op
rim
e.
m
as
rapid
a cosera
Ia
maquin
a.
PRECAUCION: Desconecte e! enchufe de
Ia
toma de
cornente
cuanc!o haga falta camb1ar
las agu;as. los prensatelas
a las planchas de
las agu;as
a cuanc!o tenga que clefar
Ia
maqwna
clesatendlda. Est a elirmna Ia poslbilldacl
de
que
Ia
maquma se
pong
a en
marcha
a! presi
onar
e!
controlac!or
de
velociclacl accic!entalmente.
PRECAUCION: Debiclo a! rnov11men/O
haC/a
a
mba
v aba;o
de
Ia
agu;a. hace fait a que
Us
ted
trabaje cu
idad
osamente y mire
Ia
zona de
costura
duran
te
el
fu
nciona
mie
nt
o de
Ia
maq
ui
na.
 Loading...