Applications
Lingerie Seams
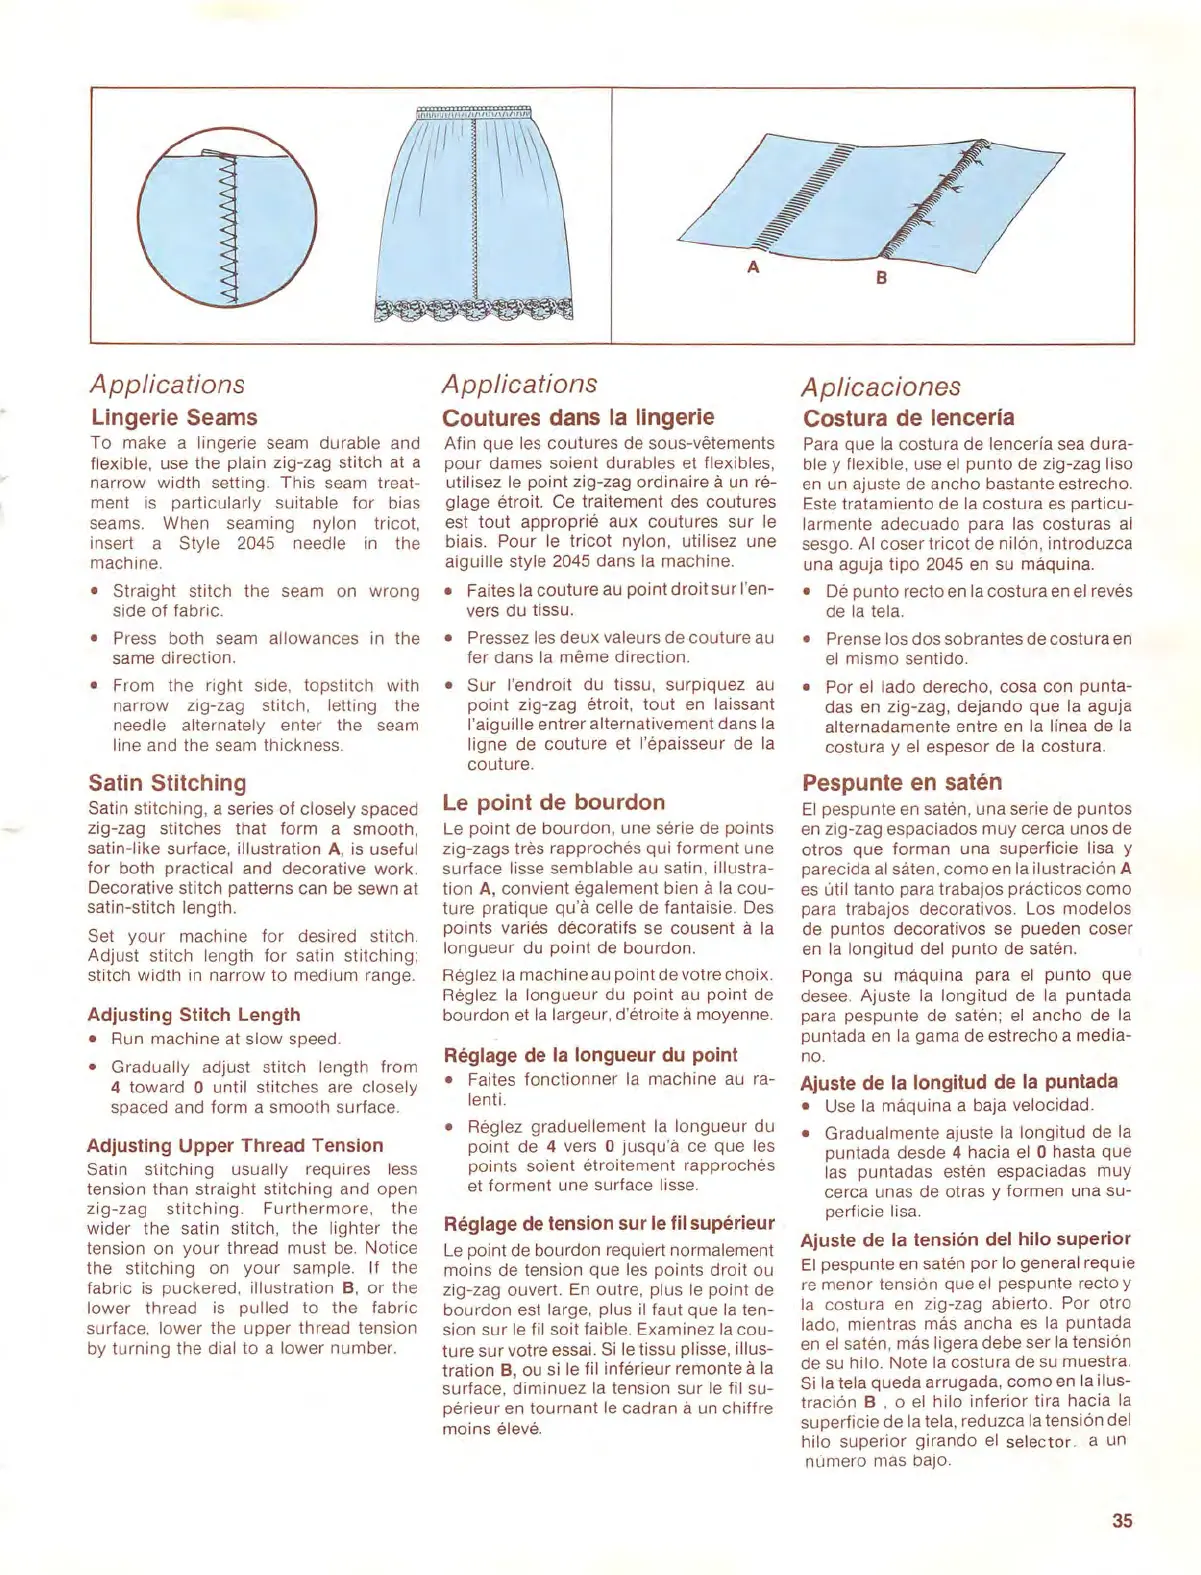
To
make a lingerie seam durable and
flexible, use the plain zig-zag stitch at a
narrow
width setting. This seam treat-
ment
is
particularly suitable for bias
seams. When seaming
nylon
tricot
,
insert a
Style 2045 needle in the
machine.
• Straight stitch the seam on
wrong
side
of
fabric.
• Press both seam allowances in the
same direction.
• From the right side,
top
stitch with
narrow zig-zag stitch,
letting the
needle alternately enter the seam
line and the seam thickness.
Satin Stitching
Satin
stitching
, a series
of
closely spaced
zig-zag stitches that
form
a
smooth
,
satin-like surface, illustration A,
is
useful
for
both practical and decorative work.
Decorative stitch patterns can be sewn at
satin-stitch
length.
Set
your
machine
for
desired s
titch
.
Adjust stitch
length
for
satin
stitching
;
stitch
width
in
narrow
to medium range.
Adjusting Stitch Length
• Run machine at
slow
speed.
•
Gradually
adjust stitch length
from
4 toward 0 until stitches are closely
spaced and form a
smooth
surface.
Adjusting Upper Thread Tension
Satin stitching usually requires less
tension than straight
stitching
and open
zig-zag
stitch
ing.
Furthermore
,
the
wider the satin stitch, the lighter the
tension on
your
thread must be.
Notice
the
stitching
on
your
sample. If the
fabric
is
puckered, illustration B,
or
the
lower thread
is
pulled to the fabric
surface,
lower the
upper
thread tension
by
turning
the dial to a
lower
number.
Applications
Coutures dans
Ia
lingerie
Afin que les coutures de sous-vetements
pour
dames soient durables et flexibles,
utilisez le
point
zig-zag ordinaire a un re-
glage
etroit. Ce traitement des coutures
est
tout
approprie aux coutures
sur
le
biais. Pour
le
tricot
nylon, utilisez une
aiguille style 2045 dans
Ia
machine.
• Faites
Ia
couture
au
point
droit
sur
l'en-
vers du tissu.
• Pressez les deux valeurs de
couture
au
fer dans
Ia
meme
direction.
•
Sur
l'
endroit
du tissu, surpiquez
au
point
zig-zag etroit,
tout
en laissant
l'aiguille
entrer alternativement dans
Ia
ligne de
couture
et l'epaisseur de
Ia
couture.
Le
point de bourdon
Le
point
de
bourdon
, une serie de points
zig-zags
tres rapproches qui
torment
une
surface
lisse semblable au satin, illustra-
tion A, convient egalement bien a
Ia
cou-
ture pratique qu'a celle de fantaisie. Des
points varies decoratifs se
cousent
a
Ia
longueur du
point
de bourdon.
Reglez
Ia
machine au
point
de votre
choix
.
Reglez
Ia
longueur
du
point
au
point
de
bourdon et
Ia largeur, d'etroite a moyenne.
Reglage de
Ia
longueur du point
• Faites
fonctionner
Ia
machine au ra-
lenti.
• Reglez graduellement
Ia
l
ongueur
du
point
de 4 vers 0 jusqu'a ce que les
points soient
etroitement
rapproches
et
torment
une surface
li
sse.
Reglage de tension sur
le
til
superieur
Le
point de bourdon requiert normalement
moins de tension que l
es
points
dro
it ou
zig-zag ouvert.
En
outre
, plus
le
point
de
bourdon
est large, plus
il
taut que Ia ten-
sion
sur
le
til soit faible. Ex
am
inez
Ia
cou-
ture
sur
votre essai .
Si
le
tissu plisse, illus-
tration
B,
ou
si
le til inferieur remonte a
Ia
surface,
diminuez
Ia
tension sur
le
til
su-
perieur en
tournant
le
cad ran a un chiffre
moins
eleve.
Aplicaciones
Costura de lenceria
Para que
Ia
costura de lenceria sea
dura-
ble y flexible, use
el
punto
de zig-zag liso
en un ajuste de
ancho
bastante estrecho.
Este tratamiento de
Ia
costura
es
particu-
larmente adecuado para las costuras al
sesgo.
AI
coser
tricot
de nilon,
introduzca
una aguja
tipo
2045
en
su
maquina
.
• De
punto
recto
en
Ia
costura
en
el reves
de
Ia
tela.
•
Prense los dos sobrantes de costura en
el
mismo
sentido.
• Por el lado derecho, cosa con
punta-
das en zig-zag,
dejando
que
Ia aguja
alternadamente entre en
Ia
linea de
Ia
costura y
el
espesor de
Ia
costura.
Pespunte en saten
El
pespunte en saten, una serie de
puntos
en
zig-zag espaciados
muy
cerca unos de
otros que
forman
una superficie lisa y
parecida
al
sa
ten,
como
en
Ia
ilustracion A
es
uti I tanto para trabajos practices
como
para trabajos decorativos. Los modelos
de puntos decorativos se pueden coser
en
Ia
longitud
del
punto
de saten.
Ponga su maquina para
el
punto
que
desee. Ajuste Ia longitud de
Ia
puntada
para pespunte de saten;
el ancho de
Ia
puntada en
Ia
gama de estrecho a
media-
no
.
Ajuste de Ia longitud de Ia puntada
• Use
Ia
maquina
a baja velocidad.
• Gradualmente
ajuste
Ia
longitud
de
Ia
puntada desde 4 hacia
el
0 hasta
que
las puntadas esten espaciadas
muy
cerca unas de otras y formen una su-
perficie
lisa.
Ajuste de
Ia
tension del hilo superior
El
pespunte en saten
por
lo general requie
re
men
or
tension que
el
pespunte recto y
Ia
costura en zig-zag abierto. Por
otro
lado, mientras mas ancha
es
Ia
puntada
en
el
sa ten, mas ligera debe ser
Ia
tension
de su
hilo
. Note
Ia
costura de su muestra.
Si
Ia
tela
queda
arrugada,
como
en
Ia
ilus-
tracion B , o
el
hilo
inferior
tira hacia
Ia
superficie de
Ia
tela, reduzca
Ia
tension del
hilo
superior
girando
el
se
l
ector
. a un
numero
mas
baJO.
35
 Loading...