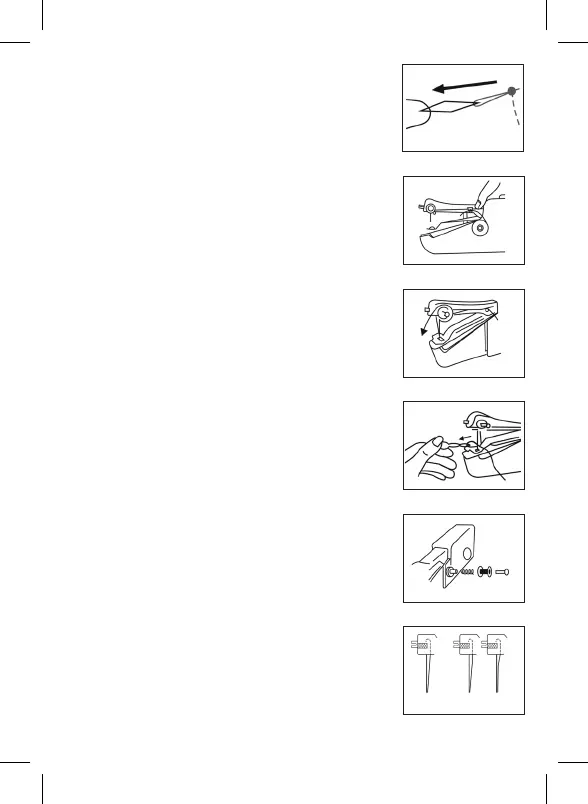
KNOTTING THE THREAD
Turn the fabric inside out and guide the spare thread
of 7.5cm according to the directions stated and the
relevant gures.
Slide the threader down the last stitch. (See Figure #6)
Thread around 2.5cm of thread from top to
the bottom. (See Figure #7)
Pass the thread through the loop and pull it tightly to
tie a knot. (See Figure #8)
Pull out the threader slowly down the stitch.
(See Figure #9)
Cut off the extra thread.
9 ]
a ]
b ]
c ]
d ]
e ]
Figure #10
Figure #11
Figure #9
Figure #12
Figure #13
Figure #14
Correct
Direcon
Incorrect
Direcon
Lower the needle to the fabric and turn the rotating dial
until the needle arm is in the highest position again.
Lift the xing plate and pull the fabric to the left,
MAKING SURE THAT YOU DO NOT PULL THE THREAD
TO THE EXTENT THAT IT IS RIPPED FROM THE SEAM.
8 ]
7 ]
THREADING
Note: The thread should ow through the upper right side of
the bobbin or the cone. The spring should be in place before the
bobbin is aached.
Attach the thread to the appliance according to
Figures 10, 11 and 12.
Pass the thread through the hole upwards.
(See Figure #10)
1 ]
2 ]