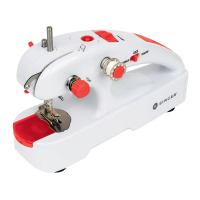
Pass the thread over the tension control between two silver-coloured
discs. (See Figure #11)
Pass the threader through the needle hole from the front to the back.
Pass the thread through the eyelet of the threader.
Pull the threader from the end of the thread towards the hole of
the needle, from the back to the front. (See Figure #12) Remove the
threader.
3 ]
4 ]
5 ]
ADJUSTING THE THREAD TENSION
If the stitch is too tight, slightly turn the tension control to the left.
If the stitch is too loose, slightly turn the tension control to the right.
1 ]
2 ]
ATTACHING A REGULAR THREAD CONE (See Figure #10)
Loosen the bobbin nut and remove the bobbin.
Slide the thread cone to the extension shaft.
Connect the extension shaft to the bobbin shaft.
1 ]
3 ]
2 ]
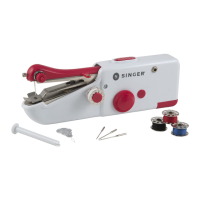
REPLACING THE NEEDLE
Loosen the set screw with a screwdriver and remove the old needle.
Always use a Singer
®
2020 90/14 needle.
The needle should be attached with the correct side of the needle
shaft, making sure that it faces the front side of Stitch Sew Quick
™
.
(See Figure #14)