7
• SKIL accessories (not standard included)
9
- glass protection nozzle D (for deecting air ow)
- at nozzle E (for broadening air ow)
- reector nozzle F (for reecting air ow)
- reduction nozzle G (for concentrating air ow)
NOTES:
- all application examples (except removing paint
next to glass) can be performed without accessories;
however, using the appropriate accessory simplies the
work and signicantly improves the quality of the results
- this tool can also be used in combination with
commonly available accessories for heat guns
• Mounting/removing accessories (not standard
included)
- simply t the accessory onto air outlet H
2
- remove an accessory by pulling it o to the front after it
has cooled down
! mount an accessory only when the air outlet is
cold, when the switch is in position "0" and when
the plug is disconnected
• Hanging ring J
q
- for easy storage of the tool
! allow the tool to cool down for at least 30 minutes
before storage
• Constant heat control (overload protection)
Protects heating element from damage when tool is over-
loaded without having to stop it and/or let it cool down for
a period of time
- when the temperature gets too high, the heating
element switches itself o, while the motor continues to
run and produces cold air
- when the temperature has dropped suciently (taking
only a few seconds), the heating element will be
switched on automatically
!
high temperature setting, and switched on again
after a short break, it may take a while before the
heating element reaches the desired temperature
APPLICATION ADVICE
• Removing paint/lacquer
w
- use a clean, sharp scraper
- scrape rmly, when the paint softens
- experiment to establish the length of time necessary to
apply the heat for optimal results
- scrape the softened paint immediately, or it will harden
again
- keep a 30° to 40° angle between the tool and the
workpiece
- remove paint and debris immediately from the scraper
to prevent them from ignition
- scrape with the grain of the wood, wherever possible
- do not direct the hot air ow towards the same surface
for too long
- dispose of all paint debris safely
- thoroughly clean the work area after completing the job
! be careful when removing layers of paint in old
buildings; in the past the building may have been
painted with paint containing lead, which is highly
poisonous
may be aected (if the system impedance of the power
supply is lower than 0,127 + j0,079 Ohm, disturbances
are unlikely to occur); if you need further clarication, you
may contact your local power supply authority
• Stay alert; watch what you are doing, use common sense
and do not operate the tool when you are tired
• Take a secure stance; do not overreach, especially on
ladders and stages
• Ensure that the tool is switched o, before putting it aside
• In case of electrical or mechanical malfunction,
immediately switch o the tool and disconnect the plug
AFTER USE:
• Switch o the tool and disconnect the plug
• Allow the tool to cool down for at least 30 minutes
before storage
• Suspend the tool on hanging ring J
2
or set it down on
its rear in an upright position; when doing so, make sure
no combustible materials or inammable gases are in the
proximity
• Do not store/leave the tool outdoors
• Store the tool in a dry and locked-up place, out of reach
of children
USE
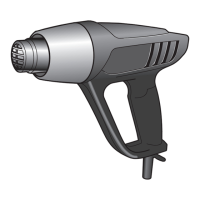
• On/o switch with 3 temperature settings
6
! check if switch A
2
is in position "0" before
plugging in
- switch on the tool by pushing switch A in desired
position:
I = 70°C, air ow 550 litres/minute
II = 450°C, air ow 350 litres/minute
III = 600°C, air ow 550 litres/minute
- when using it for the rst time, some smoke may emit
from the tool; this is normal and will soon cease
- switch o the tool by pushing switch A in position "0"
• General use
- determine the right temperature by testing out on an
inconspicuous part of the workpiece; start with a low
temperature setting
- the temperature drops as the distance between the air
outlet/nozzle and the workpiece increases
- the temperature required depends on the material to
be worked on
• Stationary use
7
- set the tool down on its rear in an upright position
- make sure the surface is clean and dustfree; polluted
air damages the motor
- make sure the air ow is directed away from you
- secure the cord to prevent pulling down the tool
- do not touch the air outlet/nozzle
- make sure nothing drops into the air outlet/nozzle
- carefully hold the tool with one hand while switching it
o with the other hand, and then allow it to cool down
• Use at hard-to-reach places
- remove ring B
2
, thus releasing the metal air outlet
over a greater distance
!
• Holding and guiding the tool
8
- hold the tool with one hand
- while working, keep the nozzle at a minimum distance
of 7 cm from the workpiece; accumulated air damages
the tool
- keep ventilation slots C
2
uncovered