EasyManua.ls Logo

Smeg PV264B - User Manual

Smeg PV264B
17 pages
Print Icon
To Next Page IconTo Next Page
Loading...
22 - PRECAUTIONS 91477A884/A
PRECAUTIONS 22
General safety instructions 22
Installation 25
Appliance purpose 26
This user manual 27
Manufacturer’s liability 27
Identification plate 27
Disposal 27
Energy efficiency information 27
To save energy 27
How to read the user manual 27
DESCRIPTION 28
General description 28
USE 28
Precautions 28
Preliminary operations 29
Using the hob 30
CLEANING AND MAINTENANCE 30
Cleaning the hob 30
Cleaning the hob 31
What to do if... 31
INSTALLATION 32
Gas connection 32
Gas types and Countries 35
Burner and nozzle specifications tables 35
Electrical connection 36
Section cut from the countertop 36
Mounting 37
Fixing to the built-in cabinet 38
Instructions for the installer 38
We advise you to read this manual carefully, which contains all the instructions for maintaining the
appliance’s aesthetic and functional qualities. For further information on the product: www.smeg.com
These instructions apply only to the destination countries listed on the appliance's data plate.
This is a class 3 built-in hob.
PRECAUTIONS
General safety instructions
Risk of personal injury
During use the appliance and
its accessible parts become
very hot. Keep children well
away from the appliance.
Protect hands with heat resistant
gloves during use.
Never try to put out a fire or
flames with water: Turn off the
appliance and smother the
flames with a fire blanket or
other appropriate cover.
This appliance may only be
used by children aged 8 years
and over, and by people of
reduced physical, sensory or
mental capacity, or lacking in
experience in the use of
electrical appliances, provided
that they are supervised or
have been given instructions on
the safe use of the appliance
and of the hazards associated
with it.
Children must not play with the
appliance.
Keep children under the age of
eight at a safe distance unless
they are constantly supervised.
Keep children under the age of
8 away from the appliance
when it is in use.
Cleaning and maintenance
must not be carried out by
unsupervised children.
Make sure that the flame-
Question and Answer IconNeed help?

Do you have a question about the Smeg PV264B and is the answer not in the manual?

Overview

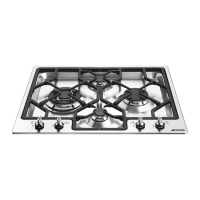
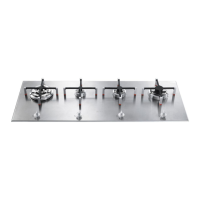
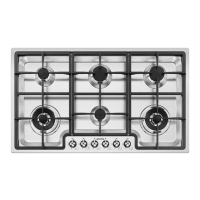
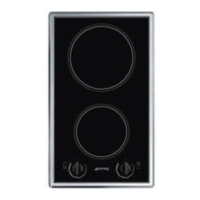
This document describes a built-in gas hob, designed for cooking food in a home environment. It is a Class 3 appliance.

Function Description

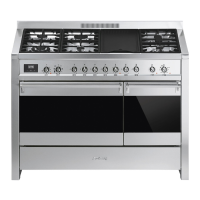
The hob is intended for cooking food using gas burners. It features an electronic ignition device for easy lighting of the burners. The appliance is controlled by knobs located on the front panel, each corresponding to a specific burner. A safety device is incorporated to cut off the gas supply in case of accidental switching off.

Important Technical Specifications

The hob is factory-set for natural gas G20 at a pressure of 20 mbar. It can be adapted for operation with other types of gas by changing the burner nozzles and adjusting the minimum flame on the gas cocks. The appliance's gas connector has a ½" external thread (ISO 228-1).

Burner Types and Capacities (Natural Gas G20 - 20 mbar):

  • AUX (Auxiliary burner): Rated heating capacity 1.00 kW, Nozzle diameter 72 (1/100 mm), Reduced flow rate 400 W.
  • SR (Semi-rapid burner): Rated heating capacity 1.70 kW, Nozzle diameter 97 (1/100 mm), Reduced flow rate 500 W.
  • RR (Rapid burner reduced): Rated heating capacity 2.60 kW, Nozzle diameter 108 (1/100 mm), Reduced flow rate 800 W.
  • R (Rapid burner): Rated heating capacity 2.90 kW, Nozzle diameter 115 (1/100 mm), Reduced flow rate 800 W.
  • UR2 (Ultra-rapid burner): Rated heating capacity 4.00 kW, Nozzle diameter 150 (1/100 mm), Reduced flow rate 1400 W.

Electrical Connection: The appliance operates on 220-240 V. The power cable should be 0.75 mm² and connected to earth. A minimum contact separation distance sufficient for complete disconnection in category III overvoltage conditions is required for the all-pole circuit breaker.

Dimensions:

  • Overall dimensions (60 cm models): Length 600 mm, Width 510 mm, Height 40 mm.
  • Overall dimensions (72 cm models): Length 720 mm, Width 510 mm, Height 40 mm.
  • Built-in cabinet dimensions (60 cm models): X (cut-out width) 560-564 mm, Y (cut-out depth) 482-486 mm.
  • Built-in cabinet dimensions (70 cm models): X (cut-out width) 560-564 mm, Y (cut-out depth) 482-486 mm.
  • Clearances: Minimum 150 mm (A), 460 mm (B), 750 mm (C) if furniture above, 20-60 mm (D), 50 mm (E).

Usage Features

Lighting and Adjusting Burners: To light a burner, press the corresponding knob and turn it anti-clockwise to the maximum flame symbol. Keep the knob pressed for a few seconds after ignition to allow the thermocouple to heat up. If the burner does not light within 15 seconds, turn the knob to the off position and wait 60 seconds before trying again. To adjust the flame, turn the knob between the maximum and minimum settings. Return the knob to the off position to turn off the burners.

Pan Usage: For optimal burner efficiency and to minimize gas consumption, use pans with lids and of suitable size for the burner, ensuring flames do not extend up the sides of the pan. Once contents boil, reduce the flame to prevent boiling over.

Griddle Usage:

  • On 60 cm models, griddles should not extend beyond the hob's edge or be close to the knobs if placed on a single burner.
  • On 70 cm models, the maximum griddle size is approximately 35 x 26 cm and should only be placed horizontally on the UR2 burner.
  • On 90 cm models, griddles should only be placed vertically on the UR2 burner.
  • Griddles can be pre-heated empty for a maximum of 5 minutes.
  • When using refractory material griddles (cast iron, steatite, terracotta), use for a maximum of 20 minutes and reduce burner power for long cooking times.
  • Ensure the burner flame does not extend beyond the griddle's edge.
  • Maintain a minimum distance of 150 mm and 50 mm from the griddle's edge to the side and rear walls.
  • Do not place a griddle over more than one burner simultaneously.

Maintenance Features

Cleaning the Hob:

  • General: Clean regularly after use, once surfaces have cooled. Use specific non-abrasive or non-chlorine-based detergents. Apply to a damp cloth, wipe, rinse thoroughly, and dry with a soft or microfibre cloth.
  • Weekly: Use an ordinary glass cleaning product, following manufacturer's instructions.
  • Food Stains/Residues: Light marks from aluminium pans can be cleaned with a vinegar-moistened cloth. Remove burnt-on residues after cooking, then rinse and dry.
  • Pan Support Grids: Remove, clean in lukewarm water with non-abrasive detergent, remove encrustations, dry thoroughly, and return to the hob.
  • Flame-spreader Crowns and Burner Caps: Remove, wash in hot water with non-abrasive detergent, remove encrustations, dry perfectly, and ensure correct positioning in their housings with respective burner caps.
  • Igniters and Thermocouples: Keep perfectly clean. Clean frequently with a damp cloth if necessary. Remove dry residues with a wooden toothpick or needle.

Gas Cocks Lubrication: Over time, gas cocks may become difficult to turn. They should be cleaned internally and the lubrication grease replaced by a specialised technician.

Troubleshooting (What to do if...):

  • Hob does not work: Check connection, main switch, power failure, fuse, and circuit breaker.
  • Unsatisfactory cooking results: Ensure proper ventilation and unobstructed air inlets.
  • Hob smokes: Let it cool, clean after cooking, ensure food has not spilled, and use a larger cooking vessel if needed.
  • Fuses blow or circuit breaker trips repeatedly: Call Technical Support or an electrician.
  • Cracks or fissures on the hob: Turn off immediately, disconnect power, and contact Technical Support.

Smeg PV264B Specifications

General IconGeneral
BrandSmeg
ModelPV264B
CategoryCooktop
LanguageEnglish

Related product manuals