Do you have a question about the Smeg PX7502 and is the answer not in the manual?
This document outlines the installation, usage, and maintenance procedures for a built-in hob, classified as Class 3. It is intended for both qualified installers and end-users, providing comprehensive instructions to ensure safe and efficient operation.
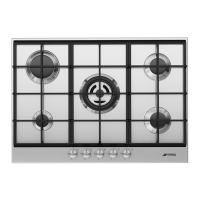
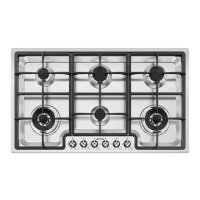
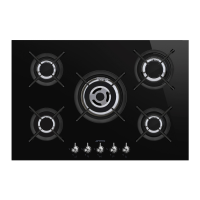
The appliance is designed for household use, specifically for cooking and heating foods. Any other uses are considered improper, and the manufacturer disclaims all liability for uses outside of its stated purpose. The hob is equipped with gas burners and electronic ignition, allowing for precise control over cooking temperatures. It features a safety device that cuts off the gas supply if a burner accidentally goes out.
The installation process requires a qualified engineer to check the gas supply system and install, commission, and test the appliance. Before installation, if the hob needs to be adapted for a gas type different from the factory preset, this adjustment must be made. The hob can be installed on various heat-resistant materials such as masonry, metal, solid wood, and wood finished with plastic laminates (T 90°C).
A hole must be made in the cabinet top, maintaining a minimum distance of 50 mm from the rear edge. If installed against higher walls, the specified distance must be maintained to prevent overheating. A minimum distance of 750 mm is required between the hob's stoves and any shelf directly above it. If a hood is installed, its instruction manual should be consulted for correct clearance.
If the hob is installed above an oven, the oven must be fitted with a cooling fan. If installed above a cupboard with doors, a separator panel must be installed underneath, leaving a gap of at least 10 mm between the hob's bottom and the panel surface for servicing access.
The adhesive foam rubber strip, supplied with the hob, must be fitted around the outside edge of its surround. This strip acts as a cushion between the hob and the cabinet surface. Care must be taken to ensure it does not project beyond the frame's outside edge. Fixing clips are then used to secure and center the hob. These clips are gently pressed horizontally into the provided groove and then turned upwards to fix them permanently.
When fitting the hob into the worktop, the pan stands and burners must first be removed. The hob's surround should first rest entirely on the back edge of the hole, then the front lowered until the appliance is completely in place. Leverage should not be applied to the surround due to its delicate nature.
For electrical connection, the power supply line voltage and size must match the specifications on the nameplate, which should never be removed. The plug and wall socket must be of the same type and comply with regulations, and the power supply line must be properly earthed. The power supply cable should pass through the rear of the cabinet, avoiding contact with the hob's bottom case or any built-in oven. The appliance's power supply line must include an omnipolar breaking device with a contact gap of at least 3 mm, easily accessible near the appliance. Reductions, adapters, or junctions are not recommended. If the power supply cable needs replacement, the new cable must have wires of at least 0.75 mm² (3 x 0.75 cable), with the earth wire (yellow-green) being at least 20 mm longer for connection. Only H05V2V2-F or similar cables resistant to 90°C should be used, and replacement must be done by a qualified electrician.
For gas connection, if installed above an oven, the gas hose must be routed around the back of the oven to prevent overheating. Connection to the gas mains can be made with a copper pipe or a continuous-wall steel hose, following relevant regulations. The horizontal position of fitting A on the appliance's back is adjustable. The hexagonal nut B should be loosened, fitting A turned to the desired position, and then nut B re-tightened, ensuring the rubber gasket provides an effective seal. After installation, leaks must be checked with a soapy solution, never a naked light. The appliance is tested with G20 (2H) natural gas at 20 mbar. For other gas types, refer to the adaptation instructions. The gas intake connection has an external 1½" gas thread (ISO 228-1).
For copper pipe connections, the gas supply mains connection must avoid any stresses or strains on the appliance. An adapter unit D with two conical elements and gasket C can be used. For steel hose connections, only continuous-wall stainless steel hoses compliant with regulations should be used, with gasket C between fitting A and hose E. When using a hose, its total length should not exceed 2 meters, and it must not touch moving parts or be crushed.
For bottled gas connection, a pressure regulator must be used, and the connection to the gas cylinder made according to regulations. The gas supply pressure must match the table in the "Adjusting for bottled gas" section.
The appliance must be installed in a permanently ventilated room as per regulations, with sufficient air flow for proper gas combustion and room ventilation. Air intakes, protected by gratings, must be of suitable size and not partially obstructed. The kitchen must be well-ventilated to disperse heat and humidity from cooking, especially after prolonged use. Combustion gases must be discharged via hoods connected to a flue with natural draught or a fan extraction system. An effective extraction system requires careful design by an authorized specialist and compliance with regulation distances and positions. The engineer must issue a certificate of compliance after installation.
The hob's control and monitoring devices are located on the front panel. To light a burner, press the knob and turn it anti-clockwise to the minimum flame symbol. Keep the knob pressed down for about 2 seconds to keep the flame alight and prime the safety device. If the burner goes out when the knob is released, repeat the operation, pressing the knob down for longer. Once lit, the control knob will illuminate to confirm operation. The light will gradually go out a few seconds after the knob is turned to the "O" (off) position or if the burner accidentally extinguishes. If burners accidentally go out, the safety device will trip after about 20 seconds, cutting off the gas supply even if the gas tap is open.
To adjust the flame, turn the knob to the zone between the maximum and minimum settings. To turn off the burner, turn the knob back to the "O" position. The burner layout symbols on the front panel indicate which burner each knob controls (front left-hand, rear left-hand, middle, rear right-hand, front right-hand).
For optimal burner efficiency and to minimize gas consumption, flat, even-bottomed pans with lids of suitable size for the burner should be used. To prevent burns or damage, all pans or griddle plates must be placed within the hob's perimeter and at least 5-7 cm from the knobs. Woks require a special reduction fitting (supplied on request), placed over the grill on the burner top.
Pan diameters for each burner type are specified: Auxiliary (7-18 cm), Semi rapid (10-24 cm), Rapid (18-24 cm), and Ultra Rapid (24-28 cm). Griddles or plates should not be used on the ultra-rapid/triple crown burner. Aluminum foil should not be placed under burners. Earthenware or steatite pans are not advisable for cooking or heating.
Before any maintenance, the appliance must be disconnected from the electricity supply. A jet of steam should never be used for cleaning.
To maintain the hob in good condition, it should be cleaned regularly after each use, once it has cooled. For glass surfaces, only specific products without abrasives or chlorine-based acids should be used. Apply the product to a damp cloth, wipe the surface, then rinse thoroughly and dry with a soft cloth or chamois leather. For food stains or spills, metal scouring pads or sharp scrapers, which can damage the surface, should not be used. Ordinary non-abrasive products for glass, with non-scratching sponges and wooden or plastic utensils, can be used if necessary. Rinse thoroughly and dry with a soft cloth or chamois leather.
For an acid-etched glass hob:
For cleaning components:
Over time, gas taps may become stiff or jam. Their insides should be cleaned, and lubricating grease changed by a skilled technician.
After adjusting the appliance for a gas type other than the one used for testing, the label on the casing must be replaced with the label for the new gas, which is supplied in the bag with the LPG nozzles (G30 - G31).
| Type | Gas Hob |
|---|---|
| Number of Cooking Zones/Burners | 5 |
| Width | 75 cm |
| Power Levels | Variable |
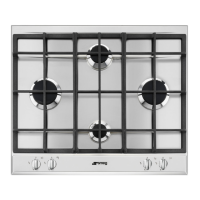
| Aesthetics | Stainless Steel |
| Control setting position | Front |
| Pan stands | Cast Iron |
| Gas Safety Valves | Yes |
| Material | Stainless Steel |
| Safety Features | Flame Failure Device |
| Ignition | Automatic |
| Burner Types | Auxiliary, Semi-rapid, Ultra-rapid |
| Total Power | 12 kW |
| Control Type | Knob |
| Type of control setting | Knobs |
| Dimensions (WxD) | 75 cm x 51 cm |