1
DEALER SET-UP INSTRUCTIONS & PRE-SALE CHECKLIST for
EUROPEAN SNAPPER LT SERIES TRACTORS
INTRODUCTION: Snapper LT (One Piece Frame) Tractors are shipped with the steering wheel and seat
cushions removed. The following steps are required for set-up. Complete all items on the Dealer Pre-Sale
Checklist at time of purchase.
NOTE
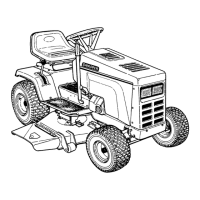
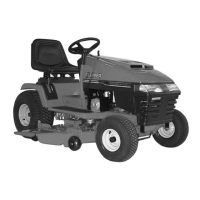
: Figure 1 shows the seat assembled to the seat
pedestal assembly. Some models are shipped
with the seat loose and will require installation.
FIGURE 1
ACTIVATE BATTERY
The battery is not installed and is shipped dry. Allow
sufficient time for charging and installing the battery
before operating the tractor. Pay close attention to the
precautionary statements on the battery and in these
instructions. Electrolyte must be purchased separately
from your local dealer or retailer. You will also need an
automotive type battery charger to activate the battery for
use.
STEP 1: SEAT/PEDESTAL ASEMBLY REMOVAL
1. Remove the seat/pedestal assembly by removing
the two seat knobs that secure it to rear fender. See
Figure 1.
Note
: The seat switch wires are still connected, so be
careful.
2. Move the seat/pedestal assembly forward and out of
the way.
STEP 2: ACTIVATING AND CHARGING BATTERY
1. Remove battery from carton.
2. Place battery in a well ventilated area on a level
surface.
INSTRUCTION No. 7-2348 (I.R. 6/13/02)
WARNING
The electrolyte (acid) produces a highly explosive
gas. Keep all sparks, flame and fire away from area
when charging battery or when handling electrolyte
or battery. Electrolyte (acid) is a highly corrosive
liquid. Wear eye protection. Wash affected areas
immediately after having eye or skin contact with
electrolyte (acid). Flush with clear water and neutralize
with baking soda. DO NOT OVER FILL!
3. Remove battery cell caps. Fill cells as required with
electrolyte (purchased separately) to proper level.
Fill to 3/16” above cell plates. Filling battery with
electrolyte will bring the battery to 80% charged
state.
Note
: 3/16” above cell plates is the recommended level.
DO NOT place anything in battery other than
specified electrolyte.
(OVER)
SEAT
SEAT/PEDESTAL
ASSEMBLY
BATTERY
SEAT KNOB