....
I
.,..
N
LoeAtlol\ Al\d ~ul\etio" of Part11
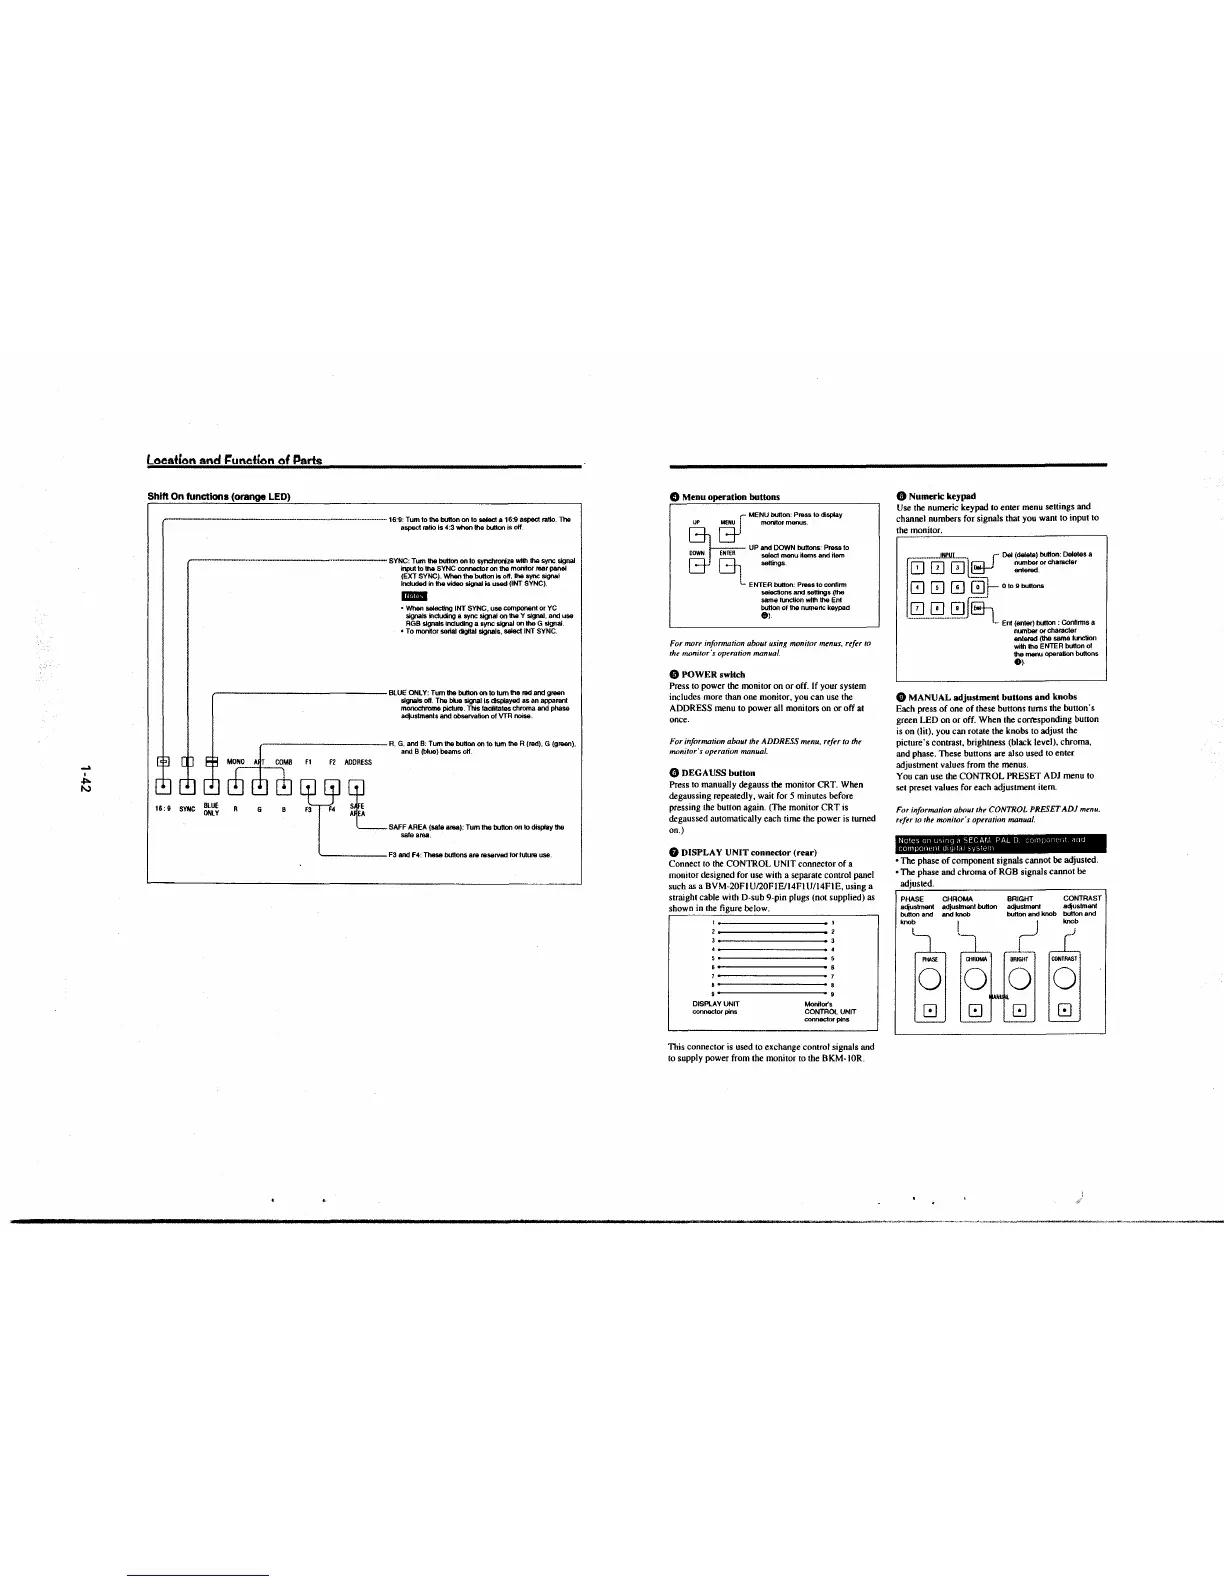
Shift On functions (orange LED)
---------·---·-·---·-·--···-···-····-·--· 16:9: Tum to the button on to &Meet a 16:9 aspect ratio. The
aspect ratio Is 4:3 when the button is off
-----·--·--------··--··----- SYNC: Tum
the button on to synchronize with 1ha sync signal
input to the SYNC connector on the monitor rear panel
(EXT SYNC). When the button Is off, lhe sync signal
included in the vtdeo signal .S used (INT SYNC).
1111111
• When selecting INT SYNC, use component or YC
signals induding a sync signal on the Y signal, and use
RGB signals including a sync signal on Iha G signal.
• To monitor serial <lgltat stgoals, select INT SYNC.
,----------------BLUE ONLY: Tum the button on to tum the red and green
signals otf. The blue signal is clsplayed as an apparent
monochrome picture. This facilitates chroma and phase
adjustments and observation of VTA noise.
BLU£
16:9
SYNC ONLY
the R (red), G (g,-i),
the button on to tum
__ R. G~r:i~ :~u;n beams off.
~
f2 ADDRESS
MB fl
M (!] ~s E buttonootodisplaylhe
F3 F4 A EA EA (sale area): Tum the
SAFF AR
sate area. ad f0< , .. u,., use.
buttons are raserv
F3 and F4: These
0 Menu operation buttons
~
ut>
MENU r ME~O::;';;;::;s to display
UP and DOWN buttons: Press to
select menu Items and item
G·· G1 settings.
!
L ENTER button: Press to confirm
selections and settings {the
same fLnCtkm with the Ent
button of the numeric keypad
9).
For nwre information about using monitor menus, refer to
the monitor's operation manual.
C, POWER switch
Press to power
the monitor on or off. If your system
includes more than one monitor, you can use the
ADDRESS menu to power all monitors on or off at
once.
For information about the ADDRESS menu, refer to the
monitor's operation manual.
0 DEGAUSS button
Press to manually degauss
the monitor CRT. When
degaussing repeatedly, wait for
5 minutes before
pressing the buuon again. (The monitor CRT is
degaussed automatically each time the power is turned
on.)
0 DISPLAY UNIT connector (rear)
Connect to the CONTROL UNIT connector of a
monitor designed for use with a separate control panel
such as a BVM-20FIU/20FIE/14FIU/14FIE, using a
straight cable with D-sub 9-pin plugs (not supplied) as
shown in the figure below.
,----------
DISPLAY UNIT
connector pins
Monitor's
CONTROL UNIT
connector pins
This connector is used to exchange control signals and
to supply power from the monitor to the BKM-IOR.
0 Numeric keypad
Use the numeric keypad to enter menu seuings and
channel numbers for signals that you want to input to
the monitor.
r
ITf0yctH~J
~
;EJ ~'";=~·.
~
0 0 01- OtoObuttons
_0,,0 0f&.1
··· Ent (enter) button : Confirms a
number Of character
entered (the same tUlCtion
with
lhe ENTER button of
the menu operation buttons
0)
Ci) MANUAL adjustment buttons and knobs
Each press of one of these buuons turns the buuon·s
green LED on or off. When the
corresponding buuon
is on (lit), you can rotate the knobs to adjust the
picture's contrast, brightness (black level). chroma,
and phase. These buttons are also used to enter
adjustment values from the menus
.
You can use the CONTROL PRESET ADJ menu to
set preset values for each adjustment item.
For information about the CONTROL PRESET ADJ menu,
refer to the monitor's operation manual.
Noles on using c1 SECAt,1 PAL D comr urF r,t ;rnrJ
component cJ191t,ll -;,y~tt:rn
• The phase of component signals cannot be adjusted.
• The phase and chroma of RGB signals cannot be
adjusted.
PHASE CHROMA BRIGHT CONTRAST
adjustment adjustment button adjustment act;uslment
button
and and knob button and knob button and
""°t~ l~ iJ _2_
6 0 ·® 0
1
G G
~
GI
--·-----··-.............. ___ , ________ _
 Loading...


