19
US
Getting Started – BASIC –
Follow the steps below to make the minimum
number of basic adjustments for using the
system.
1 Turn on the TV.
2 Press [/1.
Note
• Disconnect the headphones when you perform
the Quick Setup. You cannot operate steps after
8 with the headphones connected.
• Make sure that the function is set to “DVD.”
3 Switch the input selector on your TV so
that the signal from the system
appears on the TV screen.
[Press [ENTER] to run QUICK SETUP.]
appears at the bottom of the screen. If this
message does not appear, display the Quick
Setup and perform again (page 21).
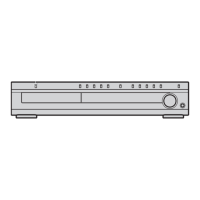
4 Press without inserting a disc.
The Setup Display for selecting the
language used in the on-screen display
appears.
5 Press X/x to select a language.
The system displays the menu and subtitles
in the selected language.
6 Press .
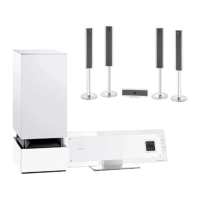
The Setup Display for selecting the aspect
ratio of the TV to be connected appears.
7 Press X/x to select the setting that
matches your TV type.
x If you have a 4:3 standard TV
[4:3 LETTER BOX] or [4:3 PAN SCAN]
(page 73)
x If you have a wide-screen TV or a 4:3
standard TV with a wide-screen mode
[16:9] (page 73)
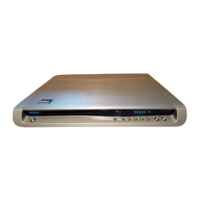
8 Press .
The Setup Display for selecting the speaker
formation appears.
9 Press C/c to select the speaker
formation image as the speakers are
actually positioned, then press .
For details, see “Getting Optimal Surround
Sound for a Room” (page 67).
Step 4: Performing the
Quick Setup
"/1
C/X/x/c,
DISPLAY
LANGUAGE SETUP
OSD:
MENU:
AUDIO:
SUBTITLE:
PORTUGUESE
FRENCH
ENGLISH
ENGLISH
SPANISH
SCREEN SETUP
TV TYPE:
16:9
4:3 PAN SCAN
4:3 LETTER BOX
JACKET PICTURE
ON
OFF
HDMI RESOLUTION:
SCREEN SAVER:
YC
B
C
R
/RGB (HDMI):
BACKGROUND:
BLACK LEVEL:
BLACK LEVEL
(COMPONENT OUT)
:
FULL
4:3 OUTPUT:
16:9
SPEAKER FORMATION
STANDARD
continued