Do you have a question about the Sony DSR-PD170 and is the answer not in the manual?
How to install the battery pack into the camcorder until it clicks.
Steps for charging the camcorder's battery pack, including normal and full charge.
How to connect the camcorder to a wall outlet using the AC adaptor for continuous power.
How to adjust the brightness of the camcorder's LCD screen for better visibility.
Tips for recording from a low camera angle using the viewfinder or rotated LCD panel.
Steps to take after completing a recording session, including powering off and ejecting.
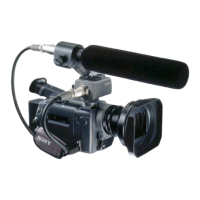
How to adjust the camcorder's viewfinder lens for clear focus.
How to use the camcorder's zoom lever and zoom ring for telephoto and wide-angle shots.
How to use the digital zoom function and its impact on picture quality.
Explanation of various indicators shown on the screen during recording, like battery time and tape status.
How to use the spot light function to prevent overexposure of faces in bright lighting.
How to monitor playback on the LCD screen and control screen indicators.
Information about monitoring sound when the LCD panel is closed.
Details on different playback modes like pause, search, skip scan, and slow playback.
Compatibility notes for playing back DV-formatted tapes recorded in SP mode.
Information on playing back cassettes recorded in a PAL system on the camcorder.
Explains the AUTO LOCK selector for manual or automatic function adjustments like iris and gain.
How to manually adjust the iris using the dial for depth of field control.
How to manually adjust the gain using the dial for controlling sound sensitivity.
How to manually adjust the shutter speed using the dial for controlling motion blur.
How to use the Neutral Density filter to adjust light levels in bright conditions.
How to use the zebra pattern to guide exposure and shutter speed adjustments.
How to disable the SteadyShot function to prevent automatic camera shake compensation.
Explanation of white balance indicators and recommended shooting conditions for optimal results.
How to set white balance manually by aiming at a white object.
Important notes and tips for white balance adjustment in various lighting conditions.
How to select audio channels for manual recording level adjustment via the menu.
How to set automatic gain control (AGC) for recording levels on channels.
Detailed steps for manually adjusting audio recording levels for channels 1 and 2.
Settings for input level, channel selection, and phantom power for connecting microphones.
Tips for reducing wind noise and safely unplugging microphones from the camcorder.
List of adjustable picture quality items and their corresponding setting values.
How to cancel, return to standard, or check custom preset settings.
How to use autofocus, manual focus, and the push auto focus function.
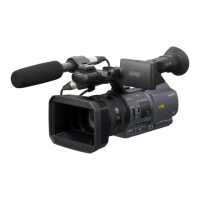
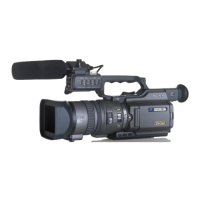
| Model | DSR-PD170 |
|---|---|
| Category | Camcorder |
| Image Sensor | 3x 1/3" CCD |
| Effective Pixels | 380, 000 pixels |
| Lens | Carl Zeiss Vario-Sonnar T* |
| Optical Zoom | 12x |
| Focal Length | 6-72mm |
| Viewfinder | Color LCD |
| Microphone | Built-in Stereo |
| Maximum Aperture | f/1.6 |
| Recording Format | DVCAM/DV |
| Audio Recording | 16-bit (48kHz) or 12-bit (32kHz) |
| Interface | IEEE 1394 (FireWire) |
| LCD Screen | 2.5" Color LCD |