EasyManua.ls Logo

Sony HCD-H700 - Using the Graphic Equalizer; Adjusting the Graphic Equalizer; Confirming the effect of the adjustment; Storing Your Individual Graphic Equalizer Settings - Personal File

Sony HCD-H700
91 pages
Print Icon
To Next Page IconTo Next Page
To Previous Page IconTo Previous Page
Loading...
SN
REED
SAB
BE
TE,
aig
ee
EURAIL,
Fe
gre
ON/OFF
CURSOR
CONTROL
64
TORS
PORT,
BT
Using
the
Graphic
Equalizer
ing
the
Graphic
izer
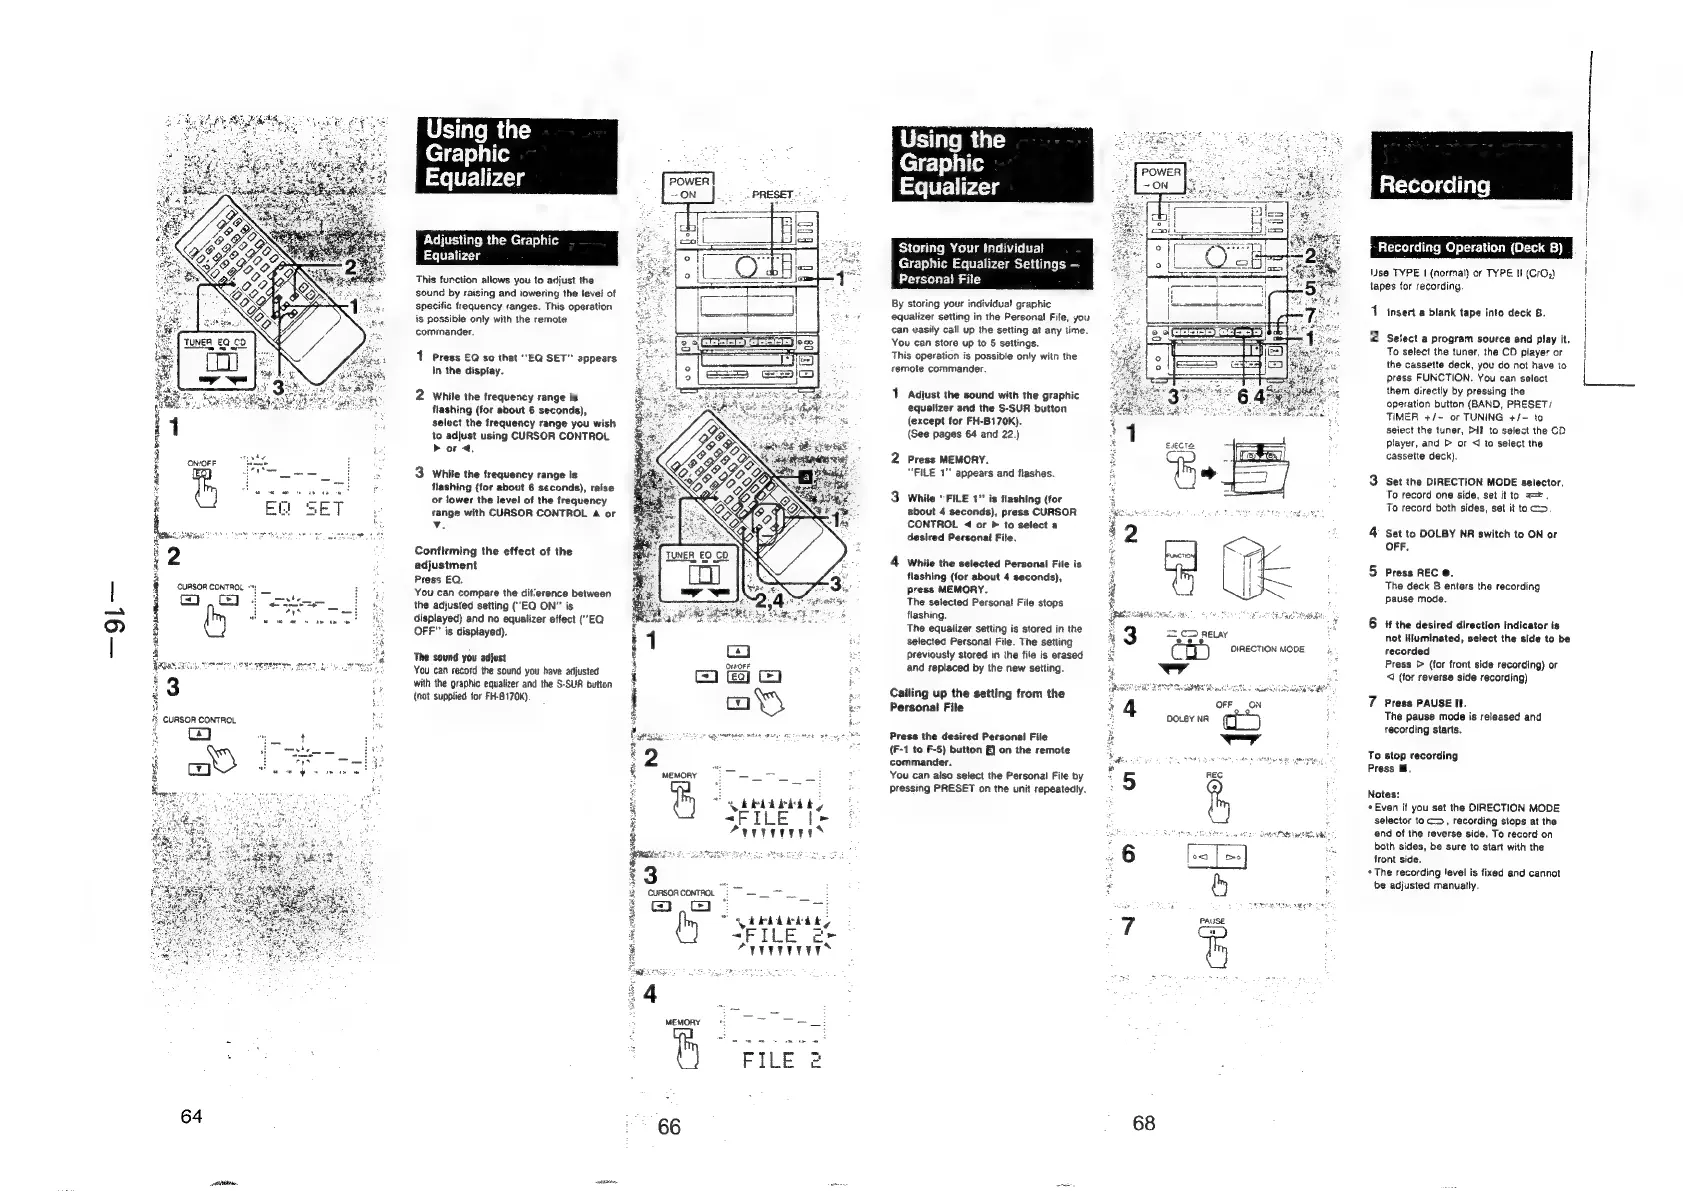
This
function
allows
you
to
adjust
the
sound
by
raising
and
iowering
the
level
of
specific
frequency
ranges.
This
operation
is
possible
only
with
the
remote
commander.
1
Press
£Q
so
that
“EQ
SET”
appears
in
the
display.
2
While
the
frequency
range
is
flashing
(for
about
6
seconds),
select
the
frequency
range
you
wish
to
adjust
using
CURSOR
CONTROL
>
or
4,
3
White
the
frequency
range
is
flashing
(for
about
6
seconds),
raise
or
lower
the
level
of
the
frequency
fange
with
CURSOR
CONTROL
4
or
be
Confirming
the
effect
of
the
adjustment
Press
EQ.
You
can
compare
the
dit‘erence
between
the
adjusted
setting
(‘EQ
ON”
is
displayed)
and
no
equalizer
effect
(“EQ
OFF"
is
displayed).
The
sound
you
adjust
You
can
record
the
sound
you
have
adjusted
with
the
graphic
equalizer
and
the
S-SUR
button
(not
supplied
for
FH-8170K).
COE
SLE
NRE
AR
ONE
REDO
nj
es
MEMORY
BOW
“—
Ce
oe
Fe
§
?
2
a
sui
MEMORY
The
et
f~
:
ms
rai
Using
the
Graphic
Equalizer
Storing
Your
Individual
Graphic
Equalizer
Settings
—
Personal
File
By
storing
your
individua!
graphic
equalizer
setting
in
the
Persona!
File,
you
can
easily
call
up
the
setting
at
any
time.
You
Can
store
up
to
§
settings.
This
operation
is
possible
only
witn
the
remote
commander.
1
Adjust
the
sound
with
the
graphic
equalizer
and
the
S-SUR
button
(except
for
FH-8170K).
(See
pages
64
and
22.)
2
Press
MEMORY.
“FILE
1”
appears
and
flashes.
3
While
“FILE
1”
is
flashing
(for
about
4
seconds),
press
CURSOR
CONTROL
<
or
P
to
select
a
desired
Personal
File.
4
While
the
selected
Personal
File
is
flashing
(for
about
4
seconds),
press
MEMORY.
The
selected
Persona!
File
stops
flashing.
The
equalizer
setting
is
stored
in
the
selected
Personal
File.
The
setting
previously
stored
in
ihe
file
is
erased
and
replaced
by
the
new
setting.
Cailing
up
the
setting
from
the
Persona!
File
Press
the
desired
Personal
File
(F-1
to
F-5)
button
€]
on
the
remote
commander.
You
can
also
select
the
Personal
Fite
by
pressing
PRESET
on
the
unit
repeatedly.
EJECTS
a
=P,
RELAY
DIRECTION
MODE
Fi
Ty
;
4
OFF
ON
DOLBY
NR
5
,
:
ne
LOG
Pe
aR
7
PAUSE
u
68
a
tererey
cellaye)
Recording
Operation
(Deck
B)
§
Vise
TYPE
|
(normal)
or
TYPE
I
(CrO.)
tapes
for
recording.
4
2
insert
a
blank
tape
into
deck
8.
Seiect
a
program
source
and
play
it.
To
select
the
tuner,
the
CD
player
or
the
cassette
deck,
you
do
not
have
to
press
FUNCTION.
You
can
select
them
directly
by
pressing
the
operation
button
(BAND,
PRESET/
TIMER
+/-
of
TUNING
+/-
to
seiect
the
tuner,
DIT
to
select
the
CD
player,
and
>
or
<
to
select
the
cassette
deck).
Set
the
DIRECTION
MODE
selector.
To
record
one
side,
set
itto
==.
To
record
both
sides,
set
it
too,
Set
to
DOLBY
NR
switch
to
ON
or
OFF,
Press
REC
@.
The
deck
8
enters
the
recording
pause
mode.
'f
the
desired
direction indicator
is
not
illuminated,
select
the
side
to
be
recorded
Press
>
(for
front
side
recording)
or
J
(for
reverse
side
recording)
Press
PAUSE
If.
The
pause
mode
is
released
and
recording
starts.
To
stop
recording
Press
@.
Notes:
*
Even
if
you
set
the
DIRECTION
MODE
selector
to
>,
recording
stops
at
the
end
of
the
reverse
side.
To
record
on
both
sides,
be
sure
to
start
with
the
front
side.
*
The
recording
!evel
is
fixed
and
cannot
be
adjusted
manually.