EasyManua.ls Logo

Sony HCD-H700 - Tape Dubbing (from deck A to B); Manual Dubbing; CD Recording; Fading Out at the Designated Time - Time Fade

Sony HCD-H700
91 pages
Print Icon
To Next Page IconTo Next Page
To Previous Page IconTo Previous Page
Loading...
2
3
tees
76
Bess
Bier
anol
ys
“4
a
Co
BELAY
DIRECTION
MODE
PAUSE
Tape
Dubbing
(from
deck
A
to
B)
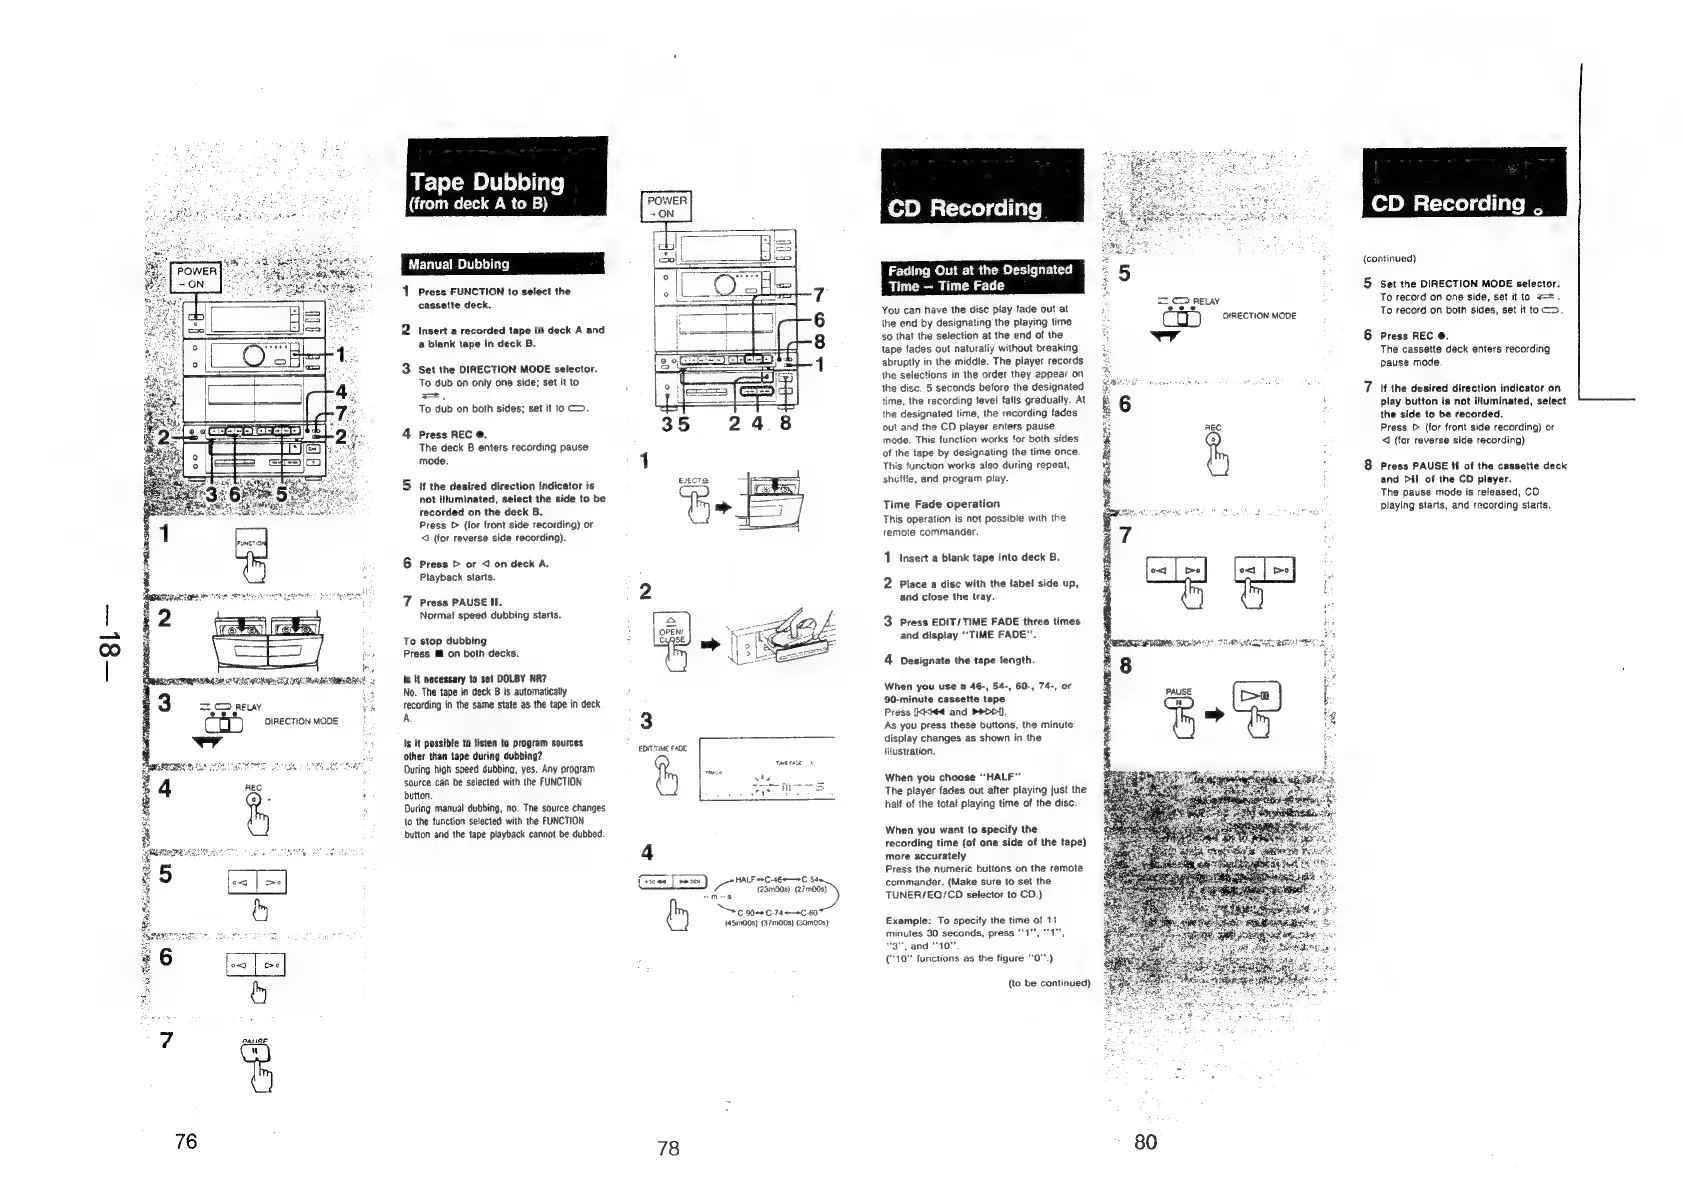
Manual
Dubbing
1
Press
FUNCTION
to
select
the
cassette
deck.
2
Insert
a
recorded
tape
in
deck
A
and
a
blank
tape
in
deck
B.
3
Set
the
DIRECTION
MODE
selector.
To
dub
on
only
one
side;
set
it
to
To
dub
on
both
sides;
set
it
to
>.
4
Press
REC
@.
The
deck
B
enters
recording
pause
mode.
5
if
the
desired
direction
Indicator
is
not
illuminated,
select
the
side
to
be
recorded
on the
deck
B.
Press
>
(for
front
side
recording)
or
<i
(for
reverse
side
recording).
for)
Press
D
or
<
on
deck
A,
Playback
starts.
7
Press
PAUSE
IE.
Normal
speed
dubbing
starts.
To
stop
dubbing
Press
@
on
beth
decks.
Is
it
necessary
to
set
DOLBY
NA?
No.
The
tape
in
deck
B
is
automatically
recording
in
the
same
state
as
the
tape
in
deck
A.
Is
it
possible
to
tisten
to
program
sources
other
than
tape
during
dubbing?
During
high
speed
dubbing,
yes.
Any
program
source
can
be
selected
with
the
FUNCTION
button.
During
manual
dubbing,
no.
The
source
changes
to
the
function
selected
with
the
FUNCTION
button
and
the
tape
playback
cannot
be
dubbed.
POWER
3
EDITTIME
FADE
TWERAUE
&
Se!
Gan
[rme)
HALF
s*C-46-—+C
$a
7
e008)
=)
“mes
Ss
c.g0e+
6-74.60
{4SmO0s}
(37m00s} (SOMCOs)
78
CD
Recording
Out
at
the
Designated
Time
—
Time
Fade
You
can
have
the
disc
play
fade
out
at
ihe
end
by
designating
the
playing
time
so
that
the
selection
at
the
end
of
the
tape
fades
out
naturally
without
breaking
abruptly
in
the
middle.
The
player
records
the
selections
in
the
order
they
appear
on
the
disc.
5
seconds
before
the
designated
time,
the
recording
tevel
falls
gradually.
At
the
designated
time,
the
recording
fades
out
and
the
CD
piayer
enters
pause
mode.
This
function
works
for
both
sides
of
the
tape
by
designating
the
time
once.
This
function
works
also
during
repeat,
shuffle,
and
program
play.
Time
Fade
operation
This
operation
is
not
possible
with
the
remote
commander.
1
inseit
a
blank
tape
into
deck
B.
2
Place
a
disc
with
the
tabel
side
up,
and
close
the
tray.
3
Press
EDIT/TIME
FADE
three
times
and
disptay
“TIME
FADE".
4
Designate
the
tape
tength.
When
you
use
a
46-,
54-,
60-,
74-,
or
90-minute
cassette
tape
Press
kks¢d
and
P>D>p>{.
As
you
press
these
buttons,
the
minute
display
changes
as
shown
in
the
iustration.
When
you
choose
‘‘HALF’’
The
player
fades
out
after
playing
just
the
half
of
the
total
playing
time
of
the
disc.
When
you
want
to
specify
the
recording
time
{of
one
side
of
the
tape)
more
accurately
Press
the
numeric
buttons
on
the
remote
commander,
(Make
sure
to
set
the
TUNER/EQ/CD
selector
to
CD.)
Example:
To
specify
ihe
time
of
11
minutes
30
seconds,
press
"1",
“1”,
"3",
and
“10°.
(10°
functions
as
the
figure
“0"".)
(to
be
continued)
80
OIRECTION
MODE
CD
Recording
,
>
(continued)
5
Set
the
DIRECTION
MODE
selector.
To
record
on
one
side,
set
it
to
==.
To
record
on
both
sides,
set
it
toc>.
Press
REC
©,
The
cassette
deck
enters
recording
pause
mode.
It
the
desired
direction
indicator
on
play
button
is
not
iNuminated,
select
the
side
to
be
recorded.
Press
&
(for
front
side
recording)
or
<1
(for
reverse
side
recording)
Press
PAUSE
if
of
the
cassette
deck
and
Dii
of
the
CD
player.
The
pause
mode
is
released,
CD
playing
starts,
and
recording
starts.