6 (E)
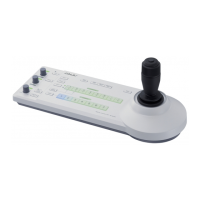
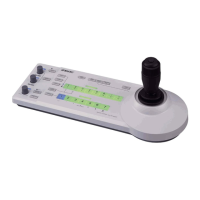
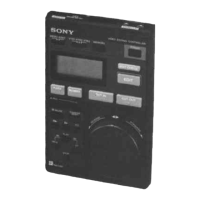
Locations and Functions of Parts
5 Black balance control block
a BLACK (black balance) controls
These controls are specified at the factory to adjust the
R/B black balance.
Using the RM Configuration menu, you can change
the function of these controls to adjust the R/B flare
balance.
The adjustment mode of these controls is specified at
the factory as Relative mode, which can also be
changed to Absolute mode using the menu.
See “Settings on the RM Configuration Menu” on page 9 (E).
b ABB (auto black balance) button (lights in red)
Press to automatically adjust the black balance and
black set.
The button lights during adjustment and goes dark
when adjustment is completed.
If you press this button when lit, the automatic
adjustment is canceled, and the button flashes. To stop
the flashing, press the button again.
Note
When the adjustment mode of the BLACK controls is
specified as Absolute mode, automatic black balance
adjustment with ABB button is disabled.
6 ACTIVE button (lights in green)
Press to select the control mode for the connected
camera system. Each time you press the button with
the factory setting, the control mode cyclically
switches among FULL, PART, and LOCK modes.
FULL mode: All controls from this unit are enabled
(panel active status). Both this button and the
IRIS/MB ACTIVE indicator in the iris/master
black control block light.
PART mode: Controls only from the iris/master
black control block are enabled (iris/master black
active status). This button goes dark, but the
IRIS/MB ACTIVE indicator stays lit.
LOCK mode: All controls from this unit are
disabled (lock status). Both this button and the
IRIS/MB ACTIVE indicator in the iris/master
black control block go dark.
BLACK
ABB
RB
ab
EXT
IRIS/MB ACTIVE
AUTO
MASTER
BLACK
IRIS
abc d
e
f
Using the RM Configuration menu, the function of this
button can be changed to switch only between FULL
and LOCK modes.
The RM Configuration menu operation is possible in
any mode.
See “Settings on the RM Configuration Menu” on page 9(E).
7 STANDARD button (lights in green)
When you press this button, the video camera is
initialized to its standard state, and the button lights for
several seconds.
If you press the button while lit, the video camera
retrieves the state before the button was lit.
8 Iris/master black control block
a MASTER BLACK control
Manually adjusts the master black level.
The adjustment mode of this control is specified at the
factory as Absolute mode, which can be changed to
Relative mode using the RM Configuration menu.
See “Settings on the RM Configuration Menu” on page 9 (E).
b EXT (lens extender) indicator (lights in amber)
Lights when the lens extender is used.
c AUTO button (lights in amber)
Press and light up the button to automatically adjust
the iris according to the amount of input light.
If you press the button when lit, it goes dark and
manual iris adjustment is enabled.
d IRIS/MB ACTIVE (iris/master black active)
indicator (lights in green)
Lights when the control mode is set as FULL or PART
mode with the ACTIVE button. When this indicator is
lit, iris/master black controls from this unit are
enabled.