Do you have a question about the Sony RM-LP211 and is the answer not in the manual?
Safety advice for device operation and handling.
Step-by-step instructions for inserting batteries correctly.
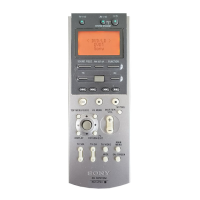
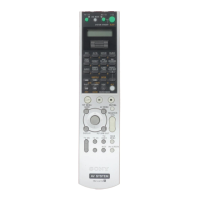
Detailed identification of remote buttons and display elements numbered 1-4.
Procedure for choosing and setting up a component from the function list.
Guide on how to choose and activate different sound field settings.
Step-by-step instructions for customizing the remote for various components.
Explains how to create and use macro sequences for multiple commands.
How to automatically power on components and switch inputs for Sony devices.
Steps to reset the remote and erase all programmed data.
Common issues and solutions for remote control malfunctions and operational problems.
This document provides operating instructions for the Sony RM-LP211 Remote Commander, a versatile remote control designed to manage various audio/video components. It offers a comprehensive set of features for controlling both Sony and non-Sony devices, allowing for a customized and streamlined user experience.
The RM-LP211 Remote Commander serves as a central control unit for your home entertainment system. Its primary function is to transmit infrared (IR) control signals to compatible receivers and other audio/video components, enabling users to power devices on/off, adjust settings, navigate menus, and perform various playback operations.
The remote features a prominent I/O switch to turn the receiver on or off. An AV I/O switch allows for powering on or off components that the remote is programmed to operate. When both the I/O switch and AV I/O switch are pressed simultaneously, it triggers a SYSTEM STANDBY function, turning off the main component and other connected Sony audio/video devices.
A Display window is centrally located, showing the current status of the selected component or a list of selectable items, providing immediate feedback to the user. The FUNCTION button is crucial for displaying a list of available components (functions) that the remote can control. This list can be customized to match the user's specific setup.
For audio control, the MASTER VOL +/- buttons adjust the volume level of all speakers simultaneously, while a MUTING button quickly silences the sound. The SOUND FIELD button displays a list of sound fields, allowing users to select their preferred audio experience.
The remote also includes dedicated TV buttons for controlling a connected television. These include TV/VIDEO to change the TV's input mode, WIDE to switch to wide mode, TV CH +/- for channel switching, and TV VOL +/- to adjust TV volume. A separate TV I/O switch turns the TV on or off.
Tape/disc operation buttons provide standard playback controls such as play, pause, stop, skip tracks, fast-forward/rewind, and search. These buttons are context-sensitive and operate differently depending on the selected component.
For menu navigation, the MAIN MENU button repeatedly selects menus (e.g., SURROUND) for the receiver. The TOP MENU/GUIDE button displays menus or guides for DVD players or SAT tuners on the TV screen. Similarly, the AV MENU button displays menus for VCRs, DVD players, or SAT tuners. The DISPLAY button selects information to be shown on the TV screen, and the RETURN/EXIT button allows users to go back to the previous menu or exit the current one.
A Control button is used for navigating and selecting settings within menus after pressing MAIN MENU, TOP MENU/GUIDE, or AV MENU. For VCR, DVD player, or SAT tuner menu operations, a specific procedure involving the FUNCTION button and selecting the component is required to enable cursor control for these devices.
The RM SET UP button displays a set-up list, which is the gateway to many of the remote's customization features. An Easy scroll key facilitates navigation through lists, allowing users to select items and confirm their choices. The </> buttons change the information displayed on the remote's screen, with the '<' button accessing the RECEIVER menu and the '>' button accessing the SUB menu or NUM menu for numeric value selection.
The RM-LP211 offers extensive customization and advanced operational features:
Inserting Batteries: The remote requires three R6 (size-AA) batteries, inserted with correct polarity. Batteries are expected to last approximately 3 months under normal conditions.
Selecting a Component: To control a specific device, users press the FUNCTION button, then use the easy scroll key to select the desired component from the displayed list (e.g., MD/DAT, CD/SACD, TUNER, PHONO). The remote then displays information about the selected component, including its category and maker. For tuners, an additional step involves selecting a preset station from a list. For tape decks, information about deck A or B can be displayed.
Selecting a Sound Field: Users can choose a sound field by pressing the SOUND FIELD button, then using the easy scroll key to select from the sound field list (e.g., NORMAL SURROUND, C.STUDIO EX A/B/C). To turn off the sound field, "AUTO DECODING" or "2CH STEREO" can be selected.
Programming the Remote: This is a key feature for customizing the remote to match connected components, including non-Sony devices. The process involves pressing RM SET UP, selecting "IR SET," choosing the component's jack (e.g., VIDEO 2), selecting its category (e.g., VCR), and finally selecting the maker (e.g., Aiwa). The remote can be programmed to control Sony components that it normally wouldn't. Users can also assign components to "USER 1" and "USER 2" items in the IR SET list for personalized control.
Macro Play: This advanced feature allows users to link up to 16 IR codes in a sequential order to be executed as a single command. This is programmed by accessing "IR SET" under RM SET UP, selecting "MACRO1" or "MACRO2," and then defining each step by selecting a component category, maker, and the specific IR code (function) to be performed. A "WAIT TIME" option allows for delays between IR code outputs, useful for ensuring components respond correctly. Macro play can be initiated by selecting the programmed macro from the FUNCTION list.
RECEIVER Menu Operations: By repeatedly pressing the '<' button, users can access the RECEIVER menu to adjust various settings such as TEST TONE, SB DECODING, NIGHT MODE, DIMMER, AUDIO SPLIT, INPUT MODE, EQ, SLEEP, and TRIGGER ON/OFF (North American models only).
Sorting Lists: The remote allows users to reorder the sound field list, function list, and SUB menu list. This is done via the "MENU EDIT" option under RM SET UP. Users can select an item and move it to a desired position within the list, customizing the display order for easier access.
Customizing the Function List: Users can choose which functions appear in the main function list, effectively hiding unused components for a cleaner interface. This is managed through "FUNCTION" under "MENU EDIT" in the RM SET UP menu.
Changing Function Names: The names of functions displayed on the remote can be customized (up to 8 characters) to better reflect the connected devices or user preferences. This is accessed via "NAME" under "FUNCTION EDIT."
Auto Power Function: When enabled, this feature allows the remote to automatically send codes to turn on appropriate Sony AV components and switch the TV to the selected input mode when a video function is selected. This only works for Sony components and is configured under "AUTO POWER" in the RM SET UP menu.
Adjusting Display Contrast: The contrast of the remote's display can be adjusted via the "CONTRAST" option in the RM SET UP menu, allowing users to optimize readability.
Switching Command Mode: The remote supports different command modes (AV SYSTEM1 or AV SYSTEM2) to match the receiver's mode. It also supports 2nd room mode and 3rd room mode (North American models only) for controlling components in other rooms using an optional IR repeater. This is configured under "COMMAND MODE" in the RM SET UP menu.
2nd Room Operation: With an optional IR repeater, the remote can control sources, volume, and power in a second room. The remote's command mode must be set to "2ND ROOM" for this functionality.
The manual provides important precautions and tips for maintaining the remote's functionality and longevity:
Safety: In case any solid object or liquid falls into the cabinet, users are advised to unplug the receiver and have it checked by qualified personnel before further operation.
Operation: Before connecting other components, ensure the receiver is turned off and unplugged.
Cleaning: The remote's cabinet, panel, and controls should be cleaned with a soft cloth slightly moistened with a mild detergent solution. Abrasive pads, scouring powder, or solvents like alcohol or benzine should not be used.
Battery Care:
Troubleshooting: The manual includes a troubleshooting guide for common issues, such as the remote not functioning (e.g., due to mismatched command modes, obstacles, weak batteries, incorrect function selection, or component incompatibility). It also addresses issues like the "empty battery" icon appearing in the display window (indicating low battery) and discrepancies between function names on the receiver and the remote (suggesting the need to select the correct function on the remote).
Clearing Memory: All programmed data and settings stored in the remote's memory can be cleared by accessing "ALL CLEAR" under RM SET UP and confirming the action. This feature is useful for resetting the remote to its default state or for resolving persistent programming issues.
Overall, the Sony RM-LP211 Remote Commander is designed for comprehensive control and high adaptability, making it a powerful tool for managing complex audio/video setups with a focus on user customization and ease of use.
| power requirements | 4.5 V DC |
|---|---|
| battery type | three R6 (size-AA) batteries |
| dimensions | 175 x 63 x 30 mm |
|---|---|
| mass | 125 g |