Location and Function of Parts and Controls
ENTER button
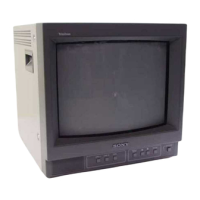
Front
2
LINE A/LINE B buttons
3
MENU buttons
4
UPOWER switch
and indicator
1 Speaker
2 LINE A/LINE B (input select) buttons
Press to select the program to be monitored.
Input signal
Signal fed through the LINE A connector
Signal fed through the LINE B connector
Press
LINE A
LINE B
3 MENU buttons
Press to make the menu appear.
For detailed information on MENU buttons, see “Operation
through On-Screen Menus” on page 10.
4 UPOWER switch and indicator
Press to turn the monitor on. The indicator lights in
green.
To turn the power off, press this again.
MENU/EXIT button
. button
> button
1
Speaker
7
1 LINE A connectors
Input connectors for the composite video, Y/C separate
video and audio signals and their loop-through output
connectors.
To monitor the input signal fed through these
connectors, press the LINE A button on the front
panel.
Note
The Y/C IN connector has priority over the VIDEO IN
connector.
When connecting the cable to the Y/C IN connector,
the Y/C IN connector is automatically selected and the
VIDEO IN connector is disconnected even if the cable
is connected.
Y/C IN connector (4-pin mini-DIN)
Connect to the Y/C separate output connector of a
video camera, VCR or other video equipment.
Y/C OUT connector (4-pin mini-DIN)
Loop-through output of the Y/C IN connector.
Connect to the Y/C separate input connector of a VCR
or another monitor.
When the cable is connected to this connector, the 75-
ohm termination of the input is automatically released,
and the signal input to the Y/C IN connector is output
from this connector.
VIDEO IN connector (BNC-type)
Connect to the video output connector of video
equipment, such as a VCR or a color video camera.
For a loop-through connection, connect to the video
output connector of another monitor.
VIDEO OUT connector (BNC-type)
Loop-through output connector of the VIDEO IN
connector. Connect to the video input connector for a
VCR or another monitor.
When the cable is connected to this connector, the 75-
ohm termination of the input is automatically released,
and the signal input to the VIDEO IN connector is
output from this connector.
AUDIO IN connector (phono jack)
Connect to the audio output connector of a VCR or
other equipment. For a loop-through connection,
connect to the audio output of another monitor.
AUDIO OUT connector (phono jack)
Loop-through output of the AUDIO IN connector.
Connect to the audio input connector of a VCR or
another monitor.
Rear Panel