Do you have a question about the Sony VO-9600P and is the answer not in the manual?
Details SP system, three-mode operation, Hi-Fi sound, and U-matic compatibility for clear pictures.
Covers remote control, dubbing, RS-232C interface, and search functions.
Explains time counter, programmed operation, time base corrector, and auto recording level.
Covers power, liquid, cord safety, installation, operation, and cleaning.
Advice on moving the unit and storing cassettes.
Explains the SP system for high-quality pictures and its compatibility with U-matic VTRs.
Details interchangeability of SP, high-band, and low-band modes with cassette types.
Compares carrier frequencies and cassette types for SP, high-band, and low-band modes.
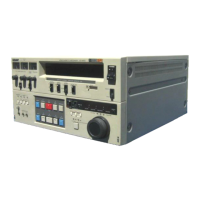
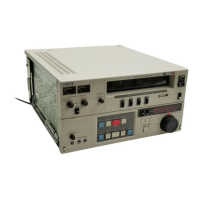
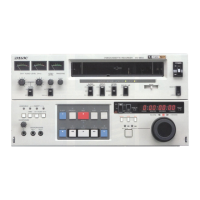
Overview of front panel components including buttons, meters, and displays.
Details the operation of EJECT, REC, PLAY, DUB, STOP, REW, F FWD, PAUSE buttons.
Explains the memory counter and its associated buttons for programmed operations.
Covers audio level controls, limiter, tracking, input select, and REC mode switches.
Explains indicators like AUTO OFF, STANDBY, FRAME CODE, DOLBY NR, and SP/HIGH.
Details buttons for SEARCH, programmed operation switch, and MARK IN A/B buttons.
Covers memory functions, resetting, and time counter display selection.
Illustrates the arrangement of connectors and ports on the rear panel.
Describes connectors for TV, VIDEO IN, DUB IN/OUT, RF OUT, and audio line in/out.
Explains SYNC IN, TBC switch, RX DATA, REMOTE, and RF modulator compartment.
Details connecting a video camera via BNC for recording.
Explains tape dubbing using VIDEO IN and AUDIO IN connectors.
Describes connecting for tape dubbing using the 7-pin DUB IN connector.
Details connecting a video monitor using the 8-pin VTR connector.
Explains connecting a video monitor without an 8-pin VTR connector.
Details connecting to a TV receiver using the RF OUT connector.
Explains connections for stereo systems and microphones.
Details connecting headphones and the unit to AC power.
Instructions for inserting and removing standard and small-size cassettes.
Provides tips on correct insertion and what to do if the STANDBY lamp remains lit.
Guidelines for handling, storage, and the function of the red button on cassettes.
Outlines necessary connections, monitor setup, timer, and tracking control settings.
Explains how to stop recording, use pause mode, and notes on automatic level adjustment.
Details powering on, inserting cassette, input/mode selection, and pressing REC.
Covers adjusting audio levels, using the AUDIO LIMITER, and monitoring sound during recording.
Explains how to monitor recorded sound via headphones or monitor speakers.
Instructions for adding new audio (music, commentary) on channel 1, overwriting previous sound.
Covers connecting sound sources, inserting tape, setting switches, and starting dubbing.
Steps to record sound on a tape at a specific point using pause and dubbing functions.
Instructions for erasing tape content by recording blank material or running the tape to the end.
Outlines necessary connections, monitor setup, timer, and switch settings for playback.
Explains how to stop playback, use pause mode, and resume playback.
Details powering on, inserting cassette, setting audio monitor, and pressing PLAY.
Explains indicators like DOLBY NR, SP/HIGH, FRAME CODE, and conditions for frame code reading.
Instructions for adjusting the SKEW lever to fix picture distortion.
Instructions for adjusting the TRACKING control to resolve snow or streaks.
Details using the search dial to locate desired portions at various speeds.
Provides notes on guardband noise and TBC interaction during search.
Steps to use MARK IN A and PROGRAMMED OPERATION switch to locate specific points.
Notes on using the search dial and limitations for repeat playback.
Instructions for setting MARK IN A and B points to repeatedly play a segment.
How to check memorized points and stop repeat playback operations.
Steps to set MARK IN B and MARK IN A for repeating playback from tape start to a specific point.
Steps to set MARK IN A and MARK IN B for repeating playback from a point to the tape end.
Explains conditions and use of frame codes for programmed operations.
Details connecting a time base corrector for optimal picture quality during playback.
Explains connecting a timer and setting times for unattended recording or playback.
Notes on returning the TIMER switch to OFF and function button behavior.
Steps for installing the optional RF modulator into the unit's compartment.
Steps for setting the antenna selector, TV receiver, and recorder for playback on a TV.
Details using the RM-690 remote control unit and its corresponding functions.
Explains using optional auto search control units for locating points via CTL signals.
Describes address search by time and segment search using the RX-353CE.
Details using the RX-707 with frame codes for precise locating and programmed operations.
Explains connecting a computer using the BKU-701 and RS-232C interface for control.
Provides dimensions and guidance for mounting the unit in a standard 19-inch rack.
Details recording system, video signal, inputs, outputs, and resolution.
Covers audio inputs/outputs, S/N, tape speed, and tape compatibility.
Lists power requirements, consumption, operating conditions, dimensions, and weight.
Lists optional accessories available for the VO-9600P.
Basic checks for power cord, power switch, and connections.
Addresses issues like AUTO OFF lamp, tape stopping, STANDBY lamp, and cassette ejection.
Provides solutions for cassette insertion, tape not running, recording issues, and picture problems.
Explains moisture detection, AUTO OFF lamp, and recommended actions.
Steps for cleaning the video head using a cleaning cassette to resolve picture issues.
Information on checking head life and when to consider replacement.
| Video System | PAL |
|---|---|
| Tape Format | U-matic |
| Tape Speed | 9.53 cm/s |
| Recording Time | Up to 60 min with KCA-60 tape |
| Input/Output Connectors | BNC |
| Operating Temperature | 5°C to 40°C (41°F to 104°F) |