INSTALLATION PREPARATION - NEW CONSTRUCTION
When installing the speakers in new construction, please follow these
instructions carefully:
1. Determine Placement
Determine where in the ceiling the speakers will be placed using the
recommendations under SPEAKER PLACEMENT. Pay careful attention
to the section on avoiding obstructions.
2. Mount InstaLLock Bracket
For best results, mount the SpeakerCraft InstaLLock New Construction
Brackets for the TIME Mini Series following the instructions included with
the bracket.
3. The Location is Ready for Drywall
The bracket provides a stable opening around which the drywall in-
staller can cut out an opening, providing a perfect location for instal-
lation of the TIME Mini Series speaker. IMPORTANT: Due to the small size
of the speaker and its ange, the hole must be cut to a tighter toler-
ance than most in-ceiling speakers. Please be careful to avoid cutting
the hole too big and to keep the cut clean and smooth.
INSTALLATION PREPARATION - FINISHED CEILING
When the speakers will be installed into a finished ceiling, please follow
these instructions carefully:
1. Determine Placement
Determine where in the ceiling the speakers will be placed using the
recommendations under SPEAKER PLACEMENT. Make sure that there
are no joists or obstructions where you plan to install the speaker. Pay
careful attention to the section on avoiding obstructions.
2. Trace Template
Place the cut-out template at the location you have decided to
place the speaker. Use a few pieces of tape or small tacks to hold the
template in place. Trace an outline on the ceiling with a pencil.
3. Cut the Hole
IMPORTANT: Due to the small size of the speaker and its ange, the
hole must be cut to a tighter tolerance than most in-ceiling speakers.
Please be careful to avoid cutting the hole too big and to keep the
cut clean and smooth. CAUTION: This is the most important part of the
entire installation. If you are not certain whether or not an obstruction
exists behind the desired mounting area, you should start by cutting
a small hole in the center of your penciled circle with a drywall saw.
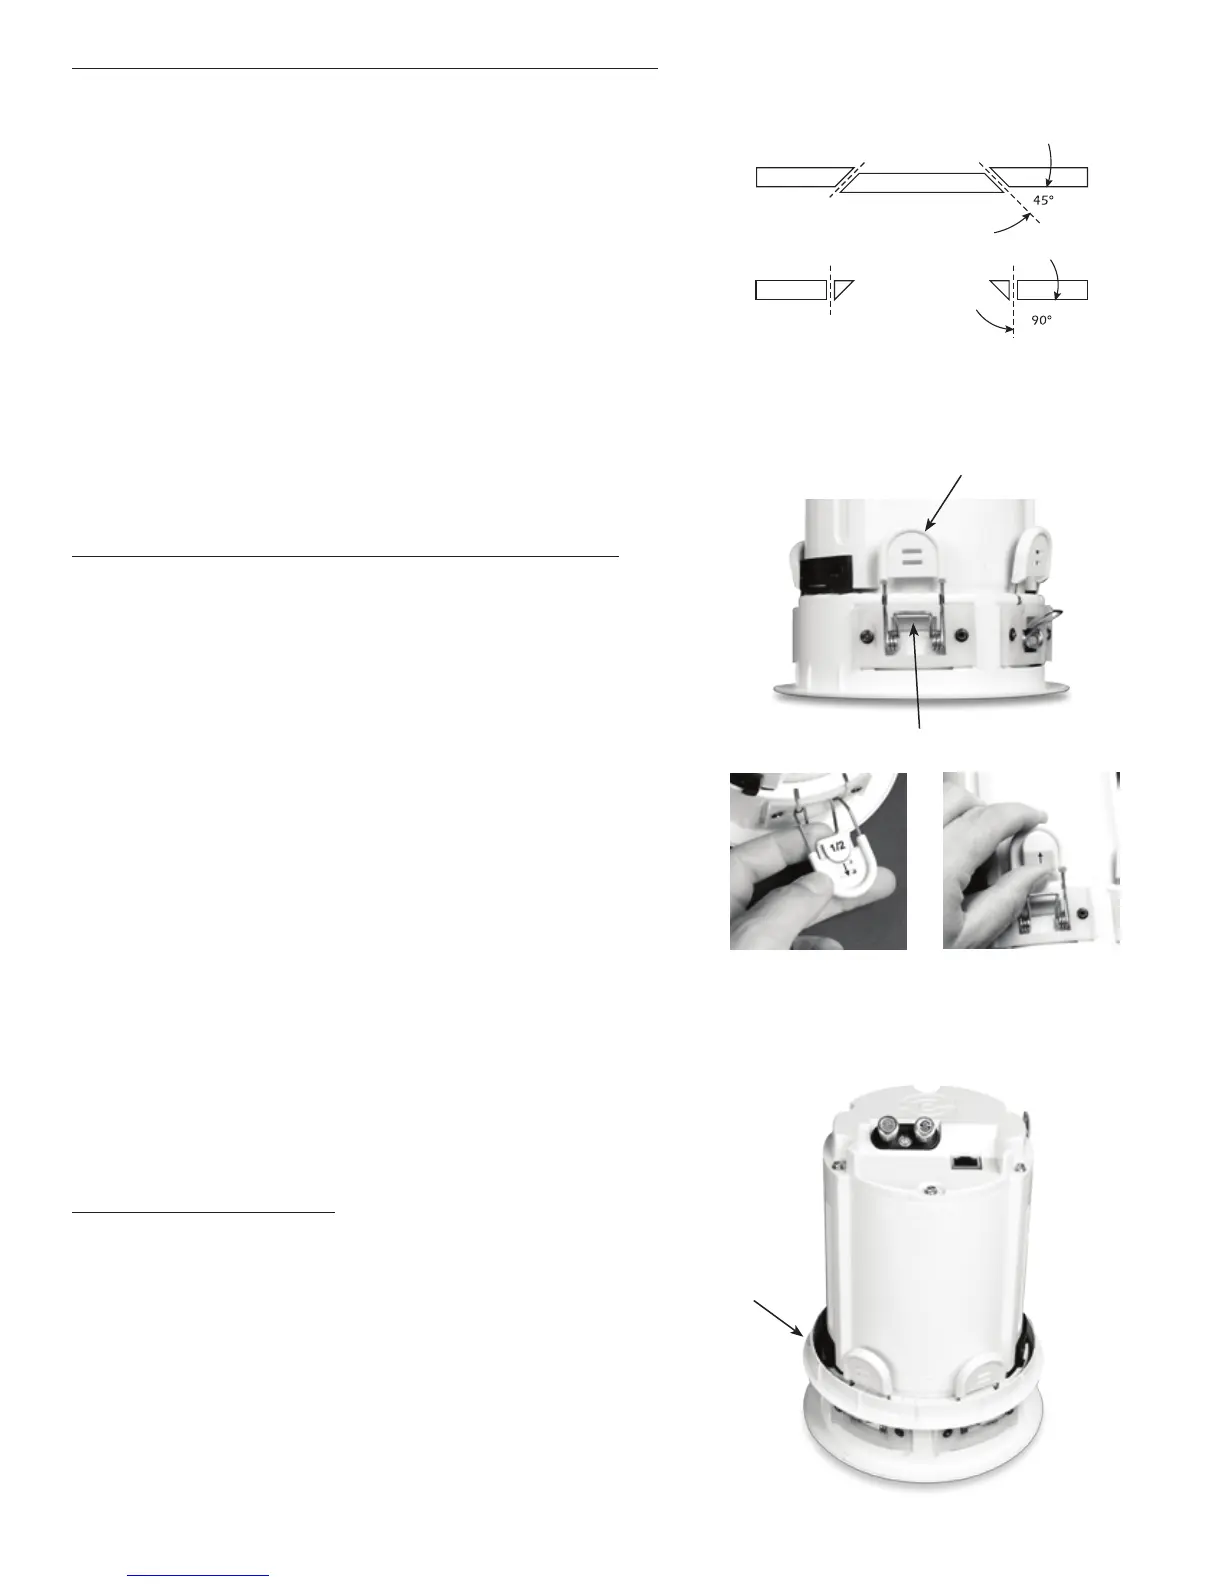
Cut at a 45˚ angle toward the inside of the hole (See Figure 3). Cut-
ting the small hole at this angle will make drywall repair much easier
as the piece cut out can be installed neatly back into the hole. Once
you have determined that there are no obstructions in your desired
mounting location, start cutting the nished hole at a 90˚ angle to the
ceiling surface.
SPEAKER INSTALLATION
The unique snap-in installation of the speaker allows for quick installa-
tion by following these easy steps:
1. Prepare the speaker
Determine the ceiling thickness. The speaker allows for three drywall
thicknesses: 5/8”; 1/2"; 3/8”. The speaker's default drywall thickness is
5/8”. If you need to change this, simply insert either the 1/2" or 3/8"
spacer onto each mounting foot. See Figure 4. Insure that the plas-
tic mounting ring is pushed up to rest against the spring clip feet as
shown in Figure 5.
SIDE VIEW OF CEILING
First Cut
Second Cut
FIGURE 3
2
FIGURE 4
Mounting Foot
Spring Clip
FIGURE 5
Mounting Ring