EasyManua.ls Logo

Speakman CPT-1000-TP - User Manual

Speakman CPT-1000-TP
3 pages
Print Icon
To Next Page IconTo Next Page
Loading...
INSTRUCTIONS FOR MODELS
NEED HELP?
92-CPT-1000-TP-R1
For additional assistance or service please contact:
SPEAKMAN
®
Company
400 Anchor Mill Road
New Castle, DE 19720
800-537-2107
customerservice@speakmancompany.com
www.speakmancompany.com
CPT-1000-TP
CPT-1300-TP
TOOLS AND SUPPLIES
IMPORTANT
SAFETY TIPS
Cover your drain to prevent loss of parts. Be sure to
always wear proper eye protection.
MAINTENANCE
Your new Valve Trim is designed for years of
trouble-free performance. Keep it looking new by
cleaning it periodically with a soft cloth. Avoid
abrasive cleaners, steel wool, and harsh chemicals as
these will dull the finish and void your warranty.
WARRANTY
Additional warranty information can be found at:
www.speakmancompany.com
Phillips
Screwdriver
• Circular Trim Package shown for reference. While
the appearance of your trim may be different, the
installation steps are the same.
• This Trim Package is intended to mount to the
following Speakman valve. Please verify the model
of your valve prior to installation.
SPEAKMAN
®
SentinelPro
®
CPV-5000 Thermostatic / Balance Pressure Valve
*NOT FOR USE WITH DIVERTER/VOLUME CONTROL MODELS
Measuring
Tape
1
Clean front surface of wall. Install Valve Mounting Plate (1) to Speakman Valve, using the 8-32 x
1-1/8” screws (2) provided. Take care to not over tighten mounting screws.
NOTE: The Valve Mounting Plate Assembly (1) should sit flush against the Speakman Valve when
installed correctly.
2
NOTE: The back surface of the Valve Mounting Plate Assembly (1) should sit flush against the wall when
installed correctly.
Secure the Wall Mounting Plate (1) to the Valve Mounting Plate (2) using the 8-32 X 2½” Screws
(3) provided.
Question and Answer IconNeed help?

Do you have a question about the Speakman CPT-1000-TP and is the answer not in the manual?

Summary

Installation Instructions

Install Valve Mounting Plate

Install Valve Mounting Plate to Speakman Valve using provided screws, ensuring not to overtighten.

Secure Wall Mounting Plate

Attach the Wall Mounting Plate to the Valve Mounting Plate using the specified screws.

Important Installation Notes

Trim Package Reference

Circular trim package shown for reference; installation steps are the same for different trims.

Safety and Maintenance

Safety Tips

Cover drain to prevent part loss and wear eye protection during installation.

Maintenance Recommendations

Clean trim periodically with a soft cloth; avoid abrasive cleaners to preserve finish and warranty.

Warranty and Support

Warranty Information

Additional warranty information is available on the Speakman website.

Customer Support

Contact Speakman for assistance or service via phone, email, or website.

Valve Trim Installation Steps

Select Spindle Adapter

Measure valve spindle distance to select the correct shallow or deep spindle adapter.

Install Spline Adapter

Insert and secure the selected Spline Adapter onto the valve spindle in a vertical orientation.

Attach Decorative Wall Plate

Orient and slide the decorative wall plate with index buttons onto the wall mounting plate.

Mount Handle Assembly

Guide handle assembly onto spline adapter, thread escutcheon onto wall mounting plate, and tighten.

Repair Parts Identification

Rough-In Dimensions

CPT-1000-TP Dimensions

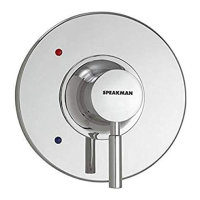
Detailed rough-in dimensions for the CPT-1000-TP model.

CPT-1300-TP Dimensions

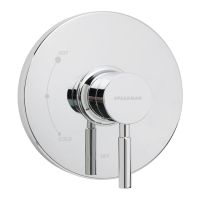
Detailed rough-in dimensions for the CPT-1300-TP model.

Speakman CPT-1000-TP Specifications

General IconGeneral
BrandSpeakman
ModelCPT-1000-TP
CategoryPlumbing Product
LanguageEnglish

Related product manuals