EasyManua.ls Logo

Speakman WS-3005 - User Manual

Default Icon
2 pages
Print Icon
To Next Page IconTo Next Page
Loading...
INSTRUCTIONS FOR MODELS
92-WS-30XX-02
For additional assistance or service please contact:
SPEAKMAN
®
800-537-2107
customerservice@speakman.com
www.speakman.com
WS-3005
WS-3010
HELPFUL TOOLS & SUPPLIES:
TOOLS AND SUPPLIES
Level
Measuring
Tape
Phillips
Screwdriver
Pencil
Drill
Drill Bit
3/16”
Tile Drill Bit
3/16”
Mounting Hardware
(included)
Hex Key
Wrench, 2.5mm
(included)
Slip Joint
Wrench
Thread Seal
Tape
(included)
Tubing
Cutter
Warranty information can be found at:
www.speakman.com
WARRANTY
MAINTENANCE
Cover your drain to prevent loss of parts. Be sure
to follow all tool manufacturers safety guidelines.
Use caution when drilling into walls to avoid
electrical and plumbing lines hidden within
the wall.
SAFETY TIPS
IMPORTANT
Do not over-tighten any connections or damage
may occur.
Be sure to read instructions thoroughly before
beginning installation.
• This item is NOT designed for use as a grab bar.
Do not mount in locations where product is likely
to be used as a grab bar.
Your new Speakman Product is designed for years of
trouble-free performance. Keep it looking new by
cleaning it periodically with a soft cloth. The use of harsh
chemicals and abrasives on any of the Speakman custom
finish products may damage the finish and void the
product warranty. Please be sure to only use approved
cleaners. Please contact Speakman for any clarification
of acceptable cleaners.
1
If present, remove existing Shower Arm and
Flange from the wall (1). Ensure Female Pipe
Fitting within the wall is secure.
2
Apply Thread Seal Tape to Adapter (1) in a
counter-clockwise direction. Thread Adapter (1)
into Female Pipe Fitting within the wall with a
Slip Joint Wrench. Ensure the Adapter is level
and plumb.
IMPORTANT: Turn on water supplies and
check for leaks. If no leaks are present, turn off
water supplies and continue.
Measure and mark a line on the adapter at
1½"-2" from the finished wall surface. Cut
remaining section free from adapter using a
tubing cutter. Be sure to debur the edges after
cutting.
Note: Grip the Adapter
towards the end so the
edges do not pinch when
cutting.
Note: Turn on water supplies and check
for leaks BEFORE cutting the Adapter.
1½”
-
2”
3
Install the top and bottom Mounting Flanges (1)
to the Slide Bar assembly. Align mounting holes
so they are horizontal. Snug the Set Screws (2)
to temporarily secure the Mounting Flanges to
the Slide Bar assembly.
X2
2.5mm
4
Align and install the Slide Bar assembly over the
Adapter. Ensure there is proper engagement
with the water inlet tube. Position the Mounting
Flanges flush with wall surface. Orient Slide Bar
so that it is perfectly vertical.
5
Once the Slide Bar is aligned and flush with wall
surface, mark the four (4) mounting locations.
Remove Slide Bar assembly from Wall.
X4
Note: If the O-Ring (1) becomes dislodged
onto the Adapter, remove from Adapter
and position back into the Arm Brace.
6
Drill 3/16” hole in marked locations. If drilling
into tile, be sure to use a drill bit designated for
tile. Push the Plastic Anchors (x4) into the drilled
holes until they are flush with the wall.
Ø 3/16”
X4
Note: If mounting directly into stud or wood wall,
Mounting Anchors are not required. Use the included
Mounting Screws to secure the Mounting Flanges to
structure. Plastic Anchors provided may not be
suitable for all types of wall construction, seek
professional help if in doubt.
7
Position the Slide Bar assembly over the Adapter
and align to final mounting position as shown in
STEP 4. Secure Mounting Flanges with the
Mounting Screws (1) provided. Loosen but do
not remove the previously tightened Set Screws
(2). Remove Slide Bar assembly from the
installed Mounting Flanges.
X4
2.5mm
8
Slide the Decorative Cover Plates (1) into
position over the posts of the Slide Bar assembly.
Install Slide Bar over the Adapter and Mounting
Flanges. While pressing the Slide Bar assembly
towards the wall, secure the assembly to the
Upper and Lower Mounting Flanges by
tightening Set Screws (2).
X2
2.5mm
9
Position Flange Cover Plates over the Mounting
Flanges. Optional: Apply silicone where cover
plate meets the wall.
X2
10
Orient the Hand Held Shower Bracket to your
desired position. Adjustments are made by
pressing the Button (1) down to release the
position, and then releasing to lock into the
desired position.
Question and Answer IconNeed help?

Do you have a question about the Speakman WS-3005 and is the answer not in the manual?

Summary

General Information and Safety

Tools and Supplies

List of tools and supplies required for installation, including common household tools and included items.

Important Safety Precautions

Key safety warnings and advisories to ensure safe installation and product use.

Maintenance and Warranty

Guidelines for product maintenance and information on where to find warranty details.

Installation Steps

Step 1: Remove Existing Fixtures

Remove the old shower arm and flange from the wall, ensuring the female pipe fitting is secure.

Step 2: Install Wall Adapter

Apply thread seal tape to the adapter and thread it into the wall fitting, ensuring it is level and plumb.

Step 3: Mount Flanges to Slide Bar

Install the top and bottom mounting flanges onto the slide bar assembly, securing them temporarily.

Step 4: Align Slide Bar Assembly

Align the slide bar assembly over the adapter, ensuring proper engagement with the water inlet tube and flush wall surface.

Step 5: Mark Mounting Locations

Mark the four mounting locations on the wall once the slide bar is aligned and flush.

Step 6: Drill Holes and Insert Anchors

Drill 3/16" holes at marked locations and insert plastic anchors flush with the wall.

Step 7: Secure Mounting Flanges

Position the slide bar assembly over the adapter and secure the mounting flanges with screws.

Step 8: Install Slide Bar Assembly

Slide decorative cover plates into position, then install and secure the slide bar assembly to the mounting flanges.

Step 9: Position Flange Cover Plates

Position the flange cover plates over the mounting flanges, with an optional silicone seal.

Step 10: Adjust Hand Held Shower Bracket

Orient the hand held shower bracket to the desired position by pressing the button to release and lock.

Step 11: Install Shower Accessories

Install shower accessories and turn on water supplies to check for leaks.

Step 12: Operate Diverter

Operate the diverter between the shower head and hand held shower, checking for leaks.

Product Diagrams and Parts

Repair Parts List

List of part numbers and descriptions for WS-3005/WS-3010 repair components.

WS-3005 Rough-In Diagram

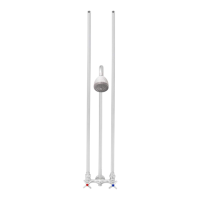
Diagram illustrating rough-in dimensions and hook-up points for the WS-3005 model.

WS-3010 Rough-In Diagram

Diagram illustrating rough-in dimensions and hook-up points for the WS-3010 model.

Overview

This document provides comprehensive instructions for the installation, use, and maintenance of the Speakman WS-3005 and WS-3010 shower systems. It serves as a complete guide for both professional installers and end-users, ensuring proper setup and long-term performance of the product.

Function Description

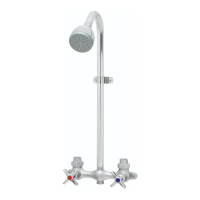
The Speakman WS-3005 and WS-3010 are shower systems designed to provide a customizable showering experience. At their core, these systems integrate a shower arm, a diverter, and a hand-held shower bracket, allowing users to switch between a fixed shower head and a hand-held shower. The primary function is to deliver water efficiently and safely, offering flexibility in how the water is directed during a shower. The system is built around a robust slide bar assembly, which not only provides structural support but also allows for vertical adjustment of the hand-held shower bracket, catering to different user heights and preferences. The diverter mechanism is crucial for directing water flow either to the main shower head or to the hand-held shower, enhancing the versatility of the system. The design emphasizes ease of installation and durability, ensuring a reliable and enjoyable showering experience for years to come.

Usage Features

The Speakman WS-3005 and WS-3010 systems are engineered with several user-friendly features that enhance the daily showering routine.

  • Adjustable Hand-Held Shower Bracket: A key feature is the adjustable hand-held shower bracket, which can be easily moved up or down along the slide bar. This adjustment is facilitated by a button mechanism: pressing the button releases the bracket, allowing it to slide to the desired position, and releasing the button locks it securely in place. This flexibility is particularly beneficial in households with users of varying heights, as it ensures that the hand-held shower is always at a comfortable and accessible level.
  • Diverter Functionality: The system includes a diverter that allows users to seamlessly switch the water flow between the main shower head and the hand-held shower. This feature provides convenience and choice, enabling users to select their preferred showering method at any given moment. For example, one might use the main shower head for a general rinse and then switch to the hand-held shower for targeted cleaning or rinsing specific areas.
  • Robust Installation: The installation process is designed to be straightforward yet secure. The slide bar assembly is mounted to the wall using mounting flanges and screws, ensuring a stable and durable setup. The instructions emphasize proper alignment and securing of components, which contributes to the overall stability and longevity of the system during daily use.
  • Compatibility with Shower Accessories: The system is designed to be compatible with various shower accessories, such as shower heads and hoses (though these are not included and are shown for reference only). This allows users to customize their shower experience further by selecting accessories that best suit their needs and aesthetic preferences.
  • Safety Considerations: The manual highlights important safety tips, such as covering the drain to prevent loss of parts during installation and exercising caution when drilling into walls to avoid hidden electrical or plumbing lines. It also explicitly states that the item is NOT designed for use as a grab bar, reinforcing safe usage practices.
  • Leak Prevention: The installation steps include critical points for checking for leaks, particularly after applying thread seal tape to the adapter and before cutting the adapter. This proactive approach ensures that the system is watertight from the outset, preventing potential water damage and ensuring efficient operation.
  • Deburring Edges: After cutting the adapter with a tubing cutter, the instructions advise deburring the edges. This small but important detail prevents sharp edges that could potentially cause injury or damage other components, contributing to a safer and more refined installation.

Maintenance Features

Maintaining the Speakman WS-3005 and WS-3010 shower systems is straightforward, focusing on preserving their aesthetic appeal and functional integrity over time.

  • Routine Cleaning: The primary maintenance recommendation is periodic cleaning with a soft cloth. This simple routine helps keep the product looking new and prevents the buildup of soap scum or mineral deposits.
  • Avoid Harsh Chemicals and Abrasives: A crucial aspect of maintenance is the explicit warning against using harsh chemicals and abrasives. These substances can damage the custom finish of Speakman products and may void the product warranty. This guidance ensures that users employ appropriate cleaning methods that are gentle on the finish.
  • Approved Cleaners Only: Users are advised to only use approved cleaners. If there is any doubt or need for clarification regarding acceptable cleaners, Speakman customer service should be contacted. This proactive approach helps users select safe and effective cleaning solutions, protecting the product's finish and extending its lifespan.
  • Durable Construction: The systems are designed for "years of trouble-free performance," indicating a robust construction that minimizes the need for frequent repairs or intensive maintenance. The quality of materials and manufacturing contributes to the product's longevity.
  • Cartridge Replacement: The repair parts list includes a "CARTRIDGE" (RPG05-106295), indicating that this component is replaceable. While not a routine maintenance task, the availability of replacement cartridges suggests that internal functional parts can be serviced if necessary, extending the overall life of the system beyond just its external components.
  • Mounting Hardware and Set Screws: The repair parts also list "MOUNTING HARDWARE AND SET SCREWS" (RPG48-106204). This ensures that if any of these critical installation components are lost or damaged during future maintenance or adjustments, replacements are available, allowing for continued secure mounting of the system.
  • Wand Holder Replacement: A "WAND HOLDER" (RPG04-107286) is also listed as a repair part. This component, which is part of the adjustable hand-held shower bracket, can be replaced if it becomes worn or damaged, ensuring the continued functionality of the hand-held shower's positioning mechanism.
  • Warranty Information: The availability of warranty information on the Speakman website (www.speakman.com) provides users with details on coverage and terms, offering peace of mind regarding potential manufacturing defects or performance issues. This encourages proper maintenance to ensure the warranty remains valid.

In summary, the Speakman WS-3005 and WS-3010 shower systems are designed for ease of use, flexibility, and long-term durability, with clear guidelines for installation and maintenance to ensure optimal performance and user satisfaction.

Speakman WS-3005 Specifications

General IconGeneral
ModelWS-3005
Product TypeShower Head
MaterialBrass
FinishChrome
Flow Rate2.5 GPM
Shower Head TypeFixed
WarrantyLimited Lifetime

Related product manuals