Do you have a question about the Spectra Stack and is the answer not in the manual?
Steps to unpack library modules from shipping containers, including inspection and removal of packaging.
Instructions for installing rack mounting hardware for library modules, ensuring compatibility with square hole racks.
Procedure to move protective covers from the Control Module to Expansion Modules if applicable.
Safety advice regarding module weight, lifting, and proper rack installation with leveling jacks.
Steps to physically install library modules into a server rack using rail assemblies and thumbscrews.
Procedures for aligning installed library modules for proper robot movement between them.
Instructions for installing half-height and full-height tape drives into the library's drive bays.
Guide for connecting Ethernet cables and power cords to the library's modules.
Instructions for connecting Fibre Channel and SAS cables to tape drives.
Steps to power on the library module using the front panel power button.
Procedure to configure internal IP addresses to avoid network conflicts during initialization.
Steps to access the user interface via the OCP screen and log in.
Procedure to set the administrator password for initial library setup and RMI access.
Steps to configure network settings like hostname, domain, and IP addressing.
Setting the library's timezone, date, and time format for accurate logging.
Finalizing and applying configuration changes made during the initial wizard.
Procedure to configure the encryption password required for using encryption standard.
Process of entering activation keys via RMI to enable library features.
Using the Basic Wizard to define partition schemes with available drives and slots.
Methods for importing tape cartridges via the EE port or bulk loading magazines.
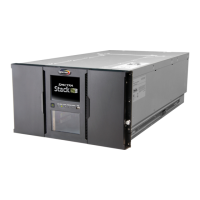
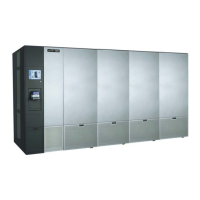
The Spectra Stack Tape Library is a modular, expandable storage solution designed for data backup operations. It begins with a 6U controller module that can hold up to 80 tape cartridges and up to six half-height LTO tape drives, three full-height LTO tape drives, or a combination of both. As storage needs grow, the library can be expanded by adding up to six 6U expansion modules. Each expansion module adds capacity for another 80 tape cartridges and six half-height LTO tape drives or three full-height LTO tape drives. When fully configured with a controller module and six expansion modules, the Spectra Stack can store up to 560 tape cartridges and accommodate 42 half-height drives or 21 full-height drives, all within a single 19-inch NEMA rack.
Each Spectra Stack library module weighs approximately 88 lb (40 kg) without drives or tape cartridges. With six tape drives and 80 tape cartridges installed, a module's weight increases to about 144 lb (70 kg). The rack-mounting hardware included with each module is compatible with square hole racks, and an adapter kit is available for round hole racks. The distance between the rack front and rear posts must be between 26.6 and 30.8 inches, with an additional 1.5 inches needed when using adapters.
Installation begins by unpacking the components, inspecting for damage, and then installing the rack rails. The rack rails are designed for easy installation, with rear hangers inserting into vertical support holes and a retention spring snapping into place. Once the rails are in, the library modules are installed, starting with the lowest module and proceeding upwards. Two people or a lift are recommended for raising the modules to the rack rail height. Modules slide into the rack rails and are secured with captive thumbscrews.
For configurations with multiple modules, alignment is crucial for robot movement. This involves loosening thumbscrews on both sides of each module, adjusting an alignment mechanism at the back of the modules, and then re-tightening the thumbscrews. Expansion interconnect cables are used to connect adjacent modules, ensuring proper communication.
Tape drives are installed into vacant drive bays at the back of the library. Half-height drives require one drive bay cover to be removed, while full-height drives require two. It's important to only remove covers for the drive being installed and to ensure all unused bays have covers. Drives are slid along alignment rails until flush with the back of the library and secured with blue captive screws.
Cabling involves connecting Ethernet, Fibre Channel, and SAS cables. An Ethernet cable plugs into the lower Ethernet port on the Control Module. Power cords connect to each power supply and then to AC power circuits, with redundant power supplies ideally connected to different circuits for increased redundancy. Fibre Channel cables connect from an HBA or SAN to the tape drive ports, and SAS cables connect from an HBA to the SAS port on the tape drive.
After powering on the library by pressing the power button on the Control Module, the Initial Configuration Wizard guides the user through essential setup steps. This includes configuring date and time, network settings, and an administrator password. The wizard can be partially skipped, with remaining steps completed via the Remote Management Interface (RMI).
A critical step is configuring internal IP addressing to prevent conflicts between internal and external Ethernet networks. The wizard presents three default IP address ranges, from which the user selects one not used by their data center network.
The library's user interface is accessed via the OCP screen, where users log in with a selected user type and password. The Initial Wizard also covers timezone selection, allowing users to choose their geographical location, which determines the library's time zone. Date and time can be set manually or automatically.
For users planning to utilize Encryption Standard, an encryption password must be configured. This is done by logging in as a Security user, navigating to the Encryption Standard settings, and entering the password.
Activation keys are essential for enabling various features on the library. These keys, typically emailed to the contact person on the sales order, are entered through the RMI under the License Key Handling section.
To prepare the library for data backup, at least one partition must be created. The Basic Wizard guides users through this process, creating one or more partitions using all available drives and licensed slots. This wizard deletes any previously configured partitions. Users can specify the number of partitions, and the wizard evenly divides resources (drives and licensed slots) among them. Magazine slots are allocated in five-slot groups.
Barcode label length and alignment can also be configured. The barcode label length, which defaults to 8 digits, can be adjusted up to 15 digits for compatibility with backup software. The alignment (left or right) determines how barcode digits are reported to the backup software. Auto Clean can be enabled to automatically clean a tape drive when requested.
Tape media can be imported either through the EE port or by bulk loading magazines. The EE port allows for importing up to 10 tape cartridges at a time without interrupting normal library operations. Bulk loading involves opening a magazine, extending it, loading tape cartridges into the slots, and then pushing the magazine back into the library. All library operations stop when a magazine is open for bulk loading.
The manual emphasizes precautions during installation and removal, such as extending rack leveling jacks, ensuring the rack rests on them, and installing stabilizing feet. It also provides contact information for Spectra Logic Phone Support in various regions (United States and Canada, Europe, Deutsch Sprechende Kunden, Australia, Mexico, Central/South America, Asia, New Zealand, Africa, Middle East) and directs users to the online support website.