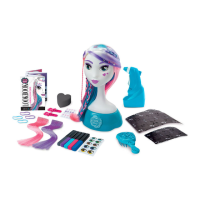
The Cool Maker Airbrush Styling Studio is a creative toy designed for users aged 8 and up, allowing them to style a model's hair and apply makeup using an airbrush and various accessories.
Function Description:
The primary function of the Cool Maker Airbrush Styling Studio is to enable users to create unique hairstyles and makeup looks on a styling model. It utilizes a cordless airbrush to apply color from "Style Sticks" onto the model's hair and face, with the aid of stencils. The kit includes various accessories to enhance the styling experience, such as clip-in extensions, hair elastics, hair clips, gems, and eye color stickers. A Lookbook is provided to offer design ideas and templates for users to create and record their own styles.
Important Technical Specifications:
- Power Source: Requires 2 x AA 1.5 V (LR6) batteries (not included) for the cordless airbrush.
- Style Sticks Ingredients: Water/Aqua, Glycerin, Potassium Sorbate, [+/- (May Contain): Blue 1 (CI 42090), Red 40 (CI 16035), Yellow 6 (CI 15985)].
- Age Recommendation: 8+ years.
- Safety Information:
- For indoor dry locations only.
- Clean with a dry cloth only.
- Do not store or use near heat, sparks, or flame.
- Batteries are small objects; replacement must be done by adults.
- Follow polarity (+/-) diagram for battery installation.
- Promptly remove dead batteries and dispose of used batteries properly.
- Remove batteries for prolonged storage.
- Use only batteries of the same or equivalent type as recommended.
- DO NOT incinerate or dispose of batteries in fire.
- DO NOT mix old and new batteries or different types (alkaline/standard/rechargeable).
- Rechargeable batteries are not recommended due to possible reduced performance; if used, they must be charged under adult supervision and removed from the toy before charging.
- DO NOT recharge non-rechargeable batteries.
- DO NOT short-circuit the supply terminals.
- The product and batteries must be recycled or disposed of properly at the end of their useful life, not with household waste.
- WARNING: CHOKING HAZARD – Small parts.
- CAUTION: Stickers are not intended to be placed on skin.
- CAUTION: Do not apply the style sticks on people and animals. Do not aim at eyes or face.
- Do not use markers with this product other than Cool Maker™ style sticks.
- Important: Please use caution around light-colored upholstery or carpeting. Adult supervision advised.
- Wash hands thoroughly with mild soap and water after use.
- Meets CPSC Safety Requirements. Conforms to ASTM D-4236.
Usage Features:
- Battery Installation: Open the battery door with a screwdriver, remove old batteries if present, install new AA (LR6) batteries following the polarity diagram, and securely replace the battery door.
- Airbrush Operation:
- Ensure the airbrush is in the OFF position.
- Remove the cap from a Style Stick and insert it, tip first, into the top of the airbrush until a click is felt.
- Push the ON/OFF switch to ON.
- Hold the airbrush on an angle, with the tip 2 finger widths away from the surface.
- Gently squeeze the trigger to spray.
- When not in use, turn off the airbrush to prevent accidental spraying.
- Hair Highlights:
- Brush all hair from root to tip.
- Highlight white hair for best color results.
- Hold a section of hair by the ends (away from the model) and spray back and forth until the desired color appears.
- Brush hair after highlighting for a softer, more natural look.
- Change colors for different sections of hair.
- Style the hair as desired.
- Hair Stencils:
- Brush all hair from root to tip.
- Gently separate the stencil on the perforation and punch out the shape.
- For best results, use a hair clip to keep the stencil area in place, avoiding loose hair.
- Press the stencil against the hair and spray. Keep the hand holding the stencil very steady.
- Makeup Stencils:
- Peel back the sticker stencil, ensuring the full design is popped out. Save the backing for reuse.
- Firmly press the design cut-out onto the model's face. The outside edge of the stencil does not need to be stuck down.
- Gently spray short bursts two finger widths from the stencil. Avoid spraying too much, as the stencil may be ruined.
- Let dry for 30 seconds, then gently remove the stencil.
- Apply eyeshadow stencils before eyebrow stencils.
- Customize with gems and eye color stickers.
- Advanced Styling (Ombre & Curls):
- Ombre Styles: Alternate colors from top to bottom. When airbrushing with makeup or hair stencils, switch colors halfway through spraying to blend them. Braid three different colored highlights for an ombre effect.
- Curls: Dampen a lock of hair and wrap it around a pencil for tight curls.
- Layering Stencils: When spraying a stencil next to another, be careful not to smudge the first stencil. Let the area dry as much as possible before doing a new stencil right next to it.
- Hair Extensions:
- Open the hair extension clip by using both thumbs to bend the ends of the clip.
- To make hair longer, hook the clip as high as possible onto the blue section of hair. (Tip: Use elastics to separate white and pink hair sections from the blue).
- Close the extension clip by using both thumbs to bend the ends of the clip towards the model.
- Extensions can be placed anywhere on the model's head or applied to the user's own hair.
- Lookbook: Provides design ideas and blank templates to record custom styles, including hair stencils used (by number), lip color, color palette, makeup stencils used (by letter), and a name for the look.
Maintenance Features:
- Cleaning the Airbrush: If spray is uneven, remove the style stick and wipe the airbrush nozzle with a paper towel. If there's leftover ink, wipe the tip of the airbrush with a paper towel and do a test spray.
- Cleaning the Model:
- Gently remove eye stickers, gems, and extensions. Return them to their backing for reuse.
- Remove the model from its base.
- Rinse the model under warm water. Use soap if needed.
- Use the hairbrush to comb the color out of the hair.
- Remove makeup using the provided sponge (dampened with warm water and squeezed out).
- Use a soft cloth to dry the model. Let hair air dry.
- Shampoo and conditioner can be used to freshen the hair periodically.
- Troubleshooting:
- Color in Wrong Area: Hold a piece of paper behind or around the section of hair being sprayed to shield the model's face or hair.
- Airbrush Spray Too Weak: Try changing the batteries.
- Cap Left Off Marker: Soak the tip of the marker in warm water for 2 minutes.
- Makeup Left On Model Too Long Causing Staining: Rub the model with soap and water or rubbing alcohol.
- General Tip: Use style sticks only in the airbrush. Using them directly on the model or other surfaces may damage the tip.
- Storage: The removable base of the model can be used to store materials.
The Cool Maker Airbrush Styling Studio encourages creativity and allows users to experiment with different looks, offering a comprehensive styling experience with easy-to-follow instructions and maintenance tips.