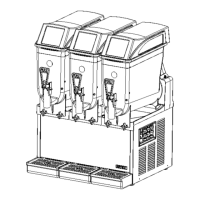
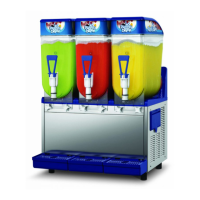
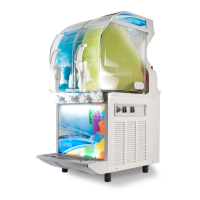
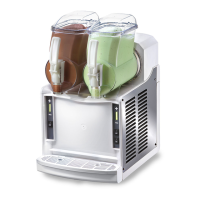
The document describes the SPM Frosty series of slush machines, specifically models Frosty1, Frosty2, and Frosty3. These are beverage dispensers designed to produce slushes, sorbets, and similar products.
Function Description
The Frosty series machines are designed to create frozen beverages. Each machine features one, two, or three bowls (depending on the model) where the product is mixed and cooled. The control board allows for individual operation of each tank, offering modes for making ice slush/sorbets, cold drinks, or simply mixing for cleaning purposes. A safety mechanism stops all moving parts when the main cover is lifted, ensuring operator protection. The consistency of the dispensed product can be adjusted via screws located at the back of the machine.
Important Technical Specifications
The machines are manufactured by S.P.M. Drink Systems S.p.a. in Spilamberto (Mo), Italy.
Key specifications, found on the identification plate, include:
- Electrical Specifications: Volt/Hz, Max. absorption (Watt), Max. current (Amp).
- Ambient Operating Temperature: Between 24°C and 32°C.
- Noise Emissions: Continuous, equivalent, weighted acoustic pressure is below 70 dB.
- Bowl Capacity: Maximum 12 liters per bowl.
- Product Sugar Content: The mixture must have a sugar content between 12% and 14%. Using only water or a lower concentration can damage mixing parts and gearmotors.
Dimensions and Weight:
- Frosty1:
- Height: 83 cm
- Width: 21 cm
- Depth: 56 cm
- Weight: 39 kg
- Frosty2:
- Height: 83 cm
- Width: 41 cm
- Depth: 56 cm
- Weight: 60 kg
- Frosty3:
- Height: 83 cm
- Width: 61 cm
- Depth: 56 cm
- Weight: 81 kg
Usage Features
Installation and Positioning:
The machine must be placed on a sturdy, flat surface with a minimum 20 cm gap around it for proper ventilation. It should not be installed near heat sources. The recommended room temperature for operation is between 24°C and 32°C. Electrical connection requires checking that the power mains voltage matches the identification plate specifications and that the output meets the device's power requirements. A suitable grounding system is legally required, and the use of extensions or multiple adaptors is prohibited.
Start-up Procedures:
- Cleaning and Sanitizing: Before initial start-up, the machine must undergo thorough cleaning and sanitizing as described in the manual.
- Product Preparation: Dilute and mix the product in a separate container according to the manufacturer's instructions. Never pour dry powder, crystals, or concentrate directly into a dry bowl. Ensure the sugar content is between 12% and 14%.
- Filling: Remove the main and secondary transparent covers. Pour the prepared mix into the bowl, respecting the maximum capacity of 12 liters.
- Cover Replacement: Restore the secondary transparent cover, then the main cover, ensuring it pushes against the security system. The unit will not work if the main cover is not correctly positioned.
- Power On: Insert the plug into the electrical outlet and activate the main switch.
Operating Instructions:
- Dispensing: Position a cup under the tap and pull the dispensing lever.
- Consistency Adjustment: Turn the screws on the back of the machine: clockwise for less dense product, counter-clockwise for denser product. This only affects consistency, not cooling temperature.
- Low Product Level: When the product level is below minimum, refill the bowl to prevent the product from becoming too thick.
Control Board (Mechanical):
- General Switch (D): Activates the machine.
- Tank Control Switches (E, F, G): Each tank has three switches.
- Ice Slush/Sorbets: Select (E) to start mixer (green LED confirms), then (F) to activate the cooling system.
- Cold Drinks: Select (E) to start mixer (green LED confirms), then (G) to activate cooling at a positive temperature.
- Cleaning: Select only (E) to start mixer without refrigeration.
- Covers' LED Lights (H): Controls the lights.
Important Warning for Overnight Shutdown:
If the machine is turned off overnight with filled or partially filled bowls, a layer of solid ice may form due to product separation. Before restarting, ensure the product is completely melted to prevent damage to the mixing auger.
Maintenance Features
Daily Cleaning and Sanitizing Procedures:
These procedures are crucial for hygiene and compliance with regulations, especially for perishable products. They should be performed daily or according to local laws.
- Emptying and Initial Rinse: Empty the bowl, remove covers, and fill with lukewarm water to melt sugar residuals, then drain.
- Disassembly (Electrical Safety): Before disassembling, ensure all switches are OFF and the main power supply is disconnected to avoid electrical shock or contact with moving parts. Do not splash water on switches or electrical components.
- Disassembly Steps:
- Pull out the upper mixing device (O) by pushing it slightly backward.
- Unscrew knobs and lower the bowl to drain residue.
- Slightly move down and pull out the bowl.
- Simultaneously press securing tabs (Q) and lift dispensing tap (I) to remove it.
- Disassemble the dispensing tap by pressing part (R) and slipping off the lever (L).
- Unscrew the securing bolt (S) (left threading), pull off the mixing unit (U), and remove sealing washers (X) and (T).
- Washing: Thoroughly wash all removed components (including o-rings, which must be removed to prevent bacteria growth) with hot water and mild dishwashing detergent. Avoid abrasive cleaners and dishwashers, as they can damage parts. Rinse well.
- Sanitizing: Use a sanitizer approved for plastic, rubber, and stainless steel objects (e.g., AMUCHINA®). Place all components in the sanitizer solution for the time recommended by the manufacturer. Carefully follow sanitizer producer prescriptions.
- Final Rinse and Dry: After sanitizing, rinse all components thoroughly with clean water and dry with a clean cloth.
- Evaporator and Drip Tray: Thoroughly wash these surfaces with a sponge soaked in sanitizer, then rinse with clean water and dry.
Reassembly:
Correct assembly is vital to prevent leaks and machine damage. Use an approved lubricant (like Vaseline) on gaskets.
- Mixing System:
- Spread Vaseline grease on suction gaskets (X).
- Mount bowl seal (T) in the correct direction.
- Assemble scraper auger (U), ensuring it engages with the driving shaft.
- Secure parts by screwing bolt (S) counter-clockwise.
- Bowl: Mount the bowl, ensuring a tight hold on its gasket. Lubricate the rear part of the bowl where it fits with its sealing. Tighten the two knobs without excessive pressure to avoid damaging threads or the bowl.
- Dispensing Tap: Reassemble tap parts, lubricating gaskets (J) with Vaseline grease for smooth sliding. Ensure it is completely inserted.
- Upper Mixing Unit: Reassemble unit (O) so its toothed crown aligns with the lower crown, allowing the front pin to fit into the bowl.
- Liquid-Collector Tray: Remove tray (AA) by turning it slightly upwards and pulling forward. Wash thoroughly and reassemble.
- Final Step: Plug the unit back into power supply.
Sanitizing (After Prolonged Disuse):
If the machine has been unused for several days after cleaning, perform these steps before start-up:
- Remove main and secondary transparent covers.
- Pour sanitizing solution (AMUCHINA®) into the bowl, following manufacturer prescriptions.
- Restore main cover, switch on the machine, and let the auger rotate with the sanitizing solution for the specified time. Do not leave sanitizer in the bowl for more than 15 minutes.
- Drain the solution by opening the plunger (open and close 10 times to sanitize the product way out area).
- Rinse thoroughly with clean water instead of sanitizer solution.
The machine is now ready for use.
Special Maintenance:
-
Condenser Cleaning: To ensure good cooling performance, the condenser must be cleaned every month.
- Switch off power and disconnect the cable.
- Remove the side panel protecting the condenser.
- Clean condenser fins with a soft brush or vacuum cleaner.
- Reassemble the panel.
Failure to maintain a clean condenser will damage the unit and void the warranty.
-
Control and Replacement of Seals:
- Rulon GASKET: Replace every 9-12 months. Lubricate during every cleaning.
- BOWL GASKET (REAR OF BOWL): Replace every 12 months.
- DISPENSE VALVE O-RING: Replace as needed when wear is evident. Lubricate each time replaced or removed for cleaning.
- SUCTION GASKET: Replace every 3 months. Lubricate with Vaseline during reassembly after cleaning.
-
Winter Storage:
- Disconnect all power.
- Disassemble, wash, and sanitize all parts that contact the mix (as per daily cleaning).
- Clean all exterior panels.
- Reassemble all parts.
- Cover the machine with its original packaging to protect from dust.
- Store in a dry location.
The manual includes a detailed troubleshooting guide covering common issues, possible causes, and solutions:
-
Machine does not cool, or cools only partially, and compressor is running:
- Possible Causes: Inadequate ventilation, refrigeration system in DEFROST mode, clogged condenser filter, non-running fan motor, refrigerant leak.
- Solutions: Ensure 20cm clearance, return to FREEZE mode, clean filter, check/reconnect/replace fan motor, locate/eliminate leak and recharge system.
-
Machine does not cool, or cools only partially, and compressor is not running:
- Possible Causes: Non-functioning electrical components of compressor, incomplete electrical connections, malfunctioning compressor.
- Solutions: Replace malfunctioning components, check/correct electrical contacts, replace compressor.
-
Machine over-freeze, making auger movement slow or stopped:
- Possible Causes: Product brix too low, consistency control screw set too far toward "+", bent limit micro-switch arm, product level too low.
- Solutions: Check/correct product brix, reset screw toward "-", straighten limit switch arm, add product or turn refrigeration "Off".
-
Machine is noisy:
- Possible Causes: Fan motor blades hitting internal components.
- Solutions: Check and correct.
-
Main power switch is "ON" but unit is not running:
- Possible Causes: Blown fuses, incomplete electrical connections, malfunctioning gear motor.
- Solutions: Replace fuses, check/correct electrical contacts, replace gear motor.
-
Bowl is leaking:
- Possible Causes: Bowl seal not in place.
- Solutions: Replace or reposition the seal.
-
Dispensing valve is leaking:
- Possible Causes: Incompletely/incorrectly replaced valve, impeded valve movement, damaged valve o-rings.
- Solutions: Reassemble/replace valve, clean/lubricate valve and cylinder, replace o-rings.
-
Product flowing into drip tray through drainage pipe:
- Possible Causes: Bell shaped seal between cylinder front and auger hub not reinstalled properly, damaged/worn bell shaped shaft seal or spindle bushing seal.
- Solutions: Find/replace seal, check drive shaft condition.
-
Auger is not turning:
- Possible Causes: Incomplete electrical connections, faulty control board, malfunctioning gear motor.
- Solutions: Check/correct electrical contacts, replace control board, replace gear motor.
-
Auger is creating noise as it rotates:
- Possible Causes: Bell shaped shaft seal replaced without lubrication or damaged, incompletely/incorrectly reassembled auger.
- Solutions: Replace/clean/lubricate seal, check/correct auger assembly.
The manufacturer disclaims responsibility for damages due to non-compliance with manual instructions and reserves the right to modify the machine for improvement while maintaining essential operative and safety characteristics.