6
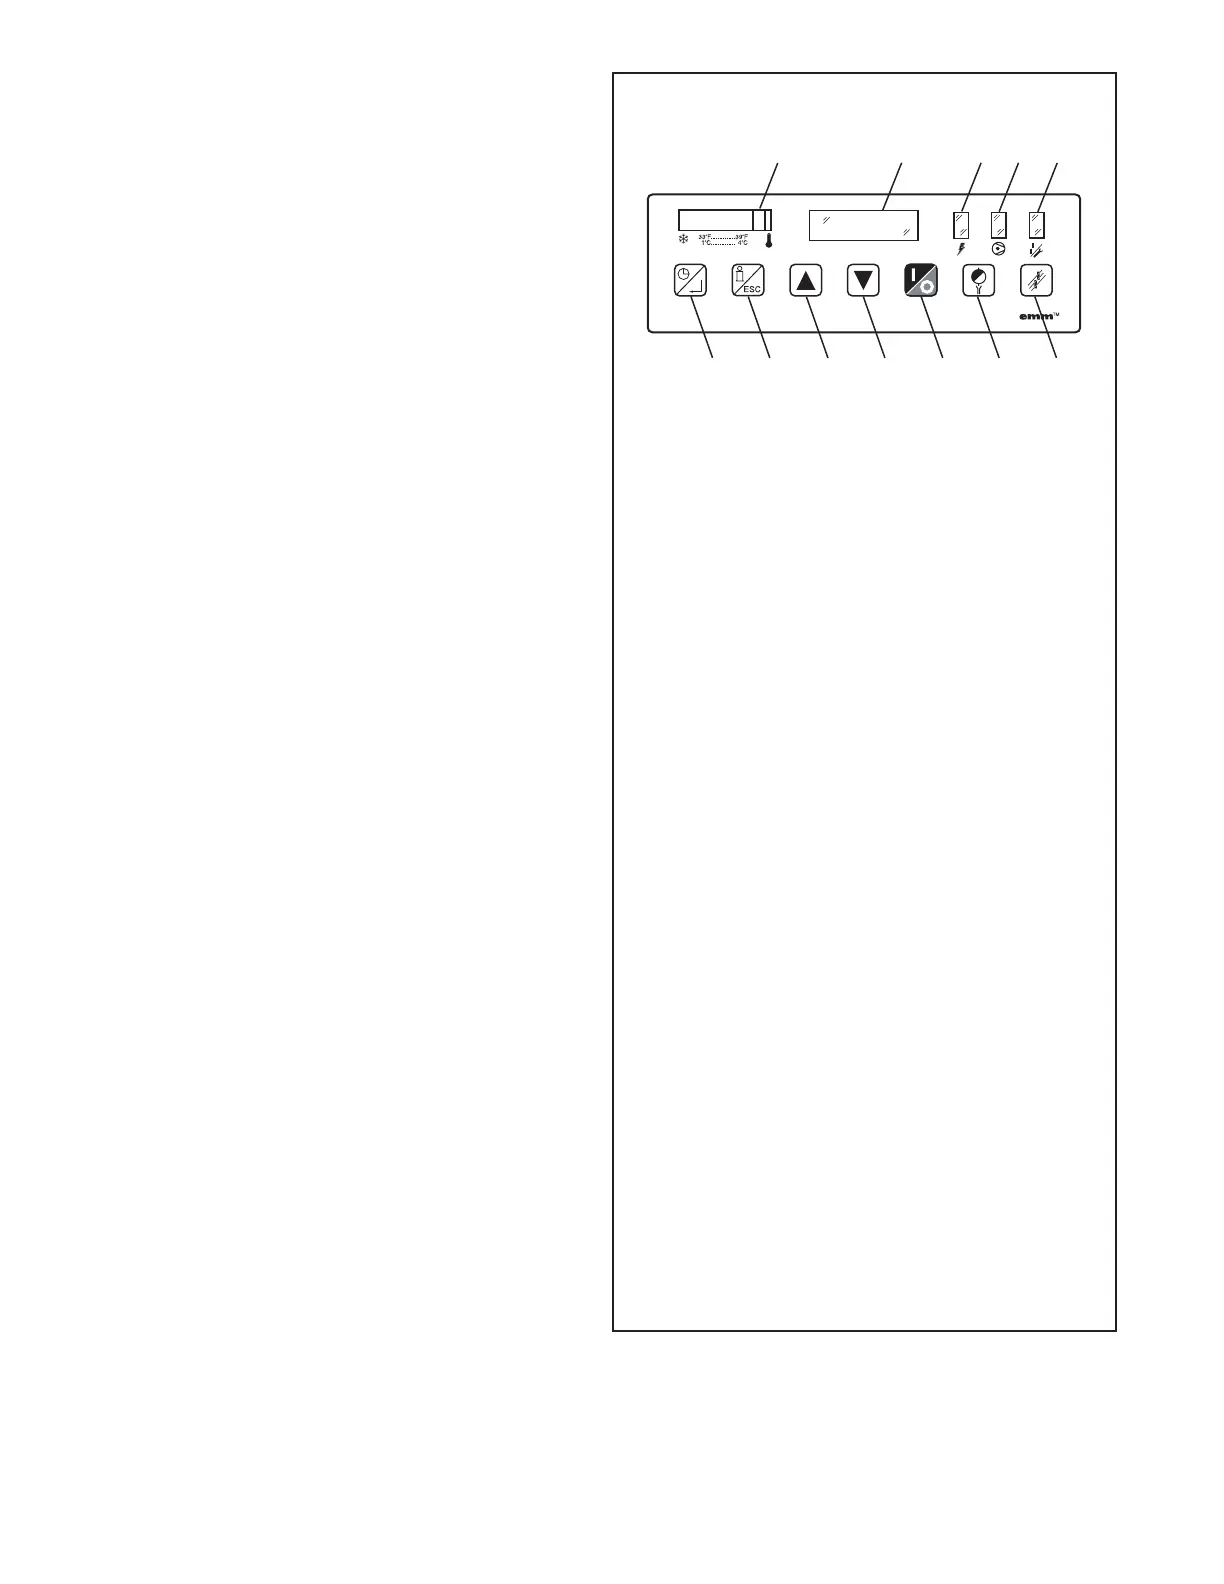
1. Temperature Indicator
2. Operator Interface Display
3. Power-on Light
4. Compressor-on Light
5. Alarm / Service Light
6. Schedule On/Off and Enter Button
a. In display mode: Press to toggle between
SCHEDULE RUNNING and MANUAL OVERRIDE.
b. In program mode:
i. Press to move to a lower level menu.
ii. Press to accept a value that has been edited.
7. Program Mode (i) and Esc
a. In display mode: Press and hold to enter pro-
gram mode.
b. In program mode: Press to move to a higher
level menu.
8. Up Arrow
a. In display mode: No function
b. In program mode:
i. Presstoviewthenextiteminalistorto
increment a variable to a higher value. Press
and hold for accelerated incrementing.
ii. When the top of the list (or highest value) is
displayed, pressing the up button will cause
the display to wrap to the bottom of the list
(or lowest value).
9. Down Arrow
a. In display mode: No function
b. In program mode:
i. Press to view the previous item in a list or to
increment a variable to a lower value. Press
and hold for accelerated incrementing.
ii. When the bottom of the list (or lowest value)
is displayed, pressing the down button will
cause the display to wrap to the top of the
list (or highest value).
10. 1/0: Press at any time to turn the dryer on/off.
11. Drain test: Press at any time to momentarily the
open drains (like the current emm).
12. Reset: Press at any time to clear the alarm/service
message (if shown) and the alarm LED.
CONTROL PANEL
1234 5
6
78
9 10
11
12
3. Setting Schedule
a. Use the ‘Up’ and ‘Down’ arrow buttons to select
desired “Day of week + on/off”. Press ‘Enter’ to
accept new value
b. Use the ‘Up’ and ‘Down’ arrow buttons to set hour
(00 to 23). Press ‘Enter’ to accept new value
NOTE: If the hour setting is ‘IGNORE’, Press ‘Enter’
again to move the cursor under the “Day of week +
on/off”. Repeat steps a through b (or c) as needed.
c. Use the Up and Down arrow buttons to set minutes
(00, 10, 20, 30, 40, 50; not shown if hour setting is
‘IGNORE’). Press ‘Enter’ to accept new value and
return to “Day of week + on/off”. Repeat steps a
through c as needed.
d. Push ‘ESC’ at any time to return to the Main Menu.
NOTE: Scheduler will ignore programmed commands
for10minutesafterexitingprogrammode.
4. Hours To Service
a. Use the ‘Up’ and ‘Down’ arrow buttons to scroll
through the range of permissible values (0 to 8760)
before service reminder is initiated. Press ‘Enter’
to accept new value. (Only hours that refrigeration
compressor is operating are counted).
b. Press ‘ESC’ at any time to return to the Main Menu.
NOTE: On dryers with air-cooled condensers, regular
condenser cleaning is recommended. Dirtiness
of ambient air at installation site will determine
frequency of service. Typically once a month is
recommended. Dryers contain an integral 3 micron
filter. As the filter element accumulates solid
contaminants, differential pressure increases. Solid
particulate load in the compressed air supply will
determine frequency of service. Typically element
changeout is recommended at least annually.
5. PushESCbuttontoexitprogrammode
NOTE: If after 60 seconds no button is pressed while in
Program Mode, the audible alarm sounds for five (5)
seconds. Dryer will resume previous operating mode.
6. Manual Operation
a. To manually turn the refrigeration system on or off
use ‘On/Off’ button; Push ‘Schedule On/Off and
Enter’ button to return to schedule.
NOTE:Afterpowerinterruptiondryerwillreenergize
in Manual override, refrigeration system off. To
restart Schedule: Push ‘Schedule On/Off and Enter’
button.
D. Starting dryer
IMPORTANT: Dryer must be energized 24 hours before
starting refrigeration compressor.
NOTE: It is recommended that dryer be started 15 minutes
before compressed air flow begins.
1. On water-cooled models: after 24 hours, begin cooling
water flow.
2. Check for proper electrical voltage.
3. Slowlypressurizeunitairsidebyopeninginletisolation
valve. Check for leaks.



 To Next Page