6
ENGLISH
(Original instructions)
u Never attempt to charge non-rechargeable batteries.
u Have defective cords replaced immediately.
u Do not expose the charger to water.
u Do not open the charger.
u Do not probe the charger.
$
The charger is intended for indoor use only.
+
Read the instruction manual before use.
Electrical safety
#
Your charger is double insulated; therefore no
earth wire is required. Always check that the
mains voltage corresponds to the voltage on
the rating plate. Never attempt to replace the
charger unit with a regular mains plug.
u If the supply cord is damaged, it must be replaced by the
manufacturer or an authorised Stanley Service Centre in
order to avoid a hazard
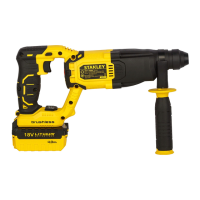
Features
This tool includes some or all of the following features.
1. On/Off switch
2. Forward/reverse selecter
3. Drilling mode selector
4. Depth stop
5. Tool holder
6. Side handle
7. Battery (Not supplied)
Assembly
Use
Warning! Let the tool work at its own pace. Do not overload.
Charging the battery (g. A)
The battery needs to be charged before rst use and
whenever it fails to produce sufcient power on jobs that were
easily done before. The battery may become warm while
charging; this is normal and does not indicate a problem.
Warning! Do not charge the battery at ambient temperatures
below 10 °C or above 40 °C. Recommended charging
temperature: approx. 24 °C.
Note: The charger will not charge a battery if the cell
temperature is below approximately 10 °C or above 40 °C.
The battery should be left in the charger and the charger will
begin to charge automatically when the cell temperature
warms up or cools down.
u To charge the battery, insert the Battery (7) into the
charger (9). The battery will only t into the charger one
way.
u Plug the charger (9) into a suitable power source and
switch on.
u Charge discharged batteries within 1 week. Battery life will
be greatly diminished if stored in a discharged state.
Fitting and removing the battery (g. B)
u To t the battery, line it up with the receptacle on the tool
(11). Slide the battery into the receptacle and push until
the battery snaps into place.
u To remove the battery, push the release button (12) and
remove the battery from the receptacle.
Fitting the side handle (g. C)
u Turn the grip counterclockwise until you can slide the side
handle (6) onto the front of the tool as shown.
u Rotate the side handle into the desired position.
u Tighten the side handle by turning the grip clockwise.
Fitting and setting the depth stop (g. C)
u Depress the button (8).
u Insert the depth stop (4) into the mounting hole as shown.
u Set the depth stop (4) to the desired position. The
maximum drilling depth is equal to the distance between
the tip of the drill bit and the front end of the depth stop.
u Release the button (8).
Fitting an accessory (g. D - E)
u Clean and grease the shank (13) of the accessory.
u Pull back the sleeve (14) and insert the shank into the tool
holder (5).
u Push the accessory down and turn it slightly until it ts into
the slots.
u Pull on the accessory to check if it is properly locked. The
hammering function requires the accessory to be able to
move axially several centimetres when locked in the tool
holder.
u To remove the accessory, pull back the sleeve (14) and
pull out the accessory.
Keyed chuck (g. F) (Not supplied)
u Open the chuck by turning the sleeve (15) anti-clockwise.
u Insert the bit shaft (17) into the chuck.
u Insert the chuck key (18) into each hole (16) in the side of
the chuck and turn clockwise until tight.
Warning! Before drilling into walls, oors or ceilings, check for
the location of wiring and pipes.
Warning! Do not apply chisels when the tool is in the drilling
mode.