10
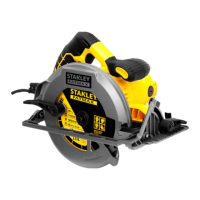
WARNING: These heavy-duty circular saws are
designed for professional wood cutting
applications. DO NOT use water feed attachments
with this saw. DO NOT use abrasive wheels or blades. DO
NOT use under wet conditions or in the presence of
flammable liquids or gases. Do not use diamond wheels.
These heavy-duty saws are professional power tools. DO
NOT let children come into contact with the tool. Supervision
is required when inexperienced operators use this tool.
♦
This product is not intended for use by persons (including
children) suffering from diminished physical, sensory or
mental abilities; lack of experience, knowledge or skills
unless they are supervised by a person responsible for
their safety. Children should never be left alone with
this product.
ELECTRICAL SAFETY
Only one voltage is applicable to this tool. Be sure to check
that the power supply corresponds to the voltage on the
rating plate.
Your Stanley tool is equipped with double insulation,
hence, it does not require to be earthed
When the power cord is damaged, have it sent
to a STANLEY service center for replacement to specially
prepared cables.
USING AN EXTENSION CABLE
If an extension cable is required, use an approved 3–core
extension cable suitable for the power input of this tool (see
Technical Data).The minimum conductor size is 1.5 mm
2
;
the maximum length is 30 m.
When using a cable reel, always unwind the cable completely.
BEFORE USE
♦
Before using the tool for the first time, it is recommended
to receive practical information.
♦
Always check that the supply voltage is the same as the
voltage indicated on the nameplate of the tool.
♦
Use suitable detectors to find hidden utility lines or call the
local utility company for assistance(contact with electric
lines can lead to fire or electrical shock; damaging a
gas line can result in an explosion; penetrating a water
pipe will cause property damage or an electrical shock).
♦
Do not work materials containing asbestos (asbestos is
considered carcinogenic).
♦ Dust from material such as paint containing lead, some
wood species, minerals and metal may be harmful
(contact with or inhalation of the dust may cause allergic
reactions and/or respiratory diseases to the operator
or bystanders); wear a dust mask and work with a dust
extraction device when connectable.
♦
Certain kinds of dust are classified as carcinogenic (such
as oak and beech dust) especially in conjunction with
additives for wood conditioning; wear a dust mask and
work with a dust extraction device when connectable.
♦
Follow the dust-related national requirements for the
materials you want to work with.
♦ Do not clamp the tool in a vice.
♦ Use completely unrolled and safe extension cords with
a capacity of 16 Amps.
AFTER USE
• After switching off the tool, never stop the rotation of the
accessory by a lateral force applied against it.
ASSEMBLY AND ADJUSTMENT
WARNING: To reduce the risk of serious personal
injury, turn tool off and disconnect tool from power
source before making any adjustments or
removing/installing attachments or accessories. Before
reconnecting the tool, depress and release the trigger switch
to ensure that the tool is off. An accidental start-up can
cause injury.
CHANGING BLADES
CAUTION: The inner flange has the different
diameter on both sides, the diameter is same as
the digital marked on the flange. Use the correct
side for the hole diameter of the blade you intend to use.
Mounting the blade on the wrong side can result in the
dangerous vibration.
SC16-B1 20mm and 25.4mm
SC16-XD 20mm and 25.4mm
SC16-KR 20mm and 19mm
SC16-A9 20mm and 19mm
TO INSTALL THE BLADE (FIG. A–D)
1. Using the lower guard lever (k), retract the lower blade
guard (i) and place blade on saw spindle against the inner
clamp washer (o), making sure that the blade will rotate in
the proper direction (the direction of the rotation arrow on the
saw blade and the teeth must point in the same direction as
the direction of rotation arrow on the saw). Do not assume
that the printing on the blade will always be facing you when
properly installed. When retracting the lower blade guard
to install the blade, check the condition and operation of
the lower blade guard to assure that it is working properly.
Make sure it moves freely and does not touch the blade or
any other part, in all angles and depths of cut.
2. Place outer clamp washer (n) on saw spindle with the
large flat surface against the blade and the wording on the
outer clamp washer facing you.
3. Thread blade clamping screw (j) into saw spindle by
hand (screw has right-hand threads and must be turned
clockwise to tighten).
4. Depress the blade lock (c) while turning the saw spindle
with the blade wrench until the blade lock engages and the
blade stops rotating.
5. Tighten the blade clamping screw firmly with the blade
wrench (s).
 Loading...
