• Check for damage to the tool, parts or accessories which
may have occurred during transport.
• Take the time to thoroughly read and understand this
manual prior to operation.
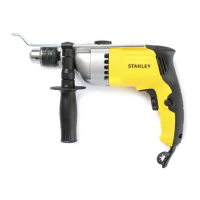
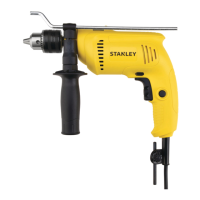
Description (fig. A)
1. Variable speed switch
2. Lock-on button
3. Forward/reverse slider
4. Mode selector
5. Ventilation slots
6. Side handle
7. Depth adjustment rod
8. Keyed chuck
9. Sleeve
10. Chuck key
11.Speed dail
Assembly
Warning! Before assembly, please ensure that the power
tool is powered off and the power plug of the tool is
unplugged from the power source.
Selecting the operating mode (fig. B) The tool can be used in
two operating modes:
Rotary drilling:
for steel, wood and plastics.
Impact drilling:
simultaneous rotating and impacting for concrete and
masonry drilling operations.
• Select the required operating mode by rotating the mode
selector (4) to the required position.
Inserting and removing a bit (fig. A)
Keyed chuck
• Open the chuck by turning the sleeve (9)
counterclockwise and insert the bit shank.
• Put the chuck key (10) into each hole in the side of the
chuck and turn clockwise until tight.
• To remove the bit, proceed in reverse order.
Fitting the side handle (fig. A)
The side handle (6) can be fitted to suit both RH- and
LH-users.
Always use the drill with the side handle properly
assembled.
• Loosen the side handle.
• For RH-users, slide the side handle clamp overthe collar
behind the chuck, handle at the left.
• For LH-users, slide the side handle clamp overthe colar
behind the chuck, handle at the right.
• Rotate the side handle to the desired positionand tighten
the handle.
Setting the drilling depth (fig. C)
• Insert the required drill bit into the chuck.
• Slacken the side handle (6).
• Fit the depth adjustment rod (7) through the hole in the
side handle clamp.
• Adjust the drilling depth as shown.
• Tighten the side handle.
Forward/reverse slider (fig. A)
• To select forward or reverse rotation, use the
forward/reverse-switch (3) (see arrow on tool).
Always wait until the motor has come to a
complete standstill before changing the direction of
rotation.
Chuck removal (fig. D)
• Open the chuck jaws as far as possible
• Insert a screwdriver into the chuck and remove the
chuck retaining screw (12) by turning clockwise.
• Tighten an Allen key into the chuck and strike it with a
hammer as shown.
Instructions for use
• Always observe the safety instructions and applicable
regulations.
• Be aware of the location of pipework and wiring.
• Apply only a gentle pressure to the tool. Excessive force
does not speed up drilling but decreases tool
performance and may shorten tool life.
7
ENGLISH
(Original instructions)