(Original instructions)
EN © 2016 English
4 GENERAL INFORMATION (PAGE 3)
4.1 Use of the manual
This manual forms an integral part of the appliance and should be kept
for future reference. Please read it carefully before installing/using the
unit. If the appliance is sold, the seller must pass on this manual to the
new owner along with the appliance.
4.2 Delivery
The appliance is delivered partially assembled in a cardboard box.
The supply package is illustrated in fig.1.
4.2.1 Documentation supplied with the appliance
D1 Use and maintenance manual
D2 Safety instructions
D3 Declaration of conformity
D4 Warranty regulations
4.3 Disposing of packaging
The packaging materials are not environmental pollutants but must still
be recycled or disposed of in compliance with the relevant legislation
in the country of use.
5 TECHNICAL INFORMATION (PAGE 3)
5.1 Intended use
The appliance is intended for use as a multi-purpose vacuum
cleaner, in compliance with the descriptions and safety
precautions contained in these instructions.
This appliance is designed for household use only and must
not be utilised for industrial or commercial purposes.
The appliance conforms to the IEC 60335-1 and IEC 60335-2-2
standards.
5.2 Operator
The symbol shown in fig. 1 identifies the appliance’s intended operator
(professional or non-professional)
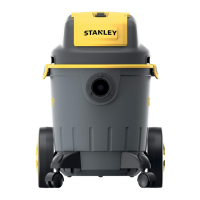
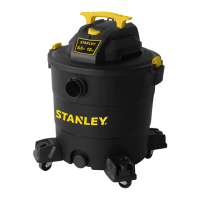
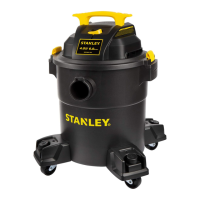
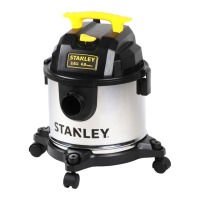
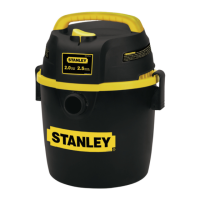
5.3 Main components:
A1 Starter device
A2 Suction connection
A3 Blower connection
A4a Handle
A4b Metal handle (where featured)
A5 Power cable stowing hook (where featured)
A6 Catches
A7 Power cable with plug
A8a Front castor wheels
A8b Rear wheels
A9 Vacuum cleaner tank
A10 Cover with motor
A11 Accessories holder (where featured)
A12 Liquid drain plug (where featured)
A13 Rear wheel axle (where featured)
C1 Power tool socket (where featured)
5.3.1 Accessories (see fig. 1 for details of models - supply
package is as shown on the cardboard box)
B1
Filter holder
B2
Cartridge filter
B3
Hose
B4
Adaptor for power tools
B5
Tube
B6
Floor brush
B7
Carpet - upholstery brush
B8
Crevice nozzle
B9
Round brush
B10
Fabric filter bag (Optional).
B11
Paper filter bag
B12
Tube hook
B13
Combined floor brush
5.4 Safety devices
- Starter device (A1)
The starter device prevents accidental use of the appliance.
6 INSTALLATION (PAGE 4-5)
Warning - danger!
All installation and assembly operations must be performed with the appliance
disconnected from the mains power supply.
The assembly sequence is illustrated on page 4.
6.1 Assembly
When unpacking, check for any missing accessories or damage to the
contents. If damage caused in transit is found, notify your dealer at
once.
Lift the cover with the motor (A10) off the appliance, releasing the
catches (A6) and take out the accessories supplied, checking that the
lter (B2) is tted correctly.
See fig. 2
The assembly sequence is illustrated one pages 4-5.
6.2
Fitting the rear wheels and front castor wheels
Turn the vacuum cleaner tank (A9), with the cover off, upside down
on a firm horizontal surface. Fit the castor wheel hubs (A8a) into
the holes provided and press fully down to secure the wheels in the
correct position.
Fit the axle (A13) correctly, turning it until the aligner holes mate with
the locator pins. Fit the retainers supplied in the bag (B17) and fix them
in place with the screws provided. Fit the wheel (A8b) and the washer
and secure with the split pin, taking care to insert it fully and open it
out so that it fits flush against the cross-section of the axle. Then fit
the wheel guard and repeat the procedure for the other wheel (A8b).
Fit the metal handle (A4b) as shown in the diagram.
See fig. 3
6.3 Fitting the accessories
Connect the hose (B3) to the suction (A2) or the blower connection
(A3) depending on the type of operation required.
See fig. 4
Then complete the sequence with the accessories required for the
type of cleaning job planned. Use the tubes (B5) and the brushes
(B6-B7-B8-B9) depending on the type of cleaning and the surface
to be cleaned. The brushes (B6-B7-B8-B9-B13) can be fitted straight
onto the hose (B3).
See fig. 5
6.4 Electrical connection
Warning - danger!
Check that the electricity supply voltage and frequency (V/Hz)
correspond to those specified on the data plate See fig.6
6.4.1 Use of extension cables
Use cables and plugs with "IPX4" protection level.
The cross-section of the extension cable should be
proportionate to its length; the longer it is, the greater its
cross-section should be.
6.5
Power tool socket (where featured)
Connect the hose (B3) to the power tool’s suction connection. If the
two connections are not compatible, use the adaptor for power tools
(B4) (where featured) cutting off the surplus.
Operate the power tool using the additional socket (C1) (For models
with this feature)
See fig. 7
 Loading...