53
JP
SW4
SW1
SW3
SW2
LED9
2
1
6
4
3
7
5
8
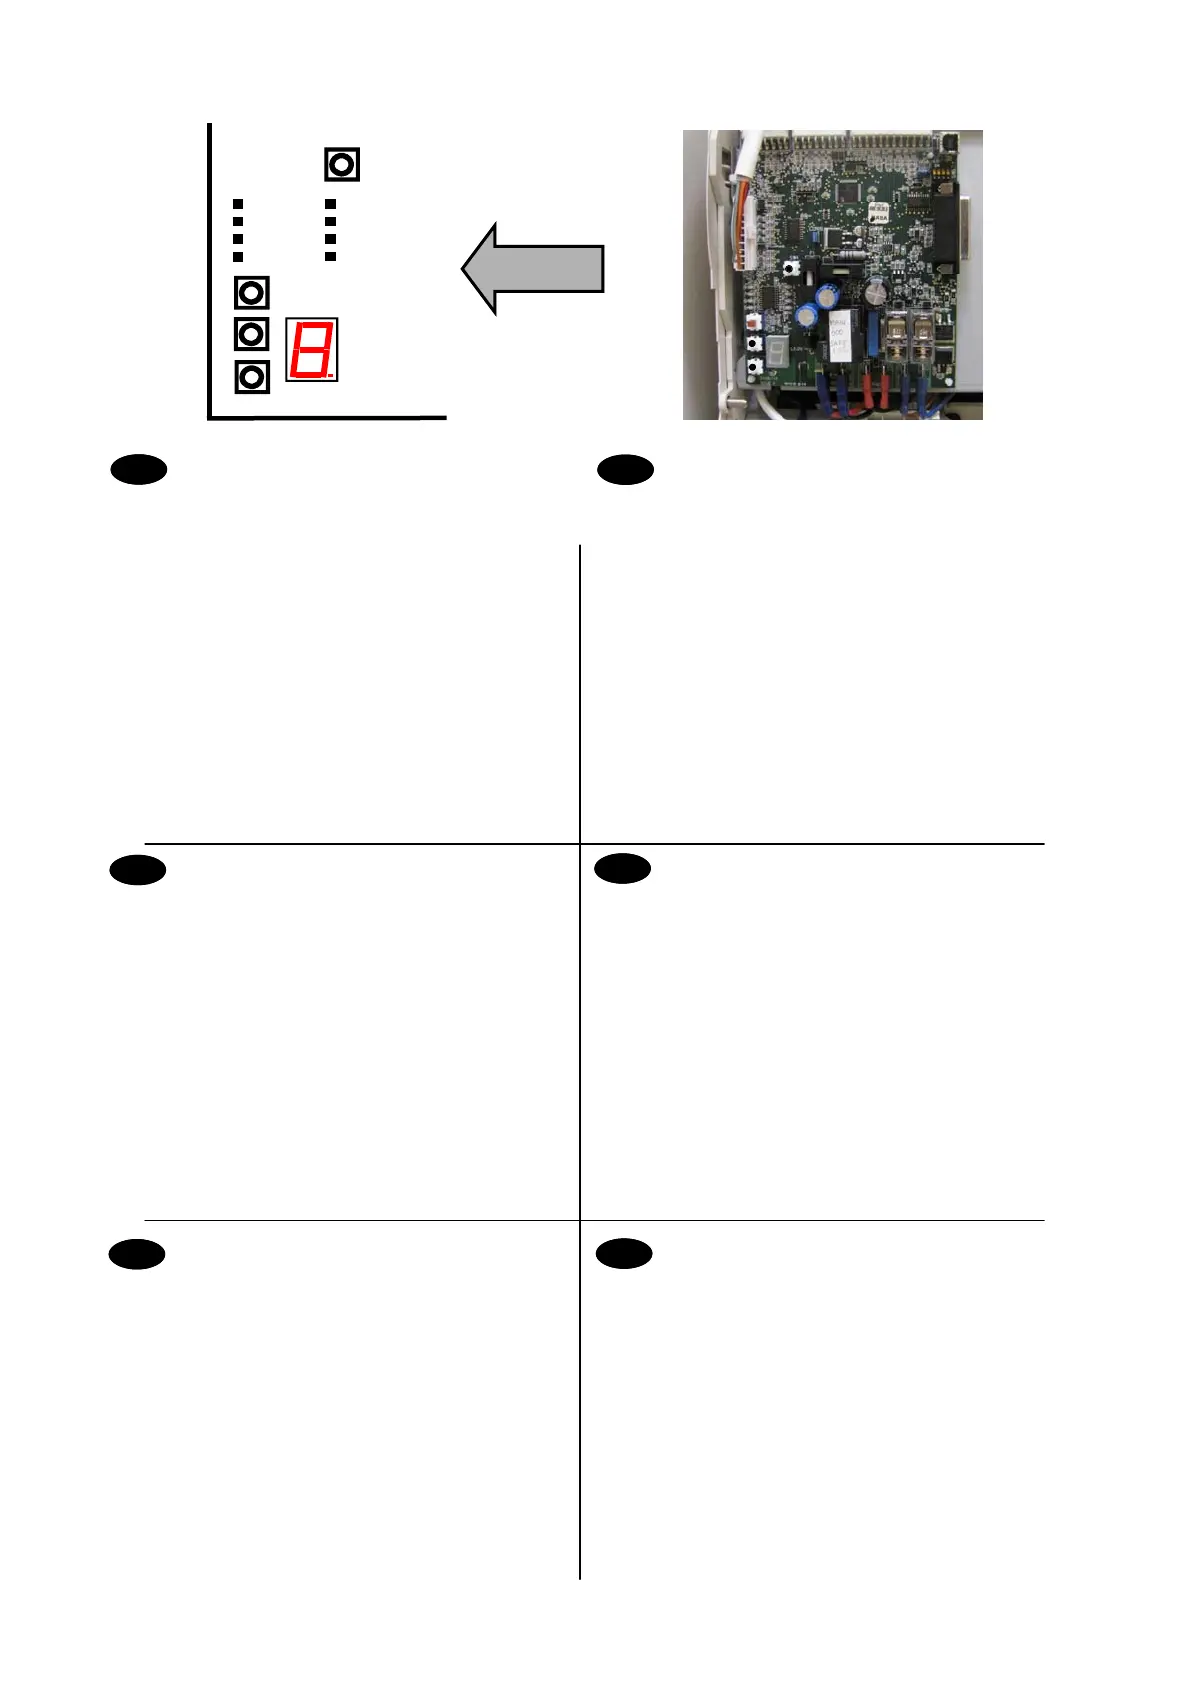
LED9- Display di stato - Guida alla risoluzione dei problemi
principali per l'operatore
SW1 – Pulsante di comando salita/discesa carrello
SW2 – Pulsante di comando salita/discesa carrello
Questi pulsanti consentono di azionare il carrello a
velocità dimezzata.
SW3 – Premere l’interruttore per il normale funzionamento della
poltroncina e per visualizzare le anomalie (0-9) sul LED
del display anomalie.
Ripremere l’interruttore per attivare i pulsanti di
comando del carrello e per abilitare la modalità
diagnostica per gli interventi tecnica.
SW4 – Pulsante Avanzamento modalità: cambia il LED del
display di stato (LED9)
LED 1- 8 del Display Anomalie. Si accendono per identificare
l'anomalia relativa al prodotto.
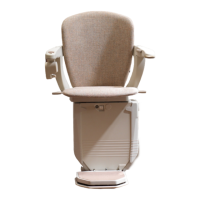
Funzioni della scheda a circuito stampato
di comando principale
LED9 (Diode 9)- Affichage d’état – Guide de dépannage de base de
l’utilisateur
SW1 – Bouton de commande du chariot montée/descente
SW2 – Bouton de commande du chariot montée/descente
Ces boutons permettent au chariot de fonctionner à mi-vitesse.
SW3 – Verrouillez le commutateur pour le fonctionnement normal du
siège et pour afficher les codes d’anomalie (0-9) sur la diode
d’affichange d’anomalie.
Déverrouillez le commutateur pour activer les boutons de
commande du chariot et le mode de diagnostic des anomalies
utilisé par le technicien
SW4 – Bouton d’avancement de mode change l’affichage d’état LED
(LED9)
Diodes 1-8 d’affichage des anomalies. S’allument pour identifier
l’anomalie du produit.
Fonctions de la carte de
circuit imprimé principale
LED9- ステータス表示 - オペレーターの基本的トラブルシューティングガイド
SW1- 台座制御ボタン 上/下
SW2- 台座制御ボタン 上/下
これらのボタンにより、台座が半分のスピードで動作することができま
す。
SW3- 標準チェア操作用のスイッチを留め、故障表示LED でユー ザー故障(0-
9)を表示します。
SW4- モード表示ボタン ステータスディスプレイLED (LED9)を変更します。
LED1~8 は故障を表示します。 点灯して製品の故障を特定します。
主電子制御ユニットコントローラ
IT
ES
LED9- Status Display - Operator basic trouble shooting guide
SW1– Carriage control button up/down
SW2– Carriage control button up/down
These buttons allow the carriage to be operated at half
speed.
SW3– Latch switch for normal chair operation and to display
user faults (0-9) on fault display LED.
De-latch switch to activate carriage control buttons and
to enable engineer fault diagnostic mode.
SW4– Mode Advance button changes Status display LED
(LED9)
LED’s 1- 8 Fault Display. Illuminate to Identify fault on product.
Main ECU controls
GB
DE
FR
Bedienelemente der Haupt-ECU
LED9- Statusdisplay - Anleitung für den Bediener bei allgemeinen
Problemen
SW1– Bedienelement der Fahreinheit aufwärts/abwärts
SW2– Bedienelement der Fahreinheit aufwärts/abwärts
Mit diesen Tasten ist es möglich die Geschwindigkeit der
Fahreinheit um die Hälfte zu reduzieren.
SW3– Verriegeln Sie den Schalter für normalen Stuhlbetrieb und zum
anzeigen von Nutzerfehlern (0-9) auf Fehleranzeige LED.
Entriegeln Sie den Schalter zum Aktivieren der
Vorschubsteuerungsschalter und zur Freigabe des
Technikfehlerdiagnosemodus.
SW4– Tasten für erweiterten Modus ändert die LED des
Statusdisplays (LED9)
LEDs 1- 8 Fehlerdisplay. Leuchten auf, um den Fehler am Produkt
anzuzeigen.
Controles de la ECU principal
LED9- Indicador de estado - Ofrece al usuario una indicación
básica de los posibles fallos que pueda presentar el
producto.
SW1– Botón de control del carro para subir/bajar
SW2– Botón de control del carro para subir/bajar
Estos botones permiten hacer funcionar el carro a
media velocidad.
SW3– Enganche el interruptor papa la operación normal del
asiento y para mostrar los fallos (0-9) en la pantalla
LED .
Desenganche el interuptor para activar los botones de
control del carro y para habilitar el modo diagnóstico
para el técnico.
SW4– Botón de modo avanzado. Cambia el indicador de
estado LED (LED9).
LED indicadores de fallo 1 a 8. Se encienden para indicar
diversos fallos en el producto.
Engineering Mode controls