Ⅵ
.METHOD OF THE OPERATION
1.ARGON ARC WELDING(TIG)
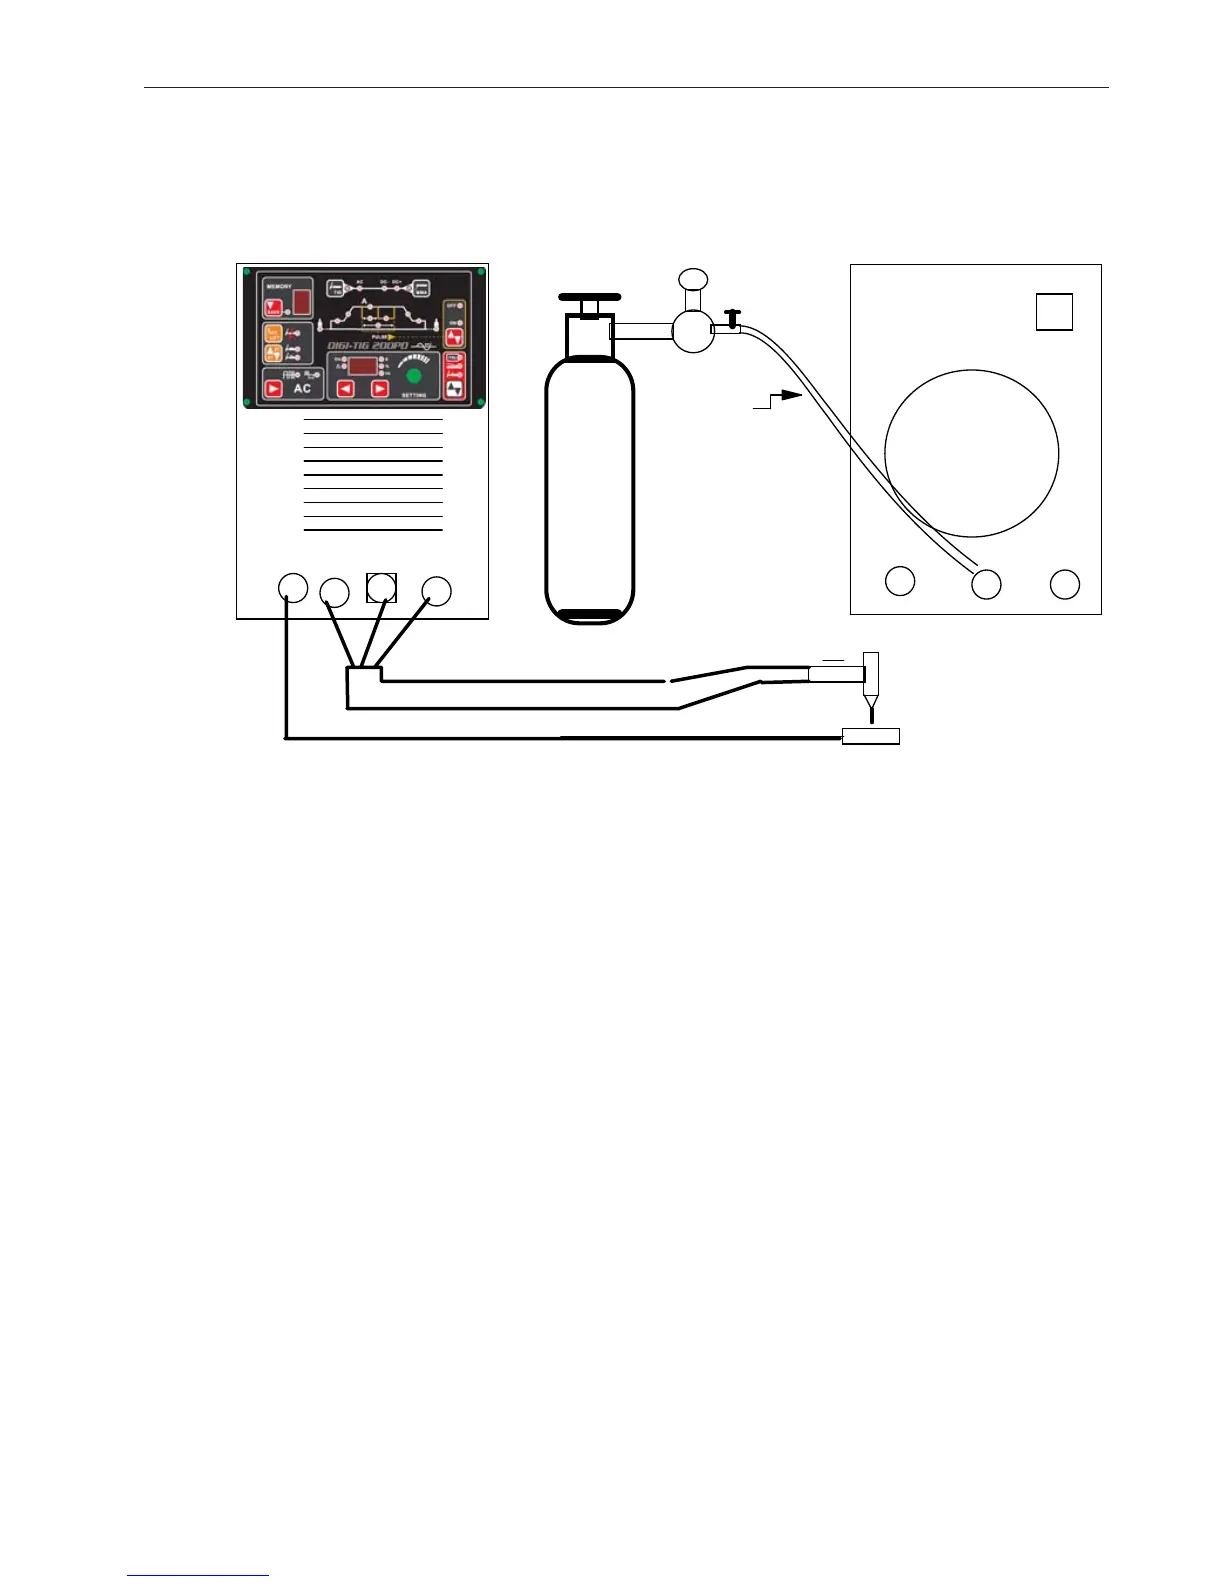
a. FRONT OF WELDER b. BACK OF WELDER
1.1 CLEARING BEFORE WELDING
Tungsten argon an welding is very sensitive to surface contamination of filled metal.
Therefore before welding is carried out, grease, paint and coating on the surface,lubricant for
machining and oxidized film should be removed.
1.2 DC ARGON ARC WELDING
①
.selector "11" onto the position " DC TIG "or "AC TIG", selector "10" onto the position " pulse
off " ,Connecting the gas inlet pipe to inlet "21" of the welding.
②
.Connecting gas inlet pipe of the welding torch to argon output of welder "17".
③
.Putting the aerial plug of the welding torch in the argon arc control socket "18".
④
.Testing gas: get the power of the welder ready and switch on the power "2", open the argon
bottle switch and switch on the flow meter, press the torch switch, select suitable argon flow.
⑤
. .Regulating the knob " 3 &13". Selecting suitable welding current according to thickness
of the workpiece to be welded.. Selecting suitable current down slope time and post flow
time according to the current.
Notice 1:
The current indicating meter on the front panel is used to display the preset output
current level before welding, and actual output level while welding: A lit display indicates input
power is turned on.
Notice 2:
When using
'
Adjustable foot control
'
.regulating the current with sole. selector "12" onto
the position " PEDAL "welding current will increase gradually when you step at full tilt the '
Adjus
table foot control
'
with sole.
Notice 3:
When using
'
Adjustable finger control torch
'
.regulating the current with finger.
selector "19" onto the position " Panel " or " PEDAL "or"
finger torch
",, then begin to weld.
⑥
. Tungsten electrode end is 2-3mm away from the welding workpiece. Press the torch
torch
21
argon
bottle
switch
flow meter
gas inlet pipe
20
24
23
22
7 8
4
9
10
1113
3
5
6
15
15
16
17
18 16
1
12
19
26
FRONT PANEL BACK PANEL
6 MACHINE OPERATION
6.1 ARGON ARC WELDING (TIG)
6.2 CLEANING BEFORE WELDING
Tungsten argon welding is very sensitive to surface contamination. Therefore, before
welding is carried out remove grease, paint, surface coatings, lubricants and oxidized
film.
6.3 DC ARGON ARC WELDING (refer to diagram on page 5)
6.3.1 Select 11 to the position DC TIG, select 10 to the position PULSE OFF, connect
the gas inlet pipe to inlet 21.
6.3.2 Connect welding torch gas inlet pipe to argon output 17.
6.3.3 Connect the torch control plug to the argon arc control socket 18.
6.3.4 Testing gas: Switch on the power 2. Open the argon bottle. Press the torch
switch and select suitable argon flow.
6.3.5 Regulating knobs 3 & 13. Select suitable welding current according to
thickness of the workpiece to be welded. Select suitable current down slope
time and post flow time according to the current.
Note 1: The current indicating meter on the front panel is used to display the
preset output current level before welding, and actual output level while
welding: A lit display indicates input power is turned on.
Note 2: Select 12 to the position PEDAL and regulate welding current with
the foot control.
Note 3: When using Adjustable Finger Control torch, select 19 to position
PANEL or PEDAL or FINGER TORCH then start welding.
6.3.6 Ensure tungsten electrode end is 2-3mm away from the workpiece. Press
the torch switch, arc striking will occur. Notice: During welding, when the
2T/4T switch 12 is on 2T the switch of the torch must be pressed and
should not be released, otherwise the arc will be broken.
 Loading...