EasyManua.ls Logo

Steelcase Brody 488 User Manual

Steelcase Brody 488
6 pages
To Next Page IconTo Next Page
Page #1 background imageLoading...
Page #1 background image
488 Brody
®
Page 1 of
250761 Rev G
TWO (2) INSTALLERS
DEUX (2) PERSONNES
DOS (2) INSTALADORES
ZWEI (2) PERSONEN
PROTECTIVE BLANKETS
COUVERTURES PROTECTRICES
COBERTURA PROTECTORA (10)
SCHÜTZENDE UNTERLAGEN
3” BIT HOLDER
PORTE-MÈCHE DE 75 mm (3 po)
PORTA PUNTAS DE 3 PULGADAS
BIT-HALTER 75 MM
T30 & T40
T30 et T40
T30 y T40
T30 und T40
8MM SOCKET WRENCH
CLÉ À DOUILLE DE 8 mm
LLAVE DE TUO DE 8mm
8MM STECKSCHLÜSSE
8MM
L
12” BIT HOLDER
PORTE-MÈCHE DE 30 cm (12 po)
PORTA PUNTAS DE 12 PULGADAS
BIT-HALTER 30 CM
(10) ZIP TIES
(6” OR LONGER)
(AU MOINS 15)
(10) AMARRAS DE CREMALLERA
(DE 6 PULGADAS O MÁS LARGAS)
(10) KABELBINDER (MIND. 15 CM )
For Europe, Middle East and Africa
If you have any problems, questions or any other requirements,
please contact your Steelcase dealer or Steelcase sales
representative.
En Europe, Moyen-Orient et Afrique
Si vous avez des problèmes, des questions ou des demandes,
contactez s'il vous plaît votre revendeur Steelcase ou le
personnel de vente Steelcase.
EN Europa, Oriente Medio y África
Si tiene problemas, preguntas o requisitos, por favor póngase
en contacto con su distribuidor o personal
de ventas de
Steelcase.
IN Europa, Mittleren Osten und Africa
Bei Problemen, Fragen oder sonstigen Wünschen wenden Sie
sich bitte an Ihren Steelcase Fachhändler oder Steelcase
Außendienst-Mitarbeiter.
© 2015 Steelcase Inc.
Printed in
Grand Rapids, MI 49501
USA

Other manuals for Steelcase Brody 488

Question and Answer IconNeed help?

Do you have a question about the Steelcase Brody 488 and is the answer not in the manual?

Steelcase Brody 488 Specifications

General IconGeneral
BrandSteelcase
ModelBrody 488
CategoryIndoor Furnishing
LanguageEnglish

Summary

Install Power Block

Align and Secure Power Block

Steps for aligning, snapping, and securing the power block to the shroud.

Manage Power Cords

Route and secure excess power cords using provided ties/clips.

Install Screens onto Brody Chair

Place Ganging Brackets and Screen Assembly

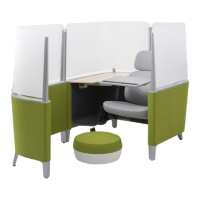
Position ganging brackets and lift screen assembly into place.

Attach Screens to Base Unit

Install screens to the base unit using specified T30 torx bit and extension.

Add Finishing Touches

Insert screw covers, place bracket pad, and attach alignment clips.

Install the Privacy Lounge Extension

Position Brody Base and Remove Components

Place Brody base on caddy and remove adjacent leg and L-bracket.

Position Extension Unit

Place the extension unit in line with the base unit side wall.

Install Ganging Brackets and L-brackets

Attach ganging brackets and L-brackets using T40 Torx bit and extension.

Install Legs and Rotate Unit

Install legs on L-brackets and carefully rotate the unit into place.

Install Screens onto Brody Chair with Extension

Place Ganging Brackets and Screen Assembly

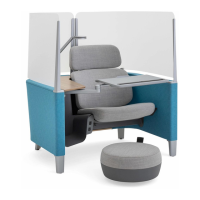
Position ganging brackets and lift screen assembly into the base unit.

Attach Screens to Base Unit

Install screens to the base unit using T30 torx bit and 12" extension.

Add Finishing Touches

Insert screw covers, place bracket pad, and attach alignment clips.

Related product manuals