E-1
CAUTION:
USAGE OF CONTROLS OR ADJUSTMENTS OR PERFORMANCE OF PROCEDURES OTHER THAN THOSE SPECIFIED HEREIN MAY
RESULT IN HAZARDOUS RADIATION EXPOSURE. THEREFORE, THIS UNIT SHOULD NOT BE ADJUSTED OR REPAIRED BY
ANYONE EXCEPT QUALIFIED SERVICE PERSONNEL.
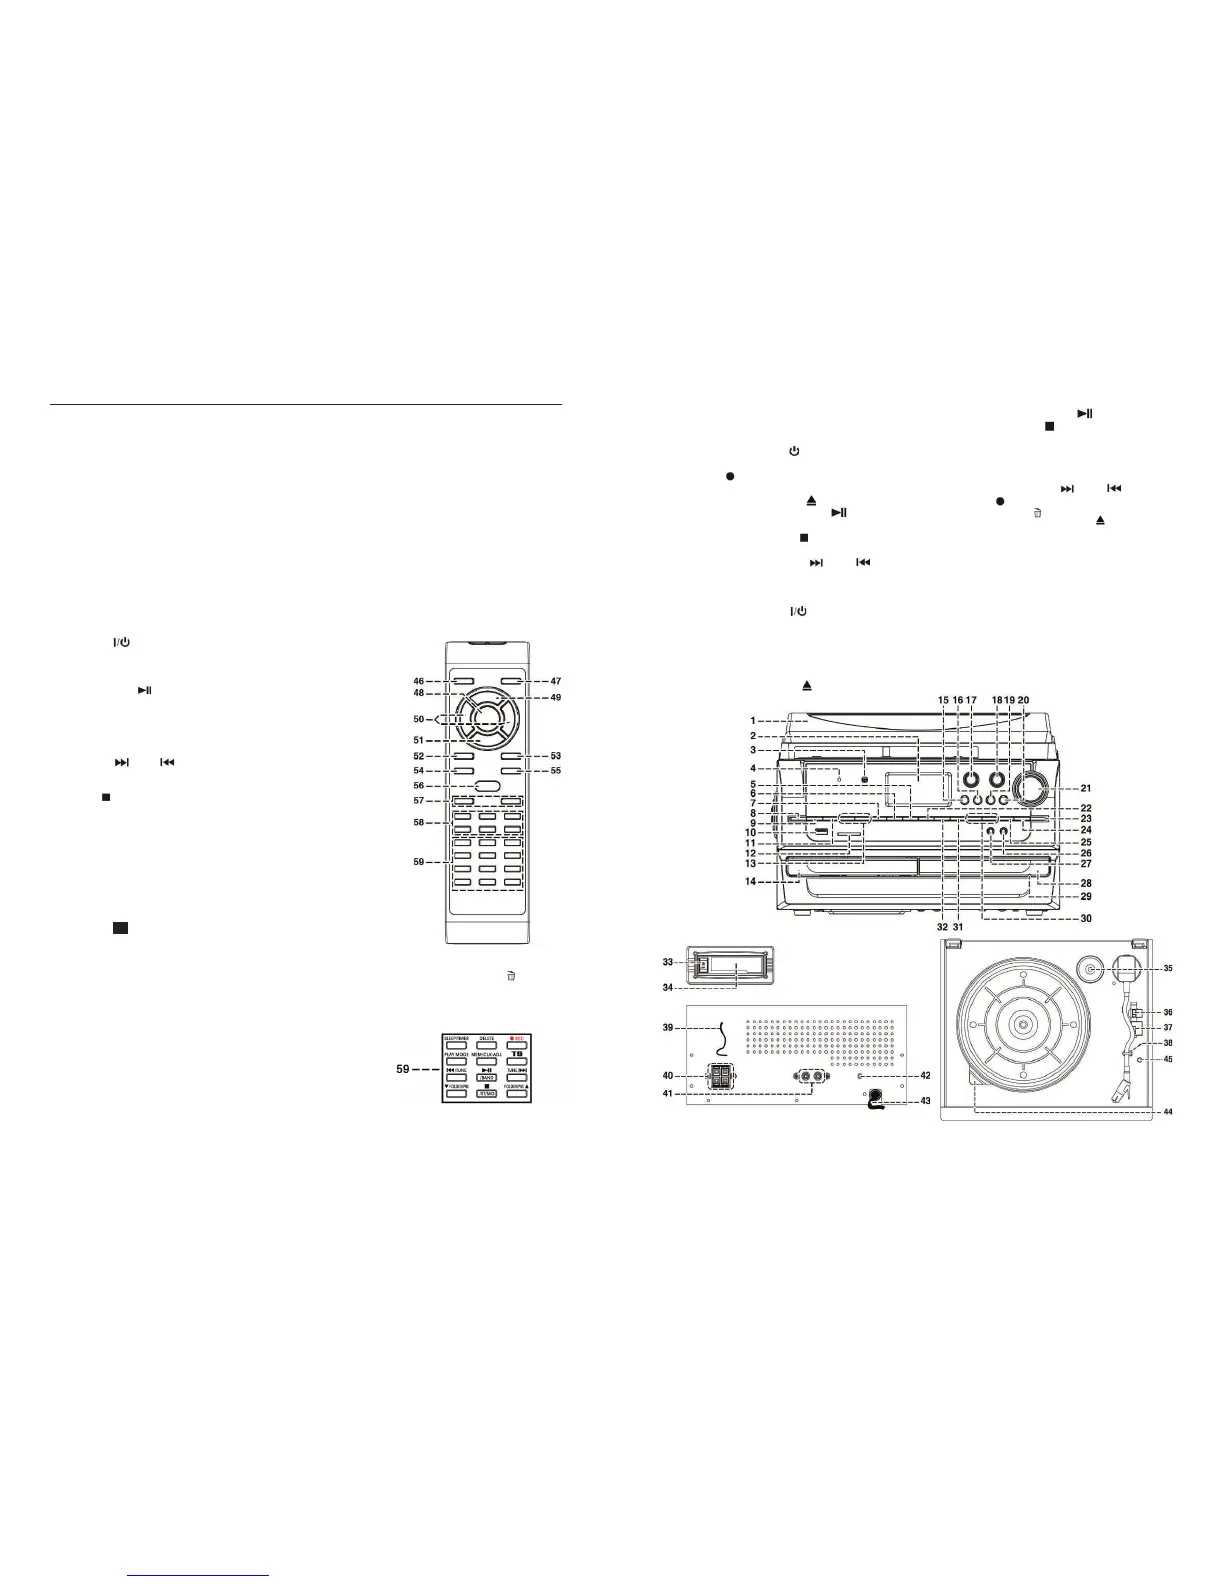
LOCATION OF CONTROLS
1. Dust Cover
2. LCD Display
3. Remote Sensor
4. Standby LED Indicator
5.
MEM/CLK-ADJ button
6. USB/SD
RECord button
7. CD
I /USB/SD FOLDER/PREset-UP Button
8. CD
I – Open/Close Button
9. CD
I/USB/SD – CD Play/Pause /band Button
10. USB Port
11. CD
I/USB/SD – CD Stop /ST/MO Button
12. SD Card slot
13. CD
I/USB/SD – CD Skip Up / Down Button
14. CD
I – CD door
15.
FIND/Encode ‘TS’ button (for Track Separation)
16. CD
II ‘TS’ button (for Track Separation)
17. Standby/On/Off Button
18.
FUNCTION Button
19.
AUTO/MANUAL Button
20. Preset
EQ Button
21.
VOLUME Up/Down knob
22.
FINALIZE Button
23. CD II Open/Close Button
24. CD II – CD Play/Pause Button
25. CD
II – CD Stop Button
26. 3.5mm Headphone Jack
27. 3.5mm
AUX-IN Jack
28. CD
II – CD door
29. CD
II – Manual Eject hole
30. CD
II – CD Skip Up / Down Button
31. CD
II RECord Button
32.
ERASE Button
33. Tape Forward / Eject Button
34. Cassette Slot Cover
35. 45rpm Spindle Adaptor
36. Turntable Speed Selector (33/45/78rpm)
37. Auto Stop Switch (
ON/OFF)
38. Tone Arm Rest & Securing Clip
39.
FM ANT Wire Antenna
40.
SPEAKER Sockets (L + R)
41. Line-Out Socket (RCA / L + R)
42. Subwoofer-out Jack
43. AC Mains Cord
44. Strobe Lens
45. Pitch Control Knob
ff
E-16
REMOTE CONTROL TRANSMITTER
BATTERY INSTALLATION
The infra-red transmitter requires 2 x 1.5V / ‘AAA’ size batteries for operation (not supplied).
It is recommended Alkaline Batteries are used to avoid the risk of leaking.
Insert the batteries observing the correct polarities (+ / -).
BATTERY USE & SAFETY
¾ Do not try to recharge the unless they are rechargeable batteries.
¾ Always use batteries of the same type/brand and do not mix old and new batteries
¾ Use only the specified size and type of battery (‘AAA’ - not supplied).
¾ A battery may explode or leak if it is mistreated - do not attempt to recharge or disassemble it.
¾ Do not dispose of the old battery in a fire – danger of explosion!
¾ Remove the batteries as soon as they are discharged or if the remote is not going to be used for a long time.
¾ Do not dispose of discharged batteries with your normal household waste. If not sure of how to dispose of
used batteries, please contact your Local Council for information on the authorized disposal location and
recycling facilities in your area.
¾ Keep batteries out of the reach of children.
REMOTE CONTROL BUTTON DESCRIPTIONS
46) ON/OFF Press to switch the unit on or off/into standby
47) FUNCTION Press to change to different modes
48) PLAY/PAUSE
In CD II mode, press once to start playback.
Press again to enter Pause mode.
49) PROGRAM In CD II mode, press to activate programming
function
50) SKIP Up
/Down In CD II mode, press to select the previous/next
tracks
51) STOP
In CD II mode, press to stop playback
52) DISPLAY Press to change the CD playback information on
the LCD display
54) REPEAT In CD II mode, press to activate the Repeat Play
function
55) + 55) REC LEVEL -/+ Press when recording to select the CD II
recording level
56) PRESET EQ Press to select a different EQ mode
57) VOL - / + Press to adjust the volume level down or up
58) CD II RECORDING Press to operate CD II recording functions such as FINALIZE, ERASE
, REC,
OPERATION BUTTONS CLEAR, AUTO/MANUAL, ‘TS’ (Track Separation)
BUTTONS FOR CD I, USB & TUNER OPERATION:
59) CD I/USB/TUNER Press the buttons in this section to operate
CD I, USB & TUNER functions: such as
PLAY MODE, FOLDER/PRESET DOWN/UP,
MEM/CLOCK/SLEEP/TIMER setting, etc.
as marked above the buttons.
 Loading...