E-2
INSERT THE PLASTIC COVER c
BRACKETS INTO dTHE BLACK HINGE
PUSH BOTH TURNTABLE DECK BLACK
HINGES BACKWARDS
e
PUSH THEM DOWN FIRMLY INTO THE
HINGES TO COMPLETE THE INSTALLATION
PRECAUTIONS FOR USE
INSTALLATION
x Unpack all parts and remove any protective packing materials.
x Please keep all packaging until you have fully checked all parts of the unit are working correctly and for future
use in case the unit needs servicing.
x Ensure the Remote Control has been taken out of the packaging before storing the box away.
x This unit is operated by 230V~50Hz AC mains only.
x Do not connect the unit to the mains before checking the mains voltage is correct for the unit and before all
other connections have been made.
x When positioning the unit, never cover any vents and make sure that there is a space of several centimeters
around the unit for ventilation.
CONNECTION
1. Connect the speaker wires to the speaker terminals (R + L) (40)
located on the rear of the unit. Push the right red socket switch
upwards to expose the hole in which to insert the red speaker cable
–
insert the wire and release the switch. Push down the right black
socket switch and insert the black cable wire.
2. Repeat this process for the other speaker, ensuring only the metal
part of the wire is inserted.
3. Connect the power cord (43) to a 230V AC Mains outlet.
4. ….. ….. : ….. ….. will be flashing on the LCD Display (2), and the Red
STANDBY LED Indicator
(4) will be on, which indicates the unit is
connected to the mains power and the system is ready for use.
5. Press the Standby/On button
(17) to switch the unit on - the LCD display, as well as the blue LED light
around the VOLUME control (21) will light up. “TUNE” shows briefly on the display and sound will be
coming from the speakers.
Note: The unit is defaulted to start with the radio (Tuner) function after switching on.
6. Press the FUNCTION button (18) repeatedly to switch to other functions – on the display it will show:
CD-2, then CD1 – USB – CARD – PHON – TAPE – AUX and eventually TUNE again.
IMPORTANT NOTE: If you find the unit switches itself off regularly, this is not a fault. Due to the ErP
stage 2 requirements for the Protection of the Environment, when the unit is connected to the mains
power, as a power saving measure, it will switch itself off automatically or go into standby mode if no
music has been playing for over 15 minutes. Switch the unit off and after a few seconds on again to
re-activate it. **For more information
on the ErP2 Directive, please refer to the last page in this manual.
DUST COVER ASSEMBLY
SETTING THE CLOCK
1. Make sure the unit is in Standby mode (17).
2. Press and hold the “
MEM/CLK-ADJ” button (5) a second, the display will start flashing.
3. Press the Skip/
TUNE or button (13) to select the appropriate hour format (12hr/24hr).
4. To set the HOUR: Press the “
MEM/CLK-ADJ” button again, the first 2 digits will be flashing.
5. Press the Skip/Tuning or button (13) to set the correct hour.
6. Press the ”
MEM/CLK-ADJ” button to store the correct hour.
7. To set the MINUTES: The 3rd and 4th digits “00” will then be flashing, press the Skip/Tuning
or
button (17) to set the correct Minutes
8. Press “
MEM/CLK-ADJ” to store the correct minutes.
E-15
SUBWOOFER JACK
Connect a powered or active Subwoofer (not supplied*) to the Subwoofer Jack (41) on the rear of this unit to add
extra BASS sound. The sound of the Subwoofer can only be adjusted by its own controls.
*Contact your supplier, or Steepletone UK Ltd, for a suitable subwoofer system to use with this unit.
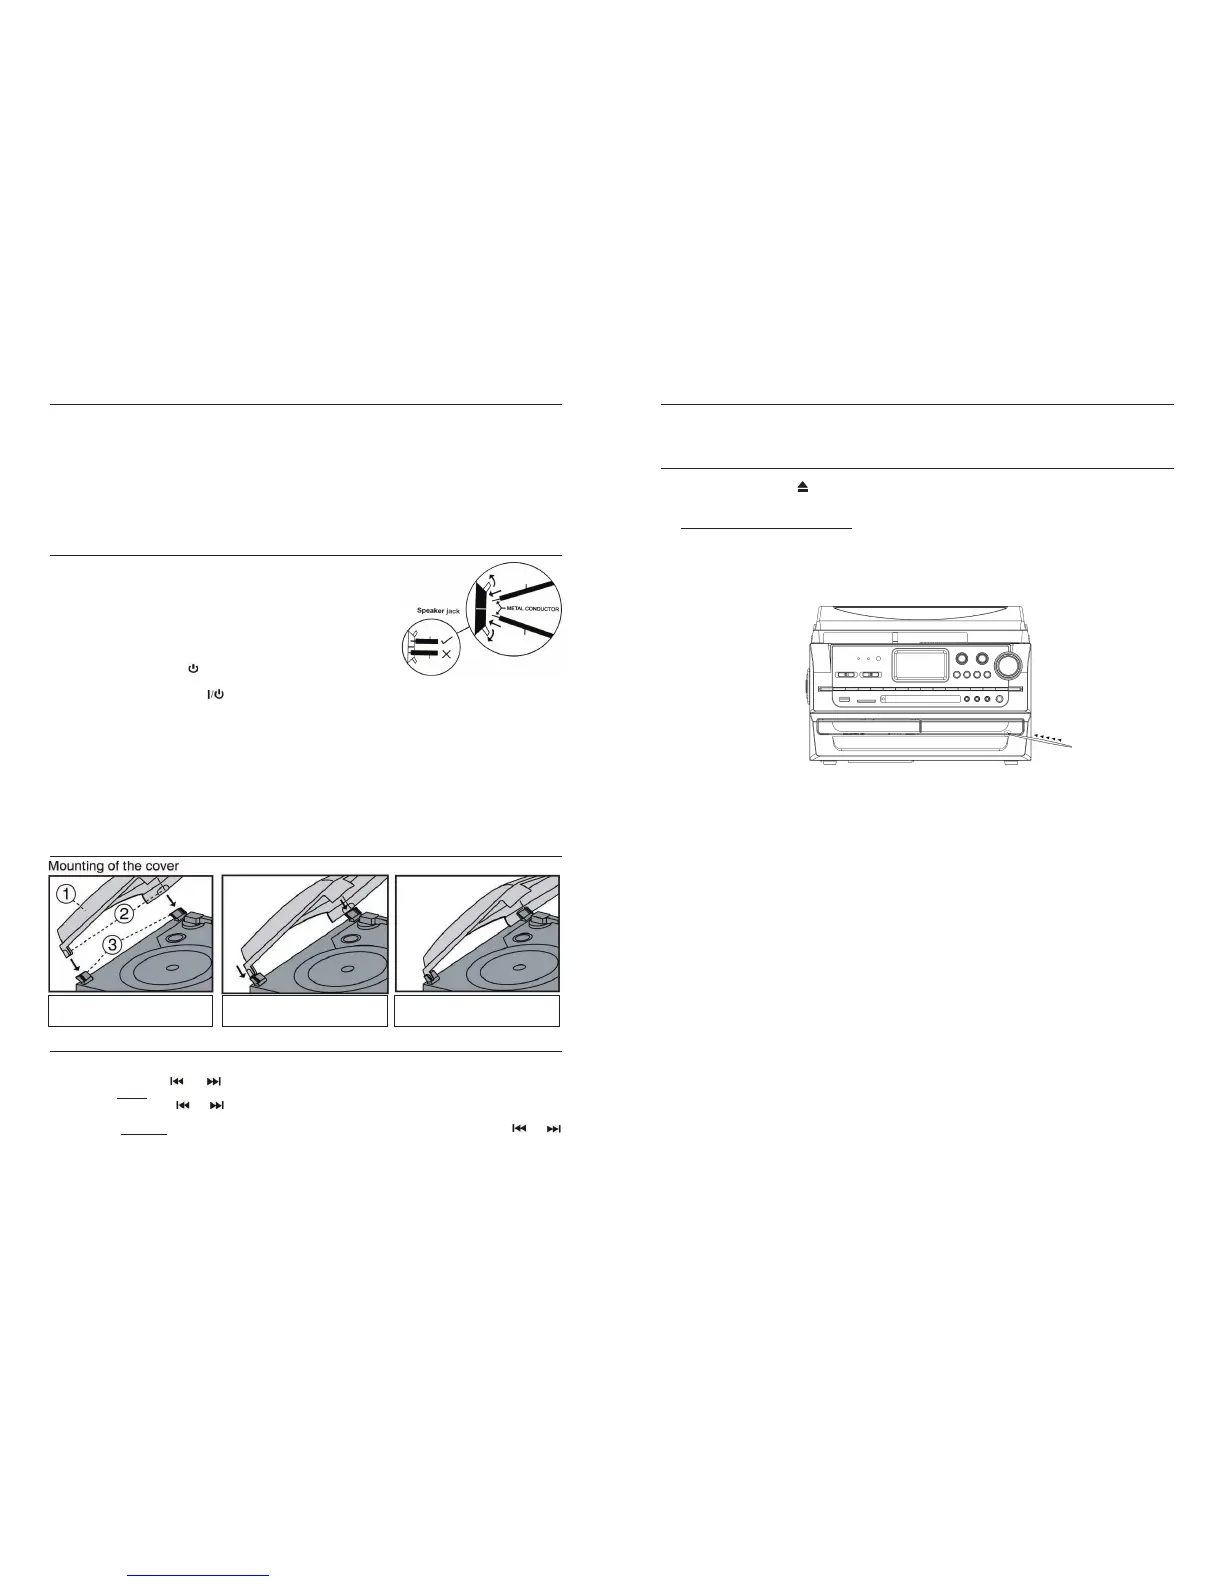
MANUALLY EJECT THE CD FROM CD II
If the power is interrupted or if you notice a problem occurs during the CD burning process, the CD tray may not
eject when the eject button is pressed. If that happens, you will need to manually eject the CD tray to
retrieve the CD, following the steps below.
1. Turn OFF the power to the unit first. Do not manually open the tray when there is power to the drive!
2. Locate the MANUAL EJECT HOLE (29) on the front of the CD II tray as shown below.
3. Carefully insert a stiff wire, such as a straightened paper clip, into the CD
II MANUAL EJECT HOLE.
4. When resistance is felt, gently press harder until the drive tray opens slightly.
5. Gently pull the tray out the rest of the way by hand to expose the CD.
6. Restart the system and repeat the burning process again.
MANUAL EJECT HOLE
 Loading...