E-5
NOTES:
– With the switch in the “OFF” position, the turntable will not stop turning at the end of the record, so to stop the
turntable rotating, turn the unit off or switch the AUTO STOP switch back to the “ON“ position, then return the
Tone Arm to the Arm Rest.
– With the Switch in the “OFF” position, the turntable will start rotating as soon as ‘PHONO’ mode is selected.
– Important: If anything is plugged into the “
AUX-IN“ socket, the turntable will not be able to rotate!
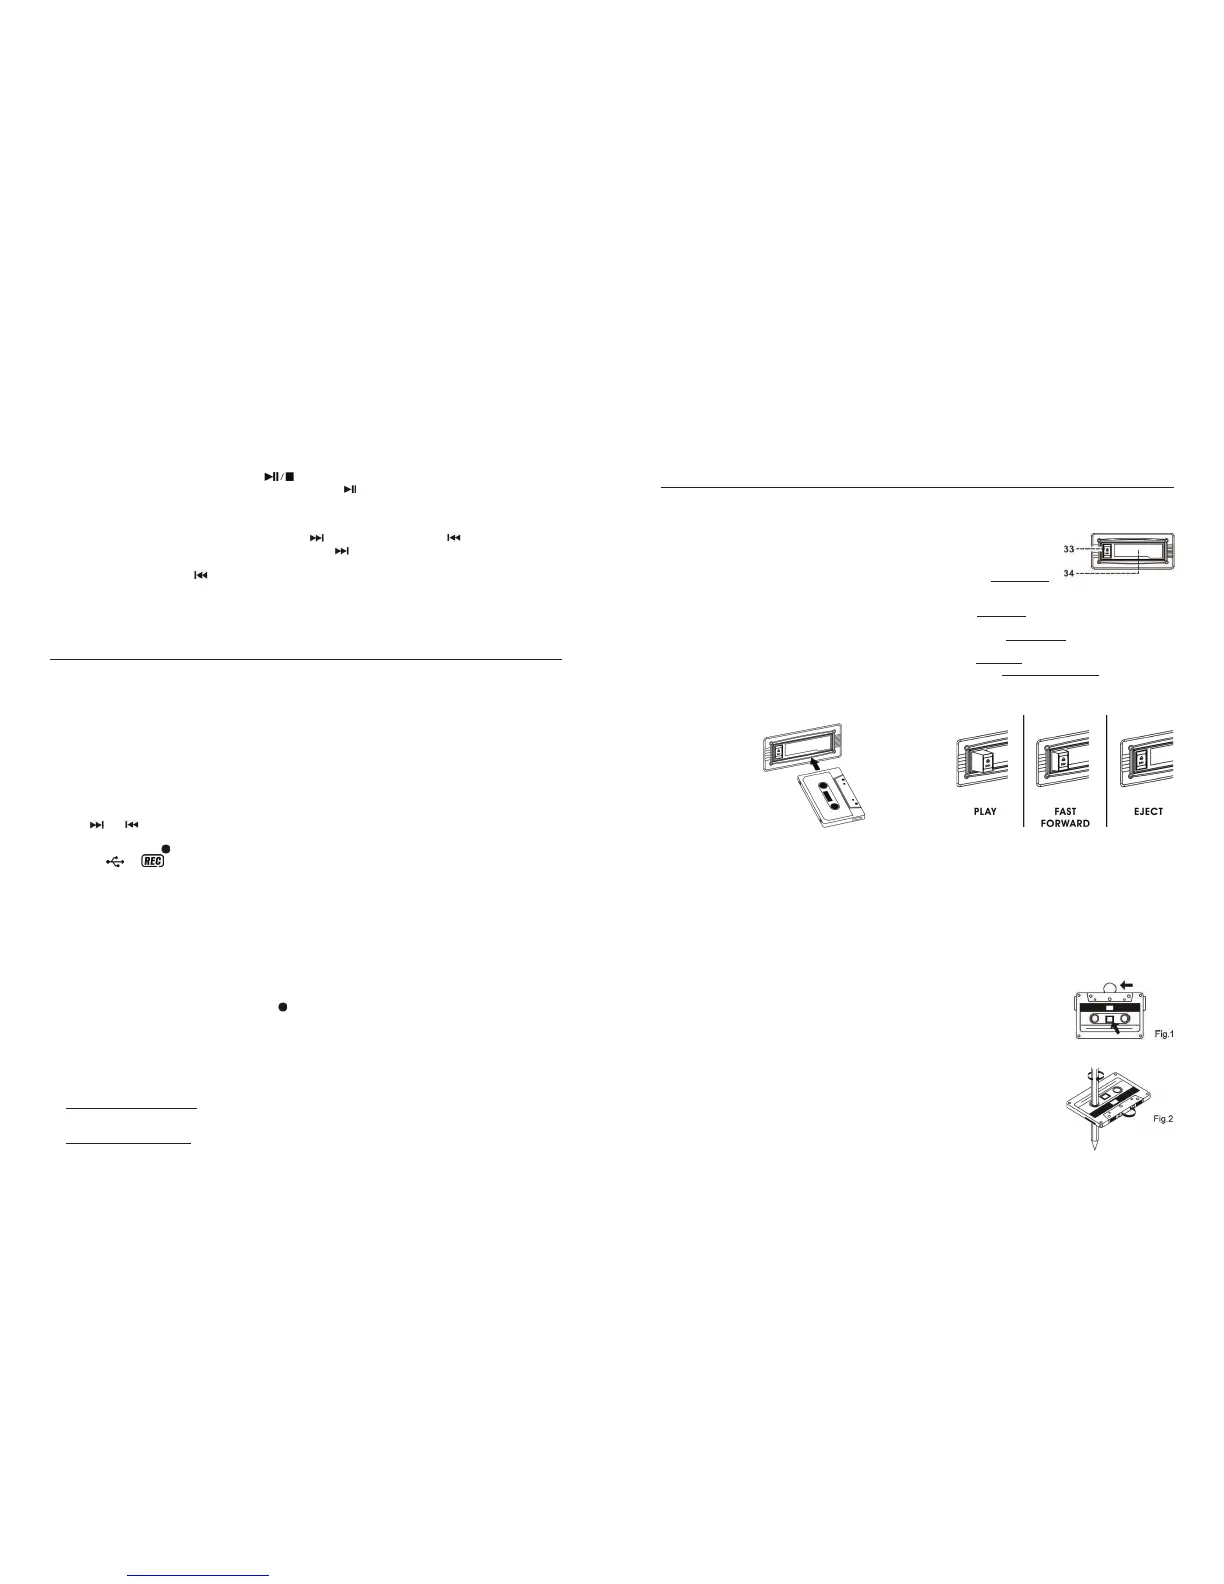
LISTENING TO CASSETTE TAPE
GENERAL OPERATION
Press the “FUNCTION” button (18) to select and activate the Tape/Cassette Mode:
Cassette Playback The system will start playback automatically after a
pre-recorded cassette tape has been inserted into the Cassette
slot on the side of the unit (see line drawing below for the
correct direction in which to insert the tape).
The “Tape Forward / Eject“ button (33) will stay at full height
position while playing the tape.
Stop and Ejection Press the “Tape Forward /
EJECT“ button (33) completely inwards - the cassette tape will
be ejected though the Cassette Door Cover (34).
The “Tape Forward / Eject“ button (33) will stay at the lowest height position.
Fast forward Press the “
TAPE FORWARD / Eject“ (33) button halfway in during Playback Mode - the tape
will wind in a forward direction. The button will stay at mid-height position.
Slightly press the “Tape Forward / Eject“ button in again to resume normal playback - the
“Tape Forward / Eject“ button will resume at the highest position while playing.
Notes:
– Make sure the direction is correct when inserting a tape into the cassette slot. Some searching noise will be
heard, this is quite normal.
– The system cannot perform the normal playback function during Fast Forward mode.
– It is strongly recommended the cassette tape is removed from the Cassette Player slot after each use - don’t
leave the cassette tape inside the system when you do not intend to play it.
CASSETTE CARE
Two common causes of trouble experienced when using cassettes are:
1. Tape jamming, leading to uneven speed during playback.
2. Tape entangling, when the tape wraps itself around vital parts of the mechanism.
To avoid these problems occurring, take the following precautions:
a) Check that there are no loose layers of tape visible through the cassette centre
window (see fig. 1).
b) Take up any loose layers (using a pencil or ballpoint pen with hexagonal barrell)
before inserting the cassette (see fig. 2) into the mechanism.
Notes: If the cassette feels tight whilst performing this operation (see fig. 2), the tape
may be jamming due to ridges formed in the winding of the tape (visible through the
centre window). In most cases, these may be removed by fast rewinding of the
cassette from one end to the other, turning it over and repeating this action again.
Do not expose cassettes to direct sunlight, dust or oil, and do not touch the tape
surfaces.
E-12
REMOVING A USB DEVICE/SD CARD
Before disconnecting a USB device or SD Card, to avoid damaging the files on the device it is recommended you
switch the unit off or change to another function first.
For USB: Pull the plug straight out.
For SD: Pull the card straight out of the slot, without bending it.
z USB/SD PLAY / PAUSE OR STOP MODE
1. To interrupt or pause playback, press the “CD
I Play/Pause ” button (9) once, the playing time will freeze
and flash on the USB/SD operation display. Press it again to resume normal playback.
2. To stop playback, press the “Stop
“ button (11) during playback.
z USB/SD SKIP/SEARCH MODE (SKIP/SEARCH UP
/ SKIP/SEARCH DOWN )
1. While in play or pause mode, if the CD I/USB/SD “Skip up ” button (13) is pressed, the unit will skip to the
next track, display the track number and then either play the music or stay in pause mode.
2. Press the CD
I Skip Down button (13) to go to the previous track and the music will continue playing or
stay in pause mode.
3. Press & hold the CD
I/USB/SD “Skip up or Skip down button“ during playback, the playing track will fast
forward or backward until the button is released.
4. Press the CD
I/USB/SD “FOLDER PRE-UP“ button (7) to select the desired folder.
MP3 ENCODING to USB or SD
This system is able to encode music from a normal Audio CD/Vinyl record/Aux-in or Tape to MP3 format and
record this to a USB device (size up 16GB max) or SD/MMC card (size from 1GB up to 32GB max).
Note: the readability of SD cards of less than 1GB size depend on the Card Brand.
As an example, the section below shows how to encode to USB from CD
I:
z MP3 ENCODING FROM CD (RECORDING FROM THE “CD I” PLAYER IS RECOMMENDED)
ENCODING ONE CD TR
ACK OR A COMPLETE DISC
1. Plug the USB device (e.g. a Flash Drive) that you wish to record onto into the USB Port (10) - make sure it has
enough memory to allow encoding and only contains MP3 format files.
2. Select the CD
I mode by pressing the “ Function“ button (18) and set it in STOP mode. The CD I
operation display area (2) will show the TOC (Table of Contents) on the disc in CD
I.
3. Press the “USB/SD Record“ button (6) to start encoding. The display will show “ONE”, press the USB/SD
skip
or buttons to select one track or all tracks, the CD I operation display will show “ONE” or “ALL”
accordingly.
4. Press the “USB/SD “
REC” button (6) to confirm the encoding. The system will start playback automatically
and the
& icons will be flashing. This indicates the CD I encoding has now started.
5. After the encoding procedure is finished, the CD
I and Encoding will stop.
ENCODING CD TRACKS BY PROGRAM
1. Select the desired tracks by following the same procedure as for “CD/MP3 programming”.
2. Follow steps 3 & 4 above as for CD
I encoding.
Notes:
– The recording speed is 1:1 and according to the actual playing time of the CD track.
– The system will creat
e an “Audio“ folder and then store the encoded track in it.
– The recording format is pre-set at MP3 bit rate: 128 kbps, Sampling rate: 44.1kHz.
– Song titles will not be recorded during encoding.
– To interrupt the recording, press the “USB/SD
REC“ button (6) again during recording.
– A recording can only be completed if the entire song has been encoded. If the encoding process is
terminated half-way through recording a track, the track will not have been being recorded or stored on the
USB or SD/MMC card.
z MP3 ENCODING FROM PHONO OR AUX
1. Select PHONO or AUX mode by pressing the Function button (18).
2. For encoding from Phono: Place the record you wish to encode on the tu
rntable and get it ready for
playback.
3. For encoding from Aux-in: Connect the audio device (such as an MP3 player, CD player, Radio, etc.) via its
headphone socket to the 3.5mm Aux-in jack (27) and get it ready to play.
Notes for Aux-in operation: A connection cable with 3.5mm dia. Stereo plugs will be required (not
supplied).
 Loading...