B) RECORDING SETTING
I) RECORDING LEVEL
The preset recording level of the system is lower than that of the original music source to avoid distortion during
recording, except when in “Aux-in” recording Mode
.
II
) MANUAL TRACK SEPARATION
You can separate the music tracks to be recorded at any time during the recording process:
After a track has played, press the “ Track Separation “
“ button (22, or TS on the RC) once during recording
(in any mode), the system will generate a new track and then continue recording the next track. The word “ bUSY
“ will briefly show on the LCD display - this means the unit is successfully creating a new track
.
III
) FINALIZING A CD-R OR CD-RW DISC
A CD-R(W) disc must be converted into a standard Audio CD before it can be played in any other CD Player,
including CD I on this unit. This process is known as “ finalizing “ and a table of contents (TOC) will be written on the
CD at the same time:
1. Press (20) to select the “ CD
II ” Function and place the recorded CD-R(W) disc to be finalized in the tray.
2. Press the Finalize button (8, or on the Remote Control) while in Stop Mode - “ FIN-d “ will show on the LCD
display. (If you wish to quit the finalizing Mode for any reason, just press the “ Stop
” button).
3. Press the “ Play/Pause
” button (24) to start finalizing - the LCD display will show “ bUSY “ during the
finalizing process.
4. After completion, the CD door will open automatically and “ NO TOC “ will disappear from the display.
NOTES:
- The time it takes to finalize a disc depends on the contents of the recording and it may take up to 15 minutes or
longer in some instances.
- No function buttons or switches are working during the finalizing process.
- Never turn the power off or unplug the cord during the finalizing process to avoid corrupting the system.
- A CD-R disc cannot be recorded on again after finalizing.
- Although a finalized CD-R disc may be played on other CD players, remember that this is not always
guaranteed.
- Not all CD-R or CD-RW discs generally on sale may be compatible with this system, due to differences in their
manufacture. If you find the quality of the recording unsatisfactory, this is not a malfunction of the system.
Please try using a disc of a different brand.
IV) ERASING OR UNFINALIZING A CD-RW DISC
It is possible to erase the last recorded track or erase a complete recorded disc on a CD-RW disc only.
a) ERASING ONE TRACK
1. Select the “ CD II ” function (20) and place the finalized CD-RW disc that you wish to delete the file from in the
CD
II tray.
2. In CD
II Stop Mode (i.e. the CD must not be playing), press the “ ERASE “ button (32 or 12 on the Remote
Control) and wait until “ bUSY “ disappears from the LCD Display.
3. Press the CD
II “ Play/Pause ” button (24/3 on the RC) to start erasing the last track.
4. Repeat step 2 and 3 to continue erasing more tracks if required.
5. Press the “ Stop
” button to quit the Erase Mode if necessary.
b) ERASING ALL TRACKS
1. Select the “ CD II ” function and place the CD-RW disc you wish to delete in the CD II tray.
2. In CD Stop Mode (i.e. the CD must not be playing) press and hold the “ ERASE “ button (32 or 12) and wait until
“UNFIN D “ appears on the LCD display.
3. Press the CD
II “ Play/Pause ” button (24/3) to start erasing all tracks and “bUSY” will show on the display.
4. The LCD display will show “ 0000000 “ to confirm the erasing process is completed and the disc is empty.
NOTES:
- This operation is permanent and cannot be undone.
- Individual tracks on a CD-RW disc copied on another audio system cannot be erased on this unit, but it may be
possible to erase All Tracks on a copied CD.
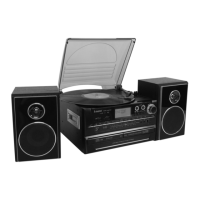
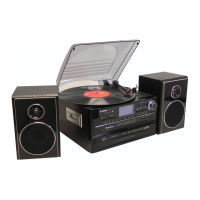
HEADPHONE SOCKET
For private listening, headphones (not supplied) can be plugged into the 3.5mm dia. Headphone Socket (28).
While listening through headphones, all sound from the internal speakers will be muted.
E-7
 Loading...