Disc type
DVD
VCD
MP4
CD
Disc symbol
MPEG4
Disc content
Audio and video
Audio and video
Audio and video
Audio only
Disc size
12CM
12CM
12CM
12CM
4
INCLUDED IN THE PACKAGE
1 x Instruction Manual 1 x RCA
to RCA Cable
1 x DVD Remote Control 1 x RCA to 3.5mm stereo plug Cable
1 x Lighting Remote Control 1 x FM Antenna
1 x USB to Micro USB connecting Cable 1 x iPad Bracket
1 x Power Supply cable (15V DC Mains Adaptor) 1 x Stylus
CONNECTING TO THE MAINS POWER
This Jukebox is designed to be operated by 15V DC power – AC/DC Mains Adaptor is supplied.
PANEL KEYS FUNCTIONS
1. MAIN POWER : Main Power switch.
2. LIGHT : LED lighting ON/OFF switch.
3. STAND BY/MUTE : Stand by ON/OFF key - When the power is switched on:
: Press this key to switch the sound Off.
: Press it again to switch the sound On.
: Press and hold it to switch the unit to Stand By or Off.
4. RESET : Reset button.
5. R : Remote control Sensor area.
6. MIC : “Call for Bluetooth” voice communication window.
7. MENU : Menu Function key – to access the various menus.
8. VOL+ : Volume Up key – Press to increase the sound volume.
9. SEL : Sound setting function - Press this function key to set the unit’s sound,
and then press VOL + / VOL - to adjust the volume level.
10. VOL- : Volume Down key - Press this key to decrease the sound volume.
11. DOWN : Panel Display angle - Press this key and the Display will slide down.
12. UP : Panel Display angle - Press this and the Display will slide upwards.
13. OPEN/EJECT
: Press this key for the display to slide down horizontally
, the DVD
drive/slot to open, press this key to make the display slide up again.
14. USB : Micro USB Port – Connect your USB device via the lead supplied.
PRECAUTIONS
To avoid accidents, please read the following precautions before installing and operating the
Jukebox:
Ø To ensure high quality video and audio effect, do not spray juice or other liquids on the
Jukebox or disc.
Ø The disc slot must be clean and wiped with a soft cloth if dusty: clean the disc with a soft
cloth before inserting it into the slot, or else dust may be brought into the Jukebox, the playing
effect will be affected and as time passes, it may be difficult or not possible to insert or eject
a disc. These are no faults with the Jukebox. If there problems occur, it may be necessary
to ask qualified personnel to clear the dust.
Ø The life of the Jukebox will be affected if it discs are played for a long time at high volume.
Ø For long life and good performance of the device, it is recommended to adjust the volume
to a medium level.
Ø Do not try and rebuild or modify the device so as to avoid accidents.
Ø The discs in the table below are suitable for use with this Jukebox:
Note: Depending on the quality and/or the condition of the recording or disc, it may not be
possible to read all discs. Try again with another disc.
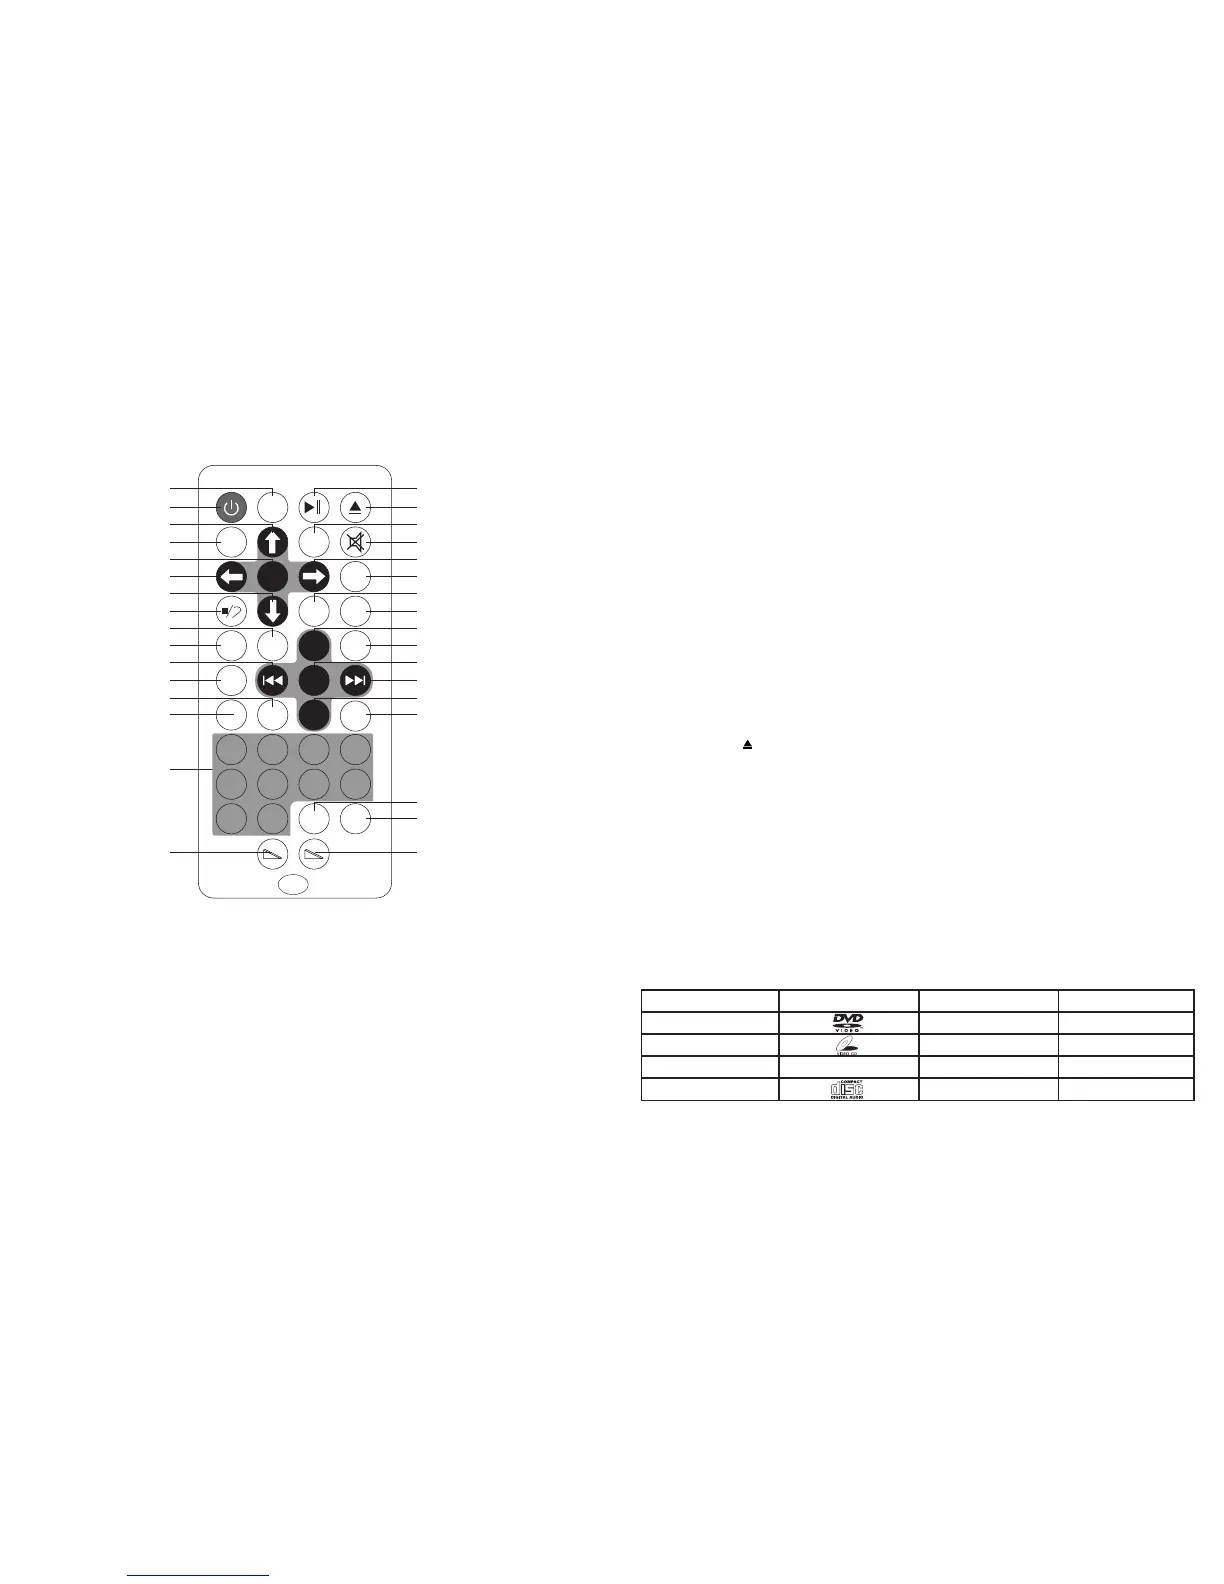
REMOTE CONTROLS - BUTTON DESCRIPTION
(
Note: This handset can be stored on one of the front magnetic panels of the cabinet, where indicated,
provided that a metal battery has been fitted).
(1) MAIN UNIT REMOTE CONTROL
CONNECTING EXTERNAL SPEAKERS
1. This jukebox is equipped with external speaker outputs.
2. The speaker jacks for external speakers are located on the back of the jukebox. Beside the speaker
jacks is a switch labelled (INT./EXT.). When using external speakers, this switch must be switched
to the “EXT.” position - this will allow only the external speakers to play, all sound from the internal
speakers will be cut off.
3. If you decide not to use the external speakers, be sure the switch is in the “INT.” position or the
internal speakers will not work.
Note: Adjust the sound from the External Speakers to the desired listening level.
HEADPHONE CONNECTION
1. Connect your Headphones (not included) to the Headphone Jack on the rear of the unit.
2. Adjust the volume to a safe level.
Note: When using headphones, the sound from the internal speakers of the unit will be cut off.
Ensure the headphones are removed after each use to allow the sound to come out of the internal
or external speakers again.
11
TITLE
SETUP
ANGLE
SUB-T
VOLUME+
ZOOM
SEL
VOLUME-
AUDIO
LOUDNESS
GOTO
SCROLL UP
EJECT
PLAY/PAUSE
MUTE
RIGHT
MODE
STAND BY
UP
BND
ENTER
APS
LOC RDM
OSD
PBC
STEREO
RETURN
DOWN
LEFT
FORWARD SKIP
BACKWARD SKIP
0-9
SCROLL DOWN
1 2 3 4
5 6 7 8
9 0
LOUD GOTO
PBC OSD Audio
SEL
VOL-
VOL+
LOC
RDM
APS ST ZOOM
Sub-TAngle
TitleBND
MODE
ENTER
Setup

 Loading...