3
When
speaking to the subject, never act surprised or provoked by
their responses or lack of response. Give the subject every opportunity to
demonstrate their best vision.
If the subject is wearing glasses or contact lenses, they should
wear them during the testing to determine whether they meet the
requirements for corrected vision.
The table or counter should be of convenient height with sufficient
surface space for the instrument. Normal room lighting is acceptable, but
care should be taken to avoid light shining on the lenses or on the
subject's face.
III. OPERATING THE OPTEC
®
1000
The first step is to connect the control panel to the instrument.
Connect the multi-prong plug to the back of the control panel. The plug will
fit in only one way. Push the plugs together and tighten the screw on each
side of the plug. You should not have to unplug the control panel once you
have joined the instrument and panel together.
Plug control panel into an electrical outlet by using the black cord
with the three (3) prong plug. (110 V AC)
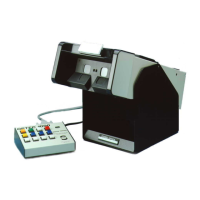
CONTROL PANEL OPERATIONS
CONTROL SWITCHES: From left to right; (see figure #1)