This document is an operating manual for the Hausted® Horizon® Series Multi-Purpose Stretchers, specifically models 4E1 & 4E2 (120 VAC) and 4D2 (230 VAC). It provides comprehensive information on the proper use, maintenance, and technical specifications of these electric-powered stretchers.
Function Description:
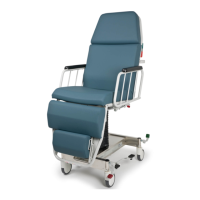
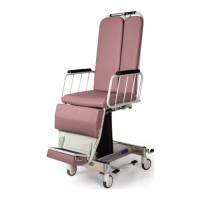
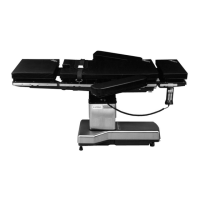
The Hausted® Horizon® Series Multi-Purpose Stretchers are electrically powered medical devices designed for patient transport and recovery. They feature various adjustments to accommodate patient comfort and medical procedures, including height, Trendelenburg, reverse Trendelenburg, Fowler, and knee flex adjustments. The stretchers are equipped with braking and steering mechanisms for safe and easy maneuverability. Optional accessories like push handles and IV rods enhance their versatility.
Important Technical Specifications:
- Product Classification: Class 1 Equipment, Type B Equipment.
- Electrical Specifications (4E1 & 4E2 Models):
- Input Voltage: 120V ~, +/-5%, 60Hz
- Amperage: Max. 3.5A
- Duty Cycle: 10% (6 min in 1 Hr.)
- IP Rating: IPX4
- Grounding Protection: Type B
- Electrical Specifications (4D2 Models):
- Input Voltage: 230V ~, +/-10%, 50Hz
- Amperage: Max. 1.9A
- Duty Cycle: 10% (6 min in 1 Hr.)
- IP Rating: IPX4
- Grounding Protection: Type B
- Patient Weight Capacity:
- Model 4E1HMC (hydraulic base): 226 Kilograms (500 lbs.)
- Model 4E2HMC (electric base): 226 Kilograms (500 lbs.)
- Models 4D2DPA and 4D2DPA: 283 Kilograms (625 lbs.)
- Stretcher Weight: 315 lbs.
- Dimensions: All dimensions are ±.375 inches.
- Continuous Operation: Not suitable for continuous operation (Duty Cycle: 10% six minutes in one hour).
- Anesthetic Mixture: Equipment not suitable for use in the presence of a flammable anesthetic mixture with air or oxygen or nitrous oxide.
- Splash-proof Equipment: IPX4.
- Battery Backup: The unit is equipped with a battery backup system for electric features, recommended for transport and emergency only. It requires approximately 8 hours of charging to fully charge.
Usage Features:
- Unpacking and Setup: The manual provides step-by-step instructions for unpacking, checking functionality, cleaning, and charging the battery before placing the unit into service.
- Braking and Steering:
- Applying Brakes: Depress the red pedal at any of the four corners to activate the central braking system. All four caster wheels should be locked from swiveling and rotating.
- Releasing Brakes: Depress the green pedal at any of the four corners. All four wheels should rotate and swivel freely.
- Applying Steering Lock/Fifth Wheel: Depress the green pedal downward into the locked position. The stretcher will steer forward, and one caster at the foot end will lock into a non-swivel mode, or the optional fifth wheel will lower and apply pressure to the floor, allowing straight steering.
- Releasing Steering Lock/Fifth Wheel: Depress the red pedal at any of the four corners. All four wheels should rotate and swivel freely, and/or the optional fifth wheel will retract.
- Litter Top Height Adjustment (4E1 Models Only): Press and release the pump pedal until the desired height is obtained. To lower, press down on the two release pedals simultaneously.
- Trendelenburg Adjustment (4E1 Models Only): Place the unit at maximum height, then press the release pedal nearest the head end until the desired position is obtained.
- Reverse Trendelenburg Adjustment (4E1 Models Only): Place the unit at maximum height, then press the release pedal nearest the foot end until the desired position is obtained.
- Electric Control Locations:
- Nurses Control Panel: Located at the foot end of the unit, under the top.
- Patient Pendant: Adjustable location, can be on either side of the rail.
- Plug Locations: Hospital grade plug located under the head end of the top section.
- Emergency Electric Backrest Override: Fowler backrest quick drop handle located under the litter top at the stretcher mid-section, for emergency use only.
- Low Battery Light (L.E.D.): Located on the controller cover under the head end. Illuminates when a pendant button is pressed, indicating backup batteries need charging.
- Litter Top Adjustment (4E2 & 4D2 Models Only):
- Height Adjustment: Lockout knob controls both pendant and control panel. Turn knob clockwise 90° to unlock, counter-clockwise 90° to lock. Nurse can use up/down arrows on the control panel. Patient can use up/down arrows on the patient pendant.
- Fowler Adjustment: Lockout knob controls both pendant and control panel. Turn knob clockwise 90° to unlock, counter-clockwise 90° to lock. Nurse can use up/down arrows on the control panel. Patient can use up/down arrows on the patient pendant. Manual override function for Fowler backrest is available via a red "T" handle under the litter top.
- Knee Flex Adjustment: Lockout knob controls both pendant and control panel. Turn knob clockwise 90° to unlock, counter-clockwise 90° to lock. Nurse can use up/down arrows on the control panel. Patient can use up/down arrows on the patient pendant.
- Trendelenburg Adjustment (4E2 & 4D2 Models Only): Nurse can use top/bottom buttons on the fourth row of the control panel. Patient pendant does not have Trendelenburg functions.
- Airglide Rail Operation: To raise, grasp the top tube and pull up until it locks. To lower, grasp the top, pull out the red tab, and lower completely.
- Retracto Rail Operation: To raise, grasp the top cap in the middle and lift. For half height, lift the rail, pull up on the red trigger under the litter top, release trigger when the rail starts to move down, and lower until it locks. To lower completely, lift the rail, hold up on the red trigger, and lower all the way down.
- Push Handle Operation (Optional Accessory): To raise, hinge the push handle up until it stops. To lower, lift up on the push handle and rotate until it is in the down position.
- Permanently Mounted IV Rod Operation: To put in up position, grasp the IV rod and hinge upward until it stops. To extend, lift up on top of the IV rod until desired length is achieved. To retract, press the button in the gray housing and lower the IV rod until desired height is achieved.
Maintenance Features:
- Preventive Maintenance Schedule:
- Every 3 Months:
- Lubricate all moving and sliding parts and hinge points with lubricating oil, light-duty grease, or wax stick lubricant. (Do not lubricate gas spring, motor, and mech-lock shafts).
- Inspect all fasteners for proper fit, position, and tightness.
- Inspect all surfaces for sharp or burred areas and apply touch-up paint as required.
- Recommended Cleaning Instructions:
- Pads: Wipe with damp cloth using routine hospital grade disinfectants, soap, and water. Do not steam clean or pressure wash.
- Electric Components: Wipe with damp cloth using routine hospital grade disinfectants, soap, and water. Ensure any wet surface on electric components is dry before plugging into a wall receptacle. Do not steam clean or pressure wash.
- Mechanical Stretcher Components: Wipe with damp cloth using routine hospital grade disinfectants, soap, and water. Lubricate pivot points after cleaning.
- Mechanical Accessories: Wipe with damp cloth using routine hospital grade disinfectants, soap, and water. Lubricate pivot points after cleaning.
- Troubleshooting Guide: Provides solutions for common issues such as non-moving components and low battery light.
- Battery Replacement Instructions: Step-by-step guide for replacing batteries, emphasizing safety warnings regarding electrical shock and proper wiring.
- Warnings and Cautions: Extensive list of safety precautions including laceration hazards, personal injury risks, electrical shock risks, and proper operation guidelines (e.g., ensuring rails are locked, smooth and level floors for fifth wheel steering).
Important Notes:
- Always disconnect the power source when servicing any electric-powered stretcher.
- Do not remove the control box cover; service by qualified personnel only.
- The batteries are wired in series; incorrect installation or rewiring can cause explosion.
- Steam cleaning and pressure washing are not recommended and can void the warranty.
- It is recommended that the unit remain plugged into a wall receptacle during normal use, with battery backup for transport and emergency only.
- Only STERIS approved accessories should be used.