Do you have a question about the Stihl GHE 250 and is the answer not in the manual?
Understanding the purpose and scope of the instruction manual for proper use.
Guidance on interpreting symbols, text, and illustrations in the manual for clarity.
Essential safety regulations and general precautions for operating the machine safely.
Warnings and safety measures related to electrical hazards and connections for user protection.
Recommended personal protective equipment and attire for safe operation of the shredder.
Guidelines and safety precautions for moving the garden shredder safely.
Explains the caution symbol and the need to read the manual for warnings.
Explains hazard symbols related to general injury risks and danger areas.
Explains hazard symbols related to rotating parts and keeping hands away.
Explains hazard symbols related to reaching into feed or ejection chutes.
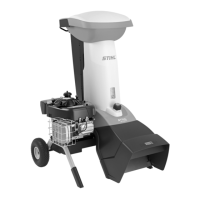
Step-by-step guide to assemble the wheels and axle onto the machine.
Procedure for attaching the chassis and ejection chute assembly.
Instructions on how to operate the discharge flap for shredding and transport.
Steps for installing the upper chute onto the machine.
How to attach the cable clip for storing the power cord.
Details on the types of organic material suitable for shredding.
Lists materials that should not be fed into the shredder due to safety or damage risks.
Specifies the maximum thickness of branches that can be shredded.
Defines the safe zone around the machine during operation.
Guidance on maintaining the correct load on the motor for optimal performance.
Explanation of the motor overload protection system and its behavior.
Steps to take if the shredding blades become jammed.
How the motor restart inhibitor prevents accidental startup.
Describes the safety mechanism that stops the motor if the feed chute is not closed.
Information about the brake that stops the blades quickly.
Details on safety covers protecting feeding and ejection areas.
Detailed instructions for cleaning the machine after each use.
Steps for attaching the feed chute to the basic unit.
Procedure for detaching the feed chute.
Identifies components subject to normal wear that require timely replacement.
Emphasizes user responsibility for damage due to non-compliance.
Highlights the importance of regular maintenance and specialist dealer services.
Section for recording initial machine delivery details and next service date.
Area for the specialist dealer to record performed maintenance operations.
| Power | 2500 W |
|---|---|
| Product color | Black, Orange, White |
| Uncertainty K | 2.7 dB |
| Cutting system | Blade |
| AC input voltage | 230 V |
| Transport wheels | Yes |
| Rated speed (max) | 2800 RPM |
| Sound power level | 103 dB |
| Material throughput | - kg/h |
| Sound pressure level | 92 dB |
| Collection box capacity | - L |
| Maximum branch thickness | 30 mm |
| Weight | 27000 g |
|---|