Do you have a question about the Stinger HEIGH10 UN1810E-FT2 and is the answer not in the manual?
Steps to remove the original stereo unit and its wiring from the vehicle dashboard.
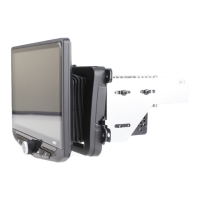
Instructions for assembling the core HEIGH10 unit components prior to installation.
Guide to correctly attaching fascia brackets and fitting the fascia plate to the HEIGH10 unit.
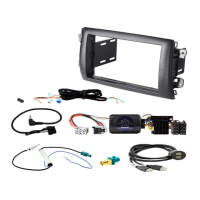
Instructions for setting DIP switches and connecting interface harnesses for vehicle integration.
Explains normal and Infodapter menu navigation using steering wheel controls on the vehicle.
Overview of how to adjust original vehicle settings via the aftermarket head unit interface.
Details on configuring Infodapter layout and functionality options for enhanced user experience.
Options to add/remove settings within Infodapter menus, including language, units, and vehicle features.
Allows adjustment of the Infodapter display screen size to match the aftermarket head unit fitted.
Options to adjust brightness, contrast, and saturation levels of the Infodapter menus and graphics.
Configuration for Park Assist, Camera connection, and Park Brake source activation settings.
Selection of available languages and viewing of the current software version history for the unit.
Procedure to exit the Infodapter menu system and return to standard stereo operation.
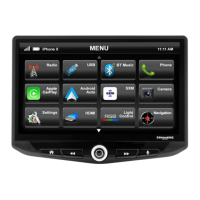
The Stinger HEIGH10 is an integrated infotainment touch screen solution designed for the Fiat Ducato 8 Series (2021-up) facelift models. This system upgrades the vehicle's radio with a 10-inch infotainment display, while retaining all original equipment manufacturer (OEM) features, vehicle settings, and more, in an easy-to-install, plug-and-play package. It is specifically compatible with non-amplified Continental Mopar factory head units.
The HEIGH10 system is engineered to enhance the screen size and expand infotainment features for drivers. Key functionalities include Apple CarPlay, Android Auto, DAB+, and Bluetooth streaming, offering a comprehensive suite of connectivity and entertainment options. The system integrates seamlessly with the vehicle's existing controls, allowing key vehicle settings to be retained and managed through the HEIGH10 display via the steering wheel controls.
The installation process begins with the removal of the existing stereo. This involves using a trim removal tool to pry and unclip the air vents surrounding the radio. There are three tabs along the top edge of the vent and two metal lugs (one on top, one towards the bottom) that need to be disengaged. Once the vents are unclipped, four T20 bolts holding the radio in place must be undone, and the radio can then be removed after disconnecting all associated wiring.
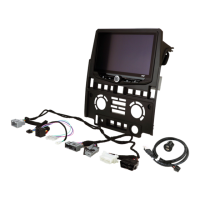
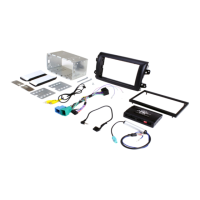
Following the stereo removal, the HEIGH10 components are assembled according to the "Installation Manual" provided with the unit. This involves configuring the HEIGH10 unit and attaching the fascia brackets to the sides of the radio module using the supplied screws. A rough test fit in the vehicle is recommended to ensure proper alignment of the brackets. Once aligned, the fascia is attached to the brackets over the unit using the kit's screws. After all stereo installation steps are complete, the assembled unit is placed into the dashboard and secured with the pre-existing screws, followed by reassembly of the main fascia panel.
The interface setup involves configuring the dipswitches on the interface module. Dipswitch 1 differentiates between Pioneer head units (ON) and all other head units (OFF - Default). Dipswitch 2 sets the reverse camera to PAL (ON) or NTSC (OFF - Default). Dipswitch 3 allows for resetting factory settings (ON) or retaining current settings (OFF - Default). Dipswitch 4 is not used.
The 14-way connector on the vehicle interface harness is plugged into the relevant connection on the side of the interface. The 12-way connector of the stereo patch lead is also plugged into its corresponding connection on the interface, and its 3.5mm jack is then attached to the HEIGH10 unit. A 4-way camera extension harness is connected to the interface. The antenna adapter is attached to the vehicle's pre-existing connection and the back of the new HEIGH10 unit. The USB retention lead connects between the vehicle's pre-existing USB connector and the HEIGH10 unit.
For camera functionality, the male yellow RCA connector is connected to the 'reverse camera input' on the back of the new stereo. If an aftermarket reverse camera is used, it connects to the female yellow RCA on the camera extension harness. It is crucial to ensure the 'Camera Connected' option in the 'Preferences' menu is set to 'Yes' for the camera to function correctly.
Additional wiring on the harness is connected to the back of the stereo: Pink for Speed Pulse, Green for Park Brake, and Purple for Reverse. Finally, after all wires and accessories are connected, the power connections between the stereo and the vehicle's pre-existing connector are made. A full connection breakdown of the HEIGH10 unit is available in its dedicated "Installation Manual."
The Infodapter retains several of the vehicle's original steering wheel control functions. These include moving up and down between tracks, adjusting the volume, and picking up or hanging up calls. Additionally, the steering wheel controls are used to enter, exit, and navigate the Infodapter menus. The diagram illustrates the layout:
Steering wheel controls related to cruise control on the front are unaffected. If the vehicle lacks phone buttons, the 'Source' button acts as the Infodapter enter/exit button.
To access the 'Configuration Menu,' simply hold the 'Speech' button (Fig. 8) on the steering wheel. If phone buttons are absent, the 'Source' button will serve as the Infodapter enter/exit button. The 'Configuration menu' presents various options and settings to customize the user experience. Navigation is done using the 'Track Up' and 'Track Down' buttons (Fig. 1 & 2).
The Infodapter interface preserves the ability to adjust vehicle settings that were present with the original head unit. The 'Vehicle Settings' menu includes various original vehicle settings, which are now accessible through the aftermarket head unit. The 'Config Type' allows adjustment of security packets emitted from the interface, crucial for preventing the odometer from flashing. Refer to the vehicle handbook for more details on these features.
This menu contains parameters to enhance and adapt the Infodapter's layout and functionality.
This menu offers options to add or remove settings within the Infodapter menus. Each option can be set to 'OFF,' 'ON,' or 'AUTO' to control its display in the main Configuration Menu. For example, if 'Language' is set to 'OFF,' it will disappear from the main menu.
Note: While care has been taken to ensure the accuracy of this menu structure, sudden software changes by the manufacturer or incompatibilities with the interface cannot be accounted for. This list is not exhaustive.
Allows adjustment of the Infodapter display screen to match the exact size of the aftermarket head unit.
Enables adjustment of Brightness, Contrast, and Saturation levels for Infodapter menus and parking graphics.
Provides a selection of languages (English, French, German, etc.) and allows viewing of the current version history.
To exit the Infodapter menu system and return to standard stereo operation, press and hold the MUTE or VOICE button while in the top-level Configuration Menu.
For further help or assistance, users can fill out a support ticket with full details of their issue via supportaampeu.zendesk.com/hc/en-us. For general inquiries, contact Stinger at Phone: 01384 958 500 or E-Mail: stinger.eu@aampglobal.com, Monday to Friday, 9 am to 5:30 pm GMT. A digital copy of the manual and other product information can be found on the www.StingerElectronics-EU.com website. This manual is considered correct at the time of printing but is subject to change; users should refer to the website for the latest manuals and updates.
The end user agrees to use this product in compliance with the instructions, terms of use, and all applicable laws. Stinger provides instructions and safety warnings and disclaims all liability for any use not in conjunction with these instructions or other misuse. If the user does not agree, they should discontinue use and contact Stinger. This product is intended for off-road and passenger use only.
| Display Size | 10.1 inches |
|---|---|
| Resolution | 1024 x 600 |
| Touchscreen | Yes |
| Bluetooth | Yes |
| Apple CarPlay | Yes |
| Android Auto | Yes |
| SiriusXM Ready | Yes |
| Navigation | Yes |
| Rear Camera Input | Yes |
| Preamp Voltage | 4V |
| RAM | 2 GB |
| Internal Storage | 32 GB |
| Wi-Fi | Yes |
| GPS | Yes |
| USB Ports | 2 |
| Steering Wheel Control | Yes |
| Inputs | USB, AUX |
| Built-in Amplifier | Yes |
| Expandable Storage | Yes |
| Outputs | RCA |