Do you have a question about the STL FLARE 12 and is the answer not in the manual?
Covers user responsibilities, daily testing, proper mounting, wiring, and avoiding interference.
Guide to identify all parts, check small bags or foam protection.
Essential points for installers on electronics, LED safety, cleaning, wiring, and airbag zones.
Steps to bench test before installation, checking LEDs, patterns, and condition.
Instructions on cleaning, avoiding car washes, and lens yellowing.
Covers wire color functions and key product specs like voltage and LED count.
Instructions for syncing patterns between multiple units using white and yellow cables.
Steps for programming alternating patterns between groups using blue cables.
Guidance on extending cables, soldering, heat shrinking, and protecting connections.
Mounting instructions using the push bulb method, lens insertion, and hardware.
Steps for surface mounting with a flare flange, cable routing, and hardware.
A list of all 34 available flash patterns, including steady burn and various flashing sequences.
Instructions to toggle steady burn mode by holding a button for 3 seconds.
Explains non-volatile memory and how to cycle through patterns.
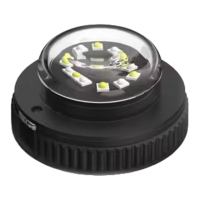
The FLARE 12 HIDEAWAY is an emergency warning device manufactured by SpeedTech Lights, Inc. It is designed to alert pedestrians and other operators to the presence of personnel, the operation of emergency vehicles, an emergency site, and other warning needs. This professional-grade equipment is intended for strict use by authorized personnel only.
The FLARE 12 HIDEAWAY is an LED-based warning light that operates on 12 VDC. It features a dome lens and contains 12 LEDs. The device offers a variety of flash patterns, including steady burn, single flash, alternating flashes, quad flash, and more, totaling 34 different patterns. These flash patterns are stored in a non-volatile memory, meaning the device will recall the last flash pattern used when it is turned on.
The wiring diagram indicates several functions controlled by different wire colors:
For multi-unit installations, the FLARE 12 HIDEAWAY supports synchronization and alternating synchronization. To synchronize units, all units must be powered on and flashing on the same pattern. Connecting the white cables of all units together, and then contacting the yellow cables of all units to +12 VDC, will cycle them to the next pattern. Powering all units off and back on completes the sync process.
For alternating synchronization, units are divided into two groups. After ensuring all units are powered on and flashing on the same pattern, and connecting the white cables of all units, the blue cables of the first group are connected together, and the blue cables of the second group are connected together. Contacting the blue cables of the first group to +12 VDC for 3 seconds will make the first group units steady burn (only half of each unit will light up). Contacting the blue cables of the second group to +12 VDC for 5 seconds will turn off the second group units. Powering all units off and back on completes the alternating sync process. It is important that all programming for both groups is completed before the steady burn portions cease.
The FLARE 12 HIDEAWAY can be mounted in two primary ways:
When extending the main cables, it is crucial to solder and heat shrink the wire connections. It is important not to cross-connect wires and to ensure that connectors, cables, and solder points are not exposed to heat, moisture, or debris.
The device's flash patterns can be set by pushing a dedicated Flash Pattern button on a Grand Control Box (if used) to cycle through the patterns. If a Grand Control Box is not used, the Flash Pattern wire (yellow) can be manually contacted to +12 VDC to cycle through patterns. A shortcut feature allows users to hold the Flash Pattern wire to +12 VDC for 3 seconds to toggle the Steady Burn mode.
To ensure the longevity and proper function of the FLARE 12 HIDEAWAY, specific maintenance practices are recommended:
It is crucial for installers to have a good understanding of automotive electronic systems and procedures. Users and installers must read the entire manual to ensure proper and safe use, preventing property damage or serious injury. The user is responsible for understanding and obeying all laws regarding emergency warning devices.
| Type | LED Light Bar |
|---|---|
| Category | Automobile Accessories |
| Length | 12 inches |
| Light Source | LED |
| Color Temperature | 6000K |
| Beam Pattern | Spot/Flood Combo |
| Waterproof Rating | IP67 |
| Housing Material | Aluminum |
| Lens Material | Polycarbonate |
| Size | 12 inches |
| Mounting Type | Bracket Mount |