The VENTY is a vaporizer designed to produce fragrances or aromas from specified plant materials through vaporization with hot air, which can then be inhaled. It is not intended for medical-therapeutic purposes.
Function Description
The VENTY operates by heating plant material in its Filling Chamber to a user-selected temperature, releasing aromas and fragrances. The device features a built-in rechargeable lithium-ion battery for portability. It includes a Cooling Unit that cools the vapor to provide a pleasant temperature and optimal aroma. The device offers three factory preset temperature levels: Base Temperature (180 °C / 356 °F), Booster Temperature (195 °C / 383 °F, an offset of +15 °C / +27 °F from Base), and Superbooster Temperature (210 °C / 410 °F, an offset of +15 °C / +27 °F from Booster). The Base Temperature and Booster Temperature can be individually changed, while the Superbooster Temperature offset can only be adjusted through the Web App.
The device also features an adjustable airflow mechanism, controlled by a Setting Wheel, allowing users to customize the draft resistance. It has an automatic switch-off function that activates two minutes after the last keystroke or application to conserve battery power.
Usage Features
To begin using the VENTY, first ensure the battery is fully charged. Connect the device to a USB-C charger using the supplied USB-C cable. The display will light up, and charge status fields will flash in an ascending order to indicate the charging level. Once fully charged, all six charge status fields will be visible, and the display will turn off. For optimal battery life, an ECO charging mode can be activated via the Web App.
Before use, the Filling Chamber must be prepared. Unscrew the Cooling Unit by turning it 90° counter-clockwise. Fill the Filling Chamber completely with crushed plant material up to the rim. Avoid excessively compressing or overfilling the chamber, as this can make inhalation difficult. Remove any excess plant material around the chamber. Alternatively, Dosing Capsules (available as optional accessories) filled with crushed plant material can be inserted into the Filling Chamber with the cap facing upwards. After filling, screw the Cooling Unit back onto the Vaporizer by turning it 90° clockwise.
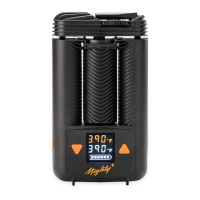
To switch on the device, press the Power Button for at least half a second. The Vaporizer will vibrate, and the display will light up, showing the Set Temperature in orange during the heating process. Heating time can vary, but typically takes at least 17 seconds. A double vibration signal and a green display light indicate that the Base Temperature has been reached.
Temperature adjustment is done using the Plus and Minus Buttons. Briefly pressing these buttons changes the temperature in 1° steps between 40°C and 210°C (104°F and 410°F). Holding the buttons down will continuously and rapidly change the numbers until released. The Booster Temperature is activated by double-pressing the Power Button, and the Superbooster Temperature by double-pressing it again from the Booster Temperature setting. Double-pressing the Power Button from the Superbooster Temperature will revert to the Base Temperature.
The device allows for switching between Celsius and Fahrenheit by simultaneously pressing the plus and minus buttons for 3 seconds. The display backlight can be adjusted (steps 0 to 9) by simultaneously pressing the plus and minus buttons for 5 seconds. Bluetooth functionality can be toggled on or off by simultaneously pressing the Power and minus buttons. When disabled, the Bluetooth symbol will not be visible, and the display will show "bLE". To re-enable, press the Plus Button while "bLE" is shown. To reset to default settings, press the Power Button for 10 seconds; a vibration and animation will confirm the reset.
For application, once heating is complete, fold out the Mouthpiece, place it between the lips, and inhale evenly for a few seconds, taking in only half as much as possible. Hold your breath for a few seconds, then slowly exhale. Users should be mindful that higher temperatures can impair the flavor and may cause irritation to the respiratory tract/lungs, in which case the temperature should be reduced.
The adjustable airflow feature is controlled by the Setting Wheel. Turning the wheel to one notch provides low airflow (almost closed opening), two notches provide medium airflow (half open), and three notches provide high airflow (completely open).
At the end of an application, press the Power Button for at least half a second to switch off the device. The Vaporizer will vibrate and switch off. Allow the device to cool down completely, indicated by a blue display light.
Maintenance Features
Regular cleaning and hygiene are crucial for proper function. The Cooling Unit and Mouthpiece must be free of deposits, which are mainly caused by steam condensate. It is recommended to check the Cooling Unit and Mouthpiece before each use and clean them no later than 7 days after the last use, or if deposits are visible.
To disassemble the Cooling Unit for cleaning:
- Pull the Mouthpiece out of the Cooling Unit Cap, tilting it back and forth slightly.
- Pull off the Mouthpiece Seal Ring using the recess.
- Use the edge of the Mouthpiece in the notch at the Rotary Cap to turn it counterclockwise to open and pull it out.
- Pull off the Seal Ring from the Rotary Cap using the recess.
- Pull the Cooling Unit Cap off the Vaporizer.
- Pull out the Screen inside the Cooling Unit.
- Use the Filling Chamber Tool to press the Setting Wheel out of the Cooling Unit, allowing the Seal Ring to fall out.
- Unscrew the Cooling Unit Base from the Vaporizer by turning it 90° counter-clockwise.
- Carefully press out the Screen from above using a cotton swab.
- Lever out the large Base Seal Ring with the Filling Chamber Tool at the recess in the groove.
For cleaning the Cooling Unit and Filling Chamber Screen:
- Use the Cleaning Brush, cotton swabs, and paper or cotton cloths for manual cleaning.
- Warm rinsing water or isopropyl alcohol can be used as a solvent.
- After each use, clean the Filling Chamber Screen and the Screen of the Cooling Unit with the Cleaning Brush.
- For a thorough clean, place all parts in warm rinsing water for at least five minutes, then rinse under running water for at least one minute, and let them dry completely.
- Alternatively, for a deeper clean, place all parts in isopropyl alcohol for a maximum of 1/2 hour. Then rinse under running water for at least one minute and let them dry completely. Caution: Isopropyl alcohol is flammable and should be handled with care. Do not soak plastic parts in isopropyl alcohol for more than 1/2 hour to prevent embrittlement.
Before reassembling, check all parts for damage, cracks, softening, hardening, embrittlement, contamination, or discoloration, and discard any damaged parts.
To reassemble the Cooling Unit:
- Assemble the parts in reverse order.
- Place the Seal Ring just on top of the Setting Wheel for Airflow, ensuring the "TOP" label is inserted upwards.
- Ensure all Seal Rings are properly seated.
- Insert the Screen correctly into the groove provided for this purpose. Caution: Incorrect screen insertion can lead to clogging and inhalation of plant particles.
To clean the Filling Chamber:
- Use a cotton swab soaked in isopropyl alcohol. Notice: Do not moisten cotton swabs too much to prevent ingress of isopropyl alcohol into the Vaporizer, which can cause material damage.
To remove and install the Screen in the Filling Chamber:
- If a Screen is clogged, it must be replaced.
- To remove, press in the Screen using the Filling Chamber Tool along the groove; it will bulge and detach. Clean it with rinsing water or isopropyl alcohol.
- To install, bend the cleaned or new Screen, insert it into the Filling Chamber with the curved side facing upwards, and press it flat into the groove with the Filling Chamber Tool.
Cleaning the Vaporizer and USB-C cable:
- Switch off the Vaporizer and disconnect the USB-C cable from the mains supply.
- Clean the housing of the Vaporizer and the USB-C cable only with a dry soft or damp cloth. Notice: Do not immerse the device or cable in water or other liquids, and do not clean with direct water, steam jet, or compressed air, as this can cause material damage.
The STORZ & BICKEL Web App (www.storz-bickel.com/app/web) allows for individual settings and access to additional information during operation. To connect, switch on your smartphone's Bluetooth, then switch on the Vaporizer, open a browser supporting Bluetooth connectivity, go to app.storz-bickel.com, click "Connect," and choose your Vaporizer. The app allows for temperature adjustments and provides device-related information like operating hours and software versions.