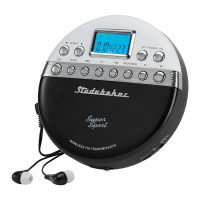
EARPHONES CONNECTION
Connect the plug of the stereo earbuds (included) into the STEREO EARPHONE JACK (#5).
Notes:
When earphones are not inserted, the unit will enter CD and FM transmit mode.
When earphones are inserted, the FM transmission will stop. Press CD MODE BUTTON
(#10) to select CD mode. Press FM MODE BUTTON (#19) to select FM radio mode..
CAUTION
Avoid excessive volume levels for long period of time when using the earphones.
Prolonged use at high levels may impair your hearing.
Do not use earphones while operating a motorized vehicle, as it may create a traffic
hazard and is illegal in many areas.
CD / MP3 CD OPERATION
PLEASE READ THIS IMPORTANT INFORMATION:
CD mechanisms used in devices like this are designed to fully read all commercial CDs. They
will also read self-compiled CD-R/CD-RW discs but it may take up to 10 seconds for playback to
start. If playback does not start, it is likely due to the quality of the CD-R/RW disc and/or the
compatibility of the CD compilation software. Manufacturer is not responsible for the playback
quality of CD-R/RW discs.
Do not attach a label or
seal to either side of the CD-R/RW disc. It may cause a malfunction.
FOR WINDOWS USERS:
When using the “Burn a CD” feature to create an MP3 CD in Windows, you must select the
“With a CD/DVD player” option when it asks “How do you want to use the disc?” The MP3 CD
will not play on this unit if you select the “Like a USB flash drive” option or if the MP3 CD is not
finalized
1.
Press
/ ON BUTTON to turn on the unit.
2.
Press CD BUTTON to enter CD mode if necessary.
(For power saving, the unit will turn off automatically after idled 60 seconds.)
3.
Slide the CD DOOR OPEN SWITCH (#1) to open the CD door.
4.
Carefully place an audio CD/MP3 CD with its label side upward in the CD compartment and
close the CD door.
5.
The player will start reading TOC of the disc.
6.
The total number of tracks and time on the CD will appear on the LCD DISPLAY (#7)
aft
er a few seconds
Note: The total number of folders and tracks on the MP3 CD will appear on the LCD
DISPLAY (#7).
7.
Tap the
/ ON BUTTON (#15) to start to play.
8.
Adjust the VOLUME CONTROL (#6) to obtain the desired sound level.
9.
To suspend playing, tap the / ON BUTTON (#15) again. To resume playing, tap the
/ ON BUTTON (#15) again.
10.
You can choose to play your favorite track directly by pressing either the /
BUTTON or / BUTTONS (#8 or #9) repeatedly. The LCD Display (#7) will indicate
the correct track number selected.
Tap the 10+ BUTTON to select the next 10 tracks
11.
To locate a particular passage within a track, keep the / BUTTON or /
BUTTONS (#8 or #9) depressed until it is found.

 Loading...