16
NOTE:-
If Studiomaster Professional PLATINUM Series console develop a serious fault, do not attempt to rectify it yourself.
Please take to your nearest dealer for service. Service work should only be carried out by qualified and experienced
service engineers.
Studiomaster Professional reserves the right to make modifications to its products without notice.
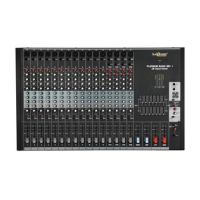
Ring - Negative / Cold / - Ve phase
Tip - positive / Hot / + Ve phase
Tip
Ring Sleeve
Sleeve - Screen / Ground / Earth
Pin 2 positive /Hot/ +Ve phase-
Pin 3 - Negative / Cold /-Ve phase
Pin 1 - Screen / Ground / Earth
To connect a balanced microphone to a mic input,
wire the 3 pin XLR as above
To connect balanced equipment to an input or output,
wire the ¼” TRS jack as above
Tip - Signal
Tip
Sleeve
Sleeve - Screen / Ground / Earth
Pin 1 - Screen / Ground / Earth
Pin 3 - Link to Pin 1
Pin 2 - positive /Hot/ +Ve phase
To connect an unbalanced microphone to a mic input,
wire the 3 pin XLR as above, +48V must not be used
when unbalanced mics are connected to the console
To connect unbalanced equipment to an input or output,
and to connect a footswitch use a ¼” TS jack wired as above
Tip - Signal
Sleeve - Screen / Ground / Earth
Tip & Ring linked together
Sleeve - Not connected
To connect to the record or playback sockets, wire the
phono (RCA jack) as above.
To bypass a channel Send/Return or Amplifier insert,
wire a ¼” TRS jack as above
Connector Wiring Information