OPERATING INSTRUCTIONS
14
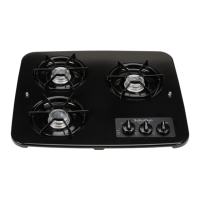
A. TOP BURNERS
1. Know which knob controls which burner. Always be sure the
correct burner is turned on.
Depress knob and turn counter-clockwise to “Lite” position.
a. Verify sufcient gas supply before attempting to light
the burner. Air in the gas line will signicantly delay
burner ignition. The burner may light unexpectedly as
the air in the line clears and is replaced by LP gas. This
unexpected ignition could burn you. Air in the gas lines
may occur after the vehicle gas bottle and/or tank is
relled, during and after servicing other appliances on
same gas line, etc.
Do not attempt to light more than one burner at a time.
Immediately light burner on those models ending with
“M” (example: SRNA3LWBM; SRSA3SWBM). Hold a
long match near the burner ports.
If your model ends with “E” (example: SRNA3LWBE /
SRSA3SWBE), the burner can be lit by rotating piezo knob
clockwise rapidly. Also, if your model ends with an “S”
(example: SRNA3SPSS / SRSA3SPSS) the burner can be lit
by depressing the push button battery powered spark igniter
located at the left hand side of the control panel, both of these
igniter systems will produce a spark at the top burners which
ignites the gas.
3. If any burner should extinguish after initial lighting or due to
accidental blowout, turn gas off by turning control knob clockwise
to “OFF”, wait ve (5) minutes before attempting to relight the
burner. Failure to follow these instructions could result in a re or
explosion. If the burner should go out while cooking, or if there is
an odor of gas, turn control knob(s) clockwise to “OFF”. Wait ve
(5) minutes for gas odor to disappear. If gas odor is still present -
do not relight burners.
4. To turn burner(s) “OFF”, turn the appropriate control knob
clockwise to “OFF”.
B. OVEN OPERATING INSTRUCTIONS
NOTE: Before the oven burner will operate, the oven pilot must be lit.
1. Lighting Oven Pilot:
a. Be sure ALL valves are in the “OFF” position. The oven
control knob should be in the “OFF” position.
Be sure main gas supply is on.
Open oven door; smell for gas - If you smell gas STOP!
Read and follow the instructions as listed in the appliances
installation manual.
d. If you do not smell gas, turn knob to the pilot position, “Push
In/Lite Pilot”.
e. Immediately light pilot with a match. Hold knob in at least
5 to 7 seconds to allow gas to ow to pilot and to heat
thermocouple. Release knob, pilot should stay on. Note: If
the appliance has not been operated for a long period of time,
a longer waiting period for ignition of the pilot may be due to
air in the pilot and gas lines. If pilot goes out, repeat steps a,
b, c, d.
a. Turn the oven control knob counter-clockwise to the
desired setting. Oven burner will come on immediately
and the oven burner will stay on until it reaches the
desired setting. Then the oven burner ame will decrease
in size. This is normal for this type of thermostat and this
ame size will maintain a constant temperature within
the oven.
NOTE: Oven thermostat was calibrated at the factory and is
not eld adjustable.
:
a. Turn oven control knob clockwise to “Pilot On” position.
At this position, the oven pilot will remain lit.
4. To Shut Off Oven Pilot:
a. Slightly depress knob and turn to “OFF”. At this position,
the oven pilot will go out.
RANGE DOOR REMOVAL INSTRUCTIONS
To remove the oven door from the range, open the oven door to approximately 45° from the closed position, and then
place 2 pins (6d nish nail) through the aligned holes in the hinge claw and the hinge link. Allow the door to move
towards the closed position and rest with the hinges locked open by the pins, the door will remain approximately 30°
open. Lift the door up and in towards the range, this will allow the hinge arms to come out of through the hinge slots
in the front frame of the oven.
To reinstall the door, insert the hinge arms in through the hinge slots on the front frame. Allow the hinge to rest on the
bottom edge of the hinge slot on the front frame. Open the door to approximately 45° and remove the pins from the
hinge arms then allow the door to close.
 Loading...